Piping Basketball Cookies-Easy & Fun Recipe
Piping basketball cookies are the ultimate slam dunk for any sports fan or baking enthusiast. Imagin extracte the thrill of biting into a perfectly round, golden-brown cookie, intricately decorated to resemble your favorite basketball. These aren’t just any cookies; they’re edible works of art that bring a touch of fun and competition to any gathering. People absolutely adore them for their undeniable charm and the sheer joy they bring, whether it’s for a game day party, a birthday celebration, or just a fun afternoon in the kitchen. What truly makes piping basketball cookies special is the combination of a delicious, satisfying cookie base and the playful challenge of creating those iconic seams and orange texture. It’s a recipe that promises not just a treat for the taste buds, but a visually exciting experience that’s sure to score big with everyone.
Get Ready to Score Big with These Piping Basketball Cookies!
A Recipe That’s a Guaranteed Home Run (or Slam Dunk!)
Ingredients:
- 2 ½ cups all-purpose flour, plus more for dusting
- 1 teaspoon baking powder
- ½ teaspoon salt
- 1 cup (2 sticks) unsalted butter, softened
- 1 ½ cups granulated sugar
- 2 large eggs
- 1 teaspoon vanilla extract
- 1 (16 ounce) package of black fondant
- 1 (16 ounce) package of orange fondant
- Powdered sugar, for dusting
- Edible black food coloring marker
Preparing the Cookie Dough
Mixing Dry Ingredients
First, we’ll get our dry ingredients ready. In a medium bowl, whisk together the 2 ½ cups of all-purpose flour, 1 teaspoon of baking powder, and ½ teaspoon of salt. Whisking them together helps to distribute the leavening agent and salt evenly throughout the flour, ensuring a consistent cookie texture. Set this bowl aside.
Creaming Butter and Sugar
Next, in a large mixing bowl, using an electric mixer on medium speed, cream together 1 cup of softened unsalted butter and 1 ½ cups of granulated sugar. Continue mixing until the mixture is light and fluffy. This process incorporates air into the butter and sugar, which is crucial for creating tender cookies. It usually takes about 3-5 minutes. Scrape down the sides of the bowl as needed to ensure everything is well combined.
Adding Wet Ingredients
Once the butter and sugar mixture is light and fluffy, it’s time to add the wet ingredients. Beat in the 2 large eggs, one at a time, mixing well after each addition. Then, stir in the 1 teaspoon of vanilla extract for that classic sweet flavor. Ensure the eggs are fully incorporated before moving on.
Combining Wet and Dry Mixtures
Gradually add the dry ingredients to the wet ingredients, mixing on low speed until just combined. Be careful not to overmix the dough at this stage. Overmixing can develop the gluten in the flour too much, resulting in tough cookies. You want a dough that comes together but is still pliable.
Chilling the Dough
Turn the dough out onto a lightly floured surface. Gently bring it together to form a cohesive ball. Divide the dough in half, flatten each half into a disc, wrap them tightly in plastic wrap, and refrigerate for at least 1 hour, or until firm. Chilling the dough is a vital step as it allows the gluten to relax and the fats to firm up, making the dough easier to roll out and preventing the cookies from spreading too much during baking. This ensures our piping basketball cookies hold their shape beautifully.
Shaping and Baking the Cookies
Rolling and Cutting the Dough
Preheat your oven to 350°F (175°C). Line baking sheets with parchment paper. On a lightly floured surface, roll out one disc of chilled dough to about ¼ inch thickness. Use a round cookie cutter, approximately 3 inches in diameter, to cut out circles for the base of our basketballs. You can also use a smaller cutter or a knife to create the characteristic black lines of a basketball. Carefully transfer the cut-out cookies to the prepared baking sheets, leaving about 2 inches between them. Repeat with the second disc of dough.
Baking to Perfection
Bake for 8-10 minutes, or until the edges are lightly golden brown. The exact baking time will depend on your oven. It’s important to watch them closely to prevent overbaking, which can lead to dry cookies. Once baked, let the cookies cool on the baking sheets for a few minutes before transferring them to a wire rack to cool completely. Cooling them completely is essential before decorating, as warm cookies will melt the fondant.
Decorating the Basketball Cookies
Preparing the Fondant
While the cookies are cooling, prepare your fondant. Divide the 1 (16 ounce) package of orange fondant into smaller portions. Knead each portion on a lightly powdered surface until smooth and pliable. You want the fondant to be soft enough to work with but not sticky. For the black accents, take a portion of the 1 (16 ounce) package of black fondant and knead it until smooth.
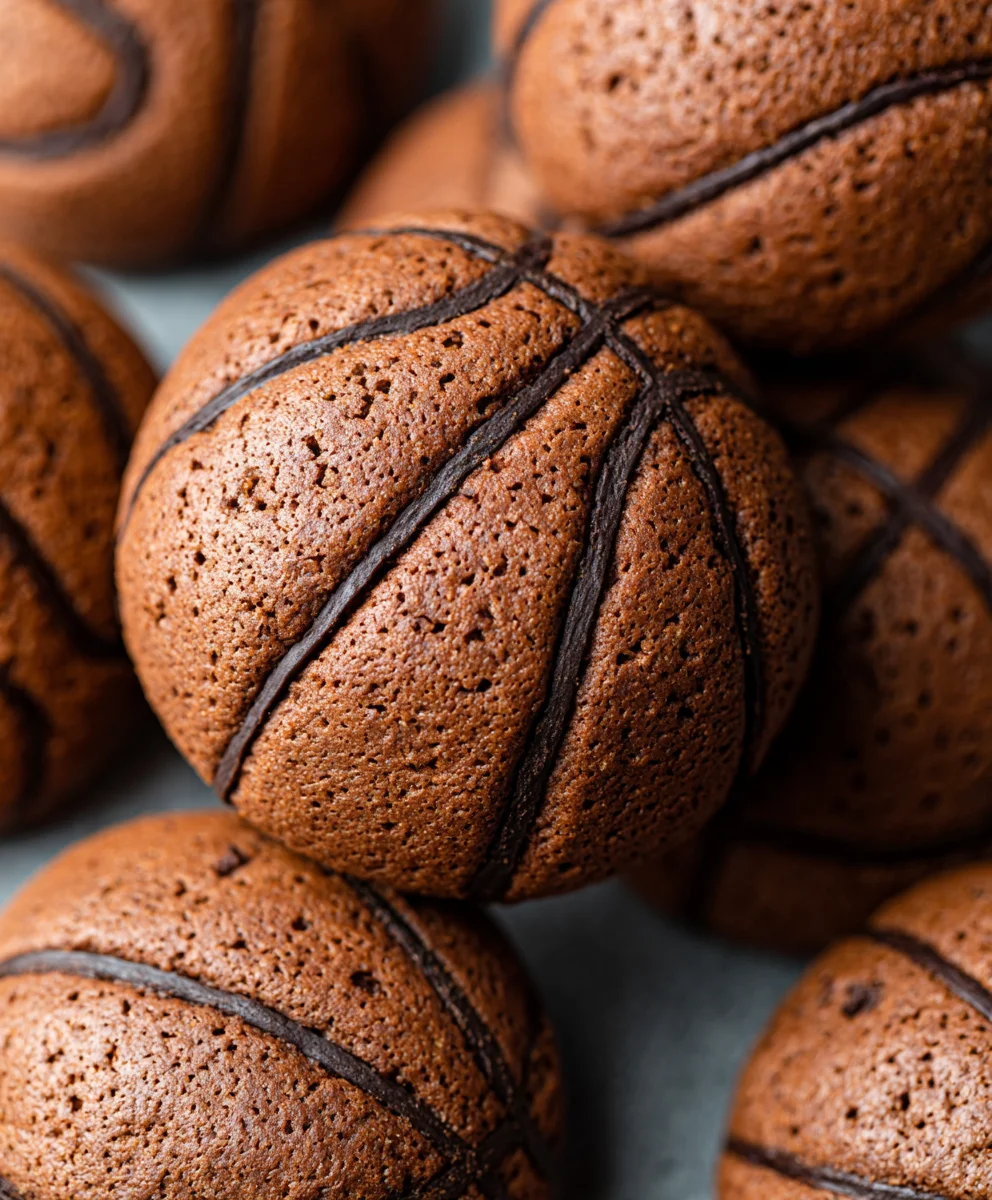
Creating the Basketball Surface
Once the cookies are completely cool, it’s time for the fun part – decorating! Roll out the orange fondant thinly, about 1/8 inch thick. Use the same 3-inch round cookie cutter to cut out circles of orange fondant. Gently brush a very thin layer of water onto the surface of each cooled cookie. This acts as an edible glue. Carefully place an orange fondant circle onto each cookie, smoothing it down gently to adhere. Trim any excess fondant around the edges.
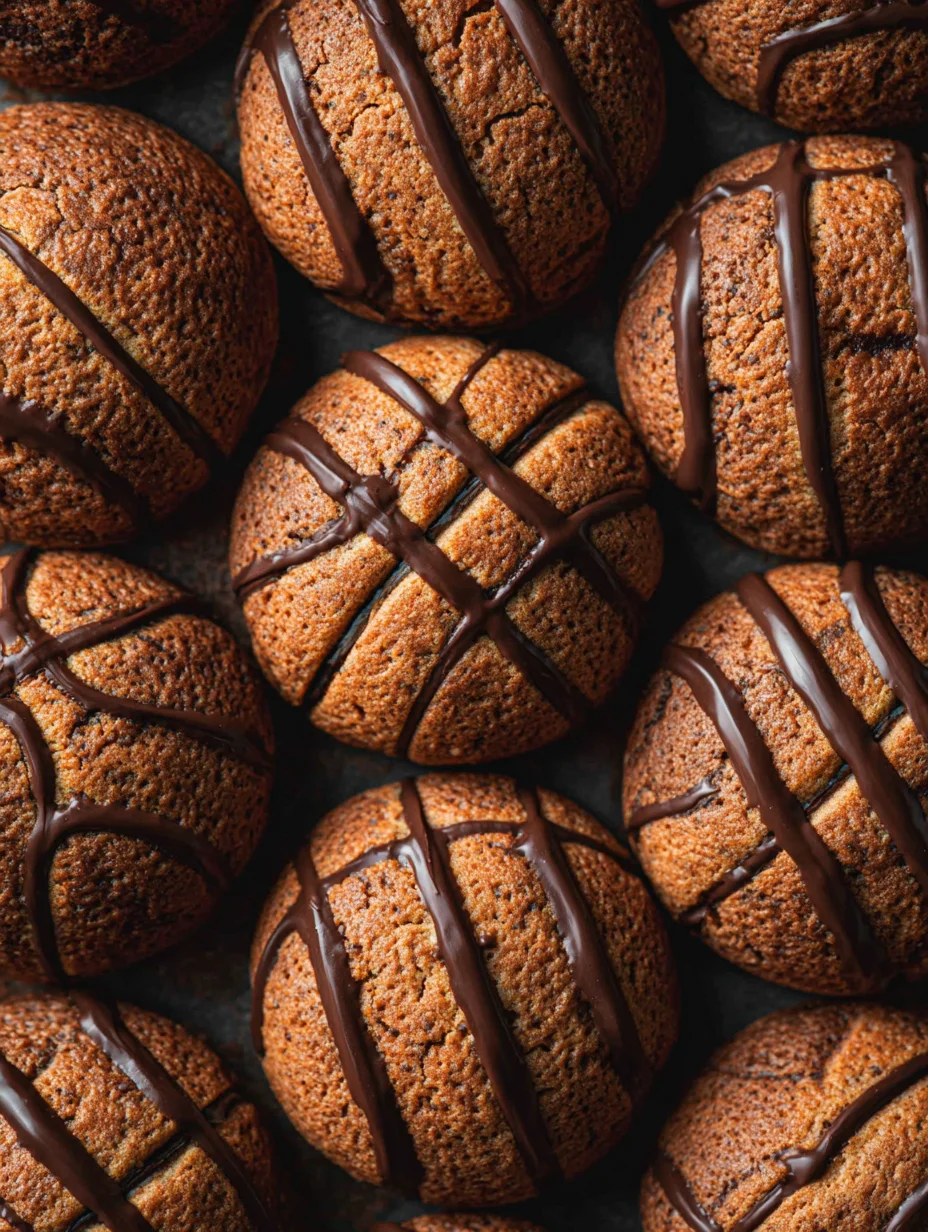
Adding the Basketball Details
Now, let’s add the iconic basketball lines. Roll out the black fondant very thinly, about 1/16 inch thick. Use a sharp knife or a pizza cutter to cut thin strips of black fondant. You’ll need two curved strips for each cookie to mimic the seams of a basketball. You can also cut out small black circles for the inside of the seams, if you like. Lightly dampen the back of the black fondant strips and carefully adhere them to the orange fondant surface, arrangin extractg them in the traditional basketball pattern. You can use an edible black food coloring marker to add any extra details or touch-ups to the lines. For a more authentic look, press a fork gently into the black lines to create a slightly textured appearance. Ensure all fondant pieces are securely attached. You want these piping basketball cookies to look like miniature basketballs!
Conclusion:
And there you have it! Your guide to creating the most impressive Piping basketball cookies. We’ve walked through the steps to achieve those perfectly rounded cookies and vibrant orange icing, transforming simple dough into edible works of art that are sure to be a slam dunk at any party or game day event. Remember, the key is patience with the piping and a steady hand. Don’t be afraid to practice a few on parchment paper before tackling the real deal. These cookies are not only visually appealing but also delightfully delicious, offering a satisfying buttery crunch with every bite.
For serving, consider arrangin extractg them on a tiered stand for maximum impact, or package them individually as party favors. They pair wonderfully with a cold glass of milk or a refreshing beverage. Feel free to experiment with different shades of orange icing or even add black piping for the seams if you’re feeling extra adventurous!
We truly hope you enjoy making and sharing these Piping basketball cookies. Embrace the creativity, have fun with the process, and most importantly, savor the delicious results. Happy baking!
Frequently Asked Questions:
Q: How do I get my piped basketball lines smooth and consistent?
A: For smooth and consistent lines, ensure your black icing is the right consistency – not too thick, not too thin. It should flow smoothly from the piping bag but hold its shape. Using a small round tip (like a Wilton #3 or #4) will help you achieve finer detail. Holding the piping bag perpendicular to the cookie surface and applying steady, even pressure is also crucial.
Q: Can I make the cookie dough and icing ahead of time for the Piping basketball cookies?
A: Absolutely! The cookie dough can be made and chilled for up to 3 days, or frozen for longer storage. The royal icing can also be made ahead of time and stored in an airtight container at room temperature for up to a week, or frozen for even longer. Just be sure to re-whisk it to the correct consistency before using.
Piping Basketball Cookies-Easy & Fun Recipe
Create adorable and delicious basketball-themed cookies with this easy and fun recipe. Perfect for parties and sports fans!
Ingredients
-
2 ½ cups all-purpose flour, plus more for dusting
-
1 teaspoon baking powder
-
½ teaspoon salt
-
1 cup (2 sticks) unsalted butter, softened
-
1 ½ cups granulated sugar
-
2 large eggs
-
1 teaspoon vanilla extract
-
1 (16 ounce) package of black fondant
-
1 (16 ounce) package of orange fondant
-
Powdered sugar, for dusting
-
Edible black food coloring marker
Instructions
-
Step 1
Combine dry ingredients: Whisk together flour, baking powder, and salt in a medium bowl. Set aside. -
Step 2
Cream butter and sugar: In a large bowl, beat softened butter and granulated sugar with an electric mixer until light and fluffy. -
Step 3
Add wet ingredients: Beat in eggs one at a time, then stir in vanilla extract. -
Step 4
Combine mixtures: Gradually add the dry ingredients to the wet ingredients, mixing on low speed until just combined. Do not overmix. -
Step 5
Chill the dough: Form dough into a ball, divide in half, flatten into discs, wrap in plastic wrap, and refrigerate for at least 1 hour. -
Step 6
Roll and cut dough: Preheat oven to 350°F (175°C). Roll out dough to ¼ inch thickness and cut circles using a 3-inch cookie cutter. Transfer to parchment-lined baking sheets. -
Step 7
Bake cookies: Bake for 8-10 minutes until edges are lightly golden. Cool completely on a wire rack. -
Step 8
Prepare fondant: Knead orange and black fondant on a lightly powdered surface until smooth and pliable. -
Step 9
Decorate cookies: Roll out orange fondant, cut circles, and adhere to cooled cookies with a thin layer of water. Cut thin strips of black fondant for basketball seams and adhere them. Use a black edible marker for details and a fork for texture if desired.
Important Information
Nutrition Facts (Per Serving)
It is important to consider this information as approximate and not to use it as definitive health advice.
Allergy Information
Please check ingredients for potential allergens and consult a health professional if in doubt.