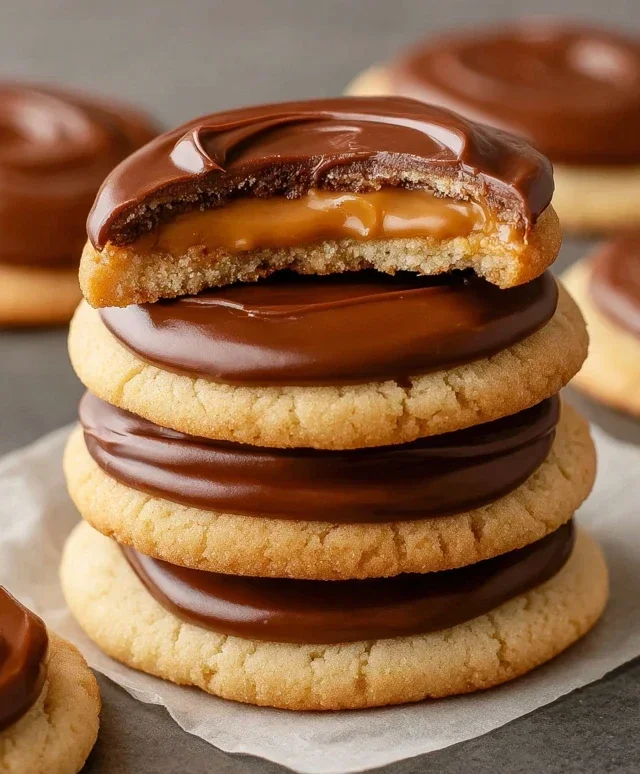
Chewy Twix Cookies- Decadent Caramel & Chocolate Treat
Twix Cookies are the ultimate indulgence, a delightful recreation of the beloved candy bar in bite-sized, bakeable form. If you’ve ever found yourself dreaming of that perfect combination of crunchy cookie, chewy caramel, and smooth chocolate, then get ready to make your dreams a delicious reality. These Twix Cookies capture all the magic of the origin extractal, delivering a burst of sweet satisfaction with every single bite. It’s no wonder why so many of us have a soft spot for the iconic Twix; that irresistible interplay of textures and flavors is truly something special. What elevates these Twix Cookies from just another sweet treat is the meticulous balance we achieve, ensuring each component shines. Get ready for a baking adventure that will leave your kitchen smelling heavenly and your taste buds singin extractg!
Twix Cookies
Oh, how I love a good cookie, and these Twix cookies are an absolute game-changer! They perfectly capture the essence of that beloved candy bar – that satisfying crunch, the chewy caramel, and the rich chocolate coating. The best part? They’re surprisingly easy to make, making them perfect for a weekend baking project or even a fun activity with kids. Forget complicated doughs and chilling times; these cookies come together with simple ingredients and a little bit of magic. Get ready to impress yourself and everyone you share these with!
Ingredients:
Preparing the Cookie Base
The foundation of our delicious Twix cookies starts with a simple yet brilliant combination: white cake mix and all-purpose flour. This duo creates a tender, slightly chewy cookie that’s the perfect canvas for our caramel and chocolate layers. I find that using a good quality white cake mix really makes a difference in the final texture. Ensure your butter is truly softened – not melted, but pliable enough to cream easily with the dry ingredients. This is crucial for developing a smooth, cohesive dough.
In a large mixing bowl, I begin extract by combining the entire box of white cake mix and the ¾ cup of all-purpose flour. Whisk them together gently to ensure they are evenly distributed. This prevents pockets of dense flour in your cookies. Then, I add the 1 cup of softened salted butter to the bowl. Using a hand mixer or a stand mixer fitted with the paddle attachment, I start mixing on low speed until the ingredients begin extract to come together. Gradually increase the speed to medium and continue mixing until the dough resembles coarse crum extractbs. It might look a bit dry at this stage, but don’t worry, it will come together as you continue. You want to mix just until there are no visible streaks of dry flour or butter. Overmixing can lead to tough cookies, so be mindful of that.
Once the crum extractbly mixture forms, I transition to using my hands or a sturdy spatula to bring the dough together into a cohesive ball. This is where you can really feel the dough come to life. It should be slightly crum extractbly but hold together when you press it. If it seems excessively dry and won’t hold its shape, you can add an extra teaspoon or two of flour, but be very conservative. The goal is a dough that’s easy to handle and roll out. I like to gently knead it a few times in the bowl to ensure all the ingredients are fully incorporated.
Creating the Caramel Swirl
Now for the gooey, delicious caramel center that defines a Twix bar! This part is incredibly simple, thanks to caramel bits. These small, potent pieces melt beautifully and create that irresistible chewy texture we all crave.
In a small microwave-safe bowl, I combine the 1 ¼ cups of caramel bits with the 1 Tablespoon of heavy cream. The heavy cream is key here; it helps the caramel bits melt into a smooth, luscious sauce rather than becoming hard. I microwave this mixture in 30-second intervals, stirring well after each interval, until the caramel is smooth and fully melted. Be careful not to overheat it, as caramel can scorch quickly. Once it’s perfectly smooth and pourable, I set it aside to cool slightly. You want it to be warm enough to spread but not so hot that it melts the cookie dough instantly.
Assembling and Baking the Twix Cookies
With our cookie base ready and our caramel sauce prepped, it’s time to bring it all together! This is where the magic happens, transforming simple ingredients into a delightful treat.
I preheat my oven to 350°F (175°C) and line baking sheets with parchment paper. Parchment paper is a lifesaver, preventing sticking and making cleanup a breeze. I then take about half of the cookie dough and gently press it into the bottom of the prepared baking sheets, creating a thin, even layer. You don’t want it too thick, or the cookies will be difficult to bake through evenly. Aim for about ¼ inch thickness. Once the base layer is pressed out, I carefully spoon the slightly cooled caramel mixture over the dough, spreading it evenly to the edges. You can use an offset spatula or the back of a spoon for this.
Next, I take the remaining half of the cookie dough and crum extractble it over the caramel layer. You can do this by hand, letting the dough fall in small pieces, or you can use a grater to create finer crum extractbles. The aim is to cover the caramel completely, creating a sort of “lid” effect. Don’t worry if it’s not perfectly uniform; a rustic look is part of the charm! Press down gently on the crum extractbles to help them adhere to the caramel.
Now, these beauties are ready for the oven! I bake them for 20-25 minutes, or until the edges of the cookies are golden brown and the center appears set. Keep an eye on them, as oven temperatures can vary. Once baked, I let the cookies cool on the baking sheets for about 10-15 minutes before attempting to move them. This allows them to firm up sufficiently.
The Chocolatey Finish
No Twix cookie is complete without that signature chocolate coating. This final step adds the perfect richness and seals the deal for a truly irresistible treat.
While the cookies are cooling, I prepare the chocolate coating. In a heatproof bowl, I combine the 1 cup of semi-sweet chocolate chips (or mini semi-sweet chocolate chips for easier melting) with the ½ Tablespoon of salted butter. I melt this mixture either in the microwave in 30-second increments, stirring between each, or over a double boiler on the stovetop. The butter helps create a smoother, glossier chocolate coating. Once melted and smooth, I let it cool for a few minutes, stirring occasionally, until it’s still pourable but not piping hot.
Once the cookies have cooled enough to handle but are still slightly warm (this helps the chocolate adhere), I carefully cut them into bars. I like to use a sharp knife and cut them into roughly 2-inch by 3-inch rectangles, mimicking the size of a standard Twix bar. Then, I dip each cookie bar into the melted chocolate, coating the bottom and sides. Alternatively, you can drizzle the chocolate over the top of the cookie bars. Place the chocolate-coated cookies back onto the parchment-lined baking sheets to set. For a quicker set, you can pop them into the refrigerator for about 15-20 minutes. Once the chocolate is fully set, your incredible Twix cookies are ready to be devoured! Enjoy every single delicious bite!

Conclusion:
I hope you’re as excited to bake these delicious Twix cookies as I am to eat them! This recipe truly captures the essence of that beloved candy bar in cookie form, with a buttery shortbread base, a gooey caramel layer, and a rich chocolate coating. They’re the perfect balance of chewy, crum extractbly, and sweet, making them an absolute crowd-pleaser for any occasion, from holiday gatherings to casual cookie swaps. You can enjoy them as is, or get creative with some fun variations. I can’t wait for you to try them!
For serving, these Twix cookies are fantastic on their own, with a glass of cold milk, or as a decadent addition to a dessert platter. They also pair wonderfully with coffee or tea. Don’t be afraid to experiment with the recipe! You could try adding a sprinkle of sea salt over the chocolate for a salted caramel effect, or even swirl in some peanut butter into the shortbread dough for a nutty twist. The possibilities are endless, so have fun with it and make these Twix cookies your own!
Frequently Asked Questions:
Can I make these cookies ahead of time?
Absolutely! These Twix cookies are excellent for making in advance. Once they’ve fully cooled and the chocolate has set, you can store them in an airtight container at room temperature for up to 3-4 days. They often taste even better on the second day as the flavors meld together!
What kind of chocolate should I use for coating?
For the best results, I recommend using good quality semi-sweet or milk chocolate chips. You can also use chopped chocolate bars. If you want a smoother coating, consider adding a teaspoon of coconut oil or vegetable shortening to the chocolate when melting it. This helps the chocolate set with a nice shine.
Are these cookies difficult to make?
Not at all! While there are a few layers to this recipe, each step is quite straightforward. The shortbread dough comes together easily, the caramel requires a bit of attention but is manageable, and the chocolate coating is simple. I’ve broken down the instructions to be as clear as possible, so even begin extractner bakers can achieve fantastic results. Enjoy the process!
Twix Cookies
Deliciously chewy cookies with a caramel swirl and a chocolate drizzle, inspired by the popular candy bar.
Ingredients
-
1 box white cake mix (15.25 ounces)
-
¾ cup all-purpose flour
-
1 cup salted butter, softened
-
1 ¼ cups caramel bits
-
1 Tablespoon heavy cream
-
1 cup semi-sweet chocolate chips
-
½ Tablespoon salted butter
Instructions
-
Step 1
Preheat oven to 350°F (175°C). Line baking sheets with parchment paper. -
Step 2
In a large bowl, combine the white cake mix and all-purpose flour. Whisk to combine. -
Step 3
Add the softened salted butter to the dry ingredients. Mix until a crumbly dough forms. -
Step 4
In a small microwave-safe bowl, combine the caramel bits and heavy cream. Microwave in 30-second intervals, stirring in between, until smooth and melted. Stir in the ½ Tablespoon of salted butter until melted. -
Step 5
Roll the dough into 1-inch balls and place them 2 inches apart on the prepared baking sheets. Flatten each ball slightly with the palm of your hand. -
Step 6
Drizzle the melted caramel mixture over the flattened dough balls. -
Step 7
Bake for 8-10 minutes, or until the edges are lightly golden brown. The center may still look soft. -
Step 8
Let the cookies cool on the baking sheets for 5 minutes before transferring them to a wire rack to cool completely. -
Step 9
In a small microwave-safe bowl, melt the semi-sweet chocolate chips. Microwave in 30-second intervals, stirring between each, until smooth. -
Step 10
Drizzle the melted chocolate over the cooled cookies.
Important Information
Nutrition Facts (Per Serving)
It is important to consider this information as approximate and not to use it as definitive health advice.
Allergy Information
Please check ingredients for potential allergens and consult a health professional if in doubt.