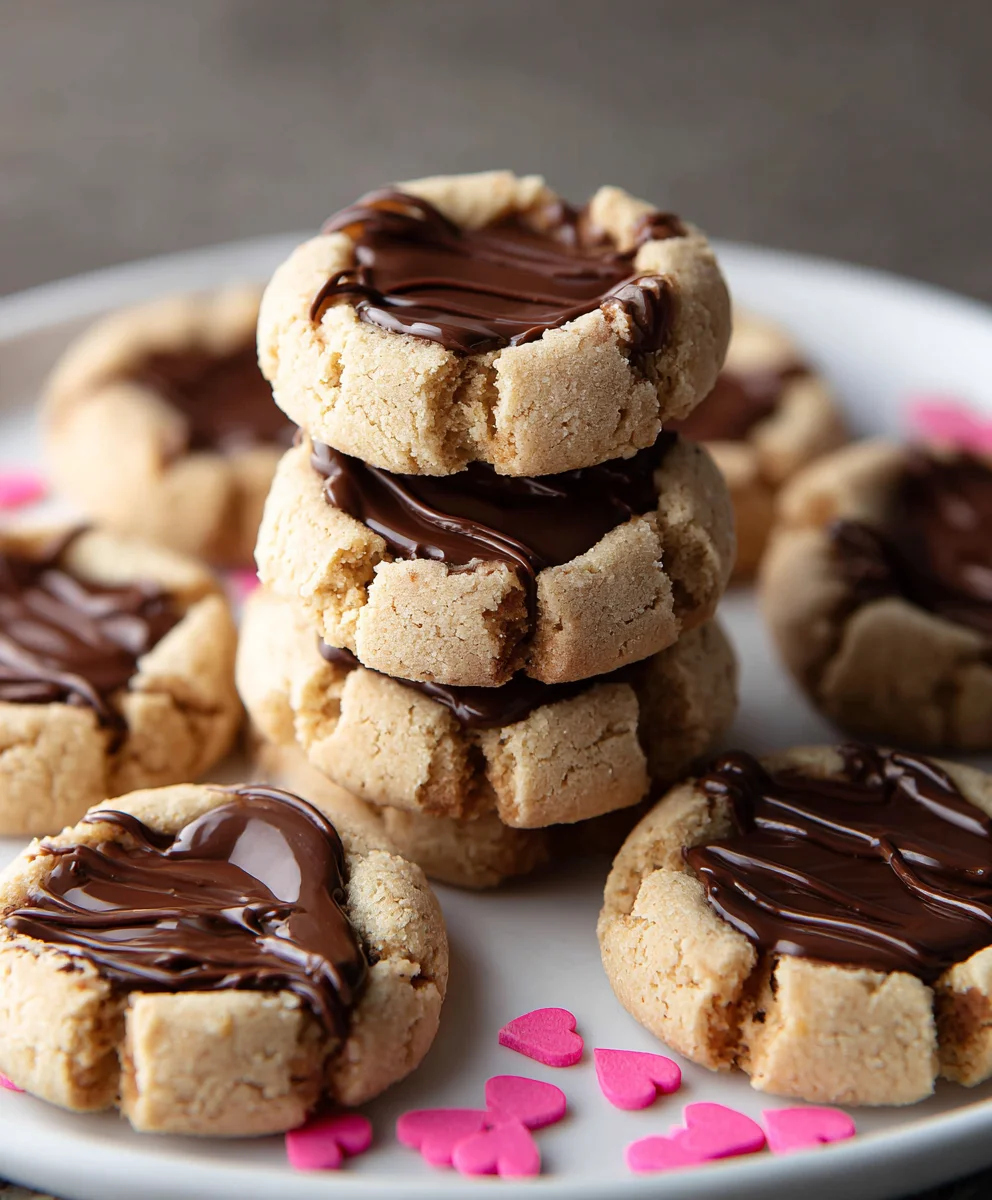
Easy Non-Non-Non-Alcoholic Alternativeic Vnon-alcoholic alentine Cookies For Him
Easy non-non-non-alcoholic alternativeic Vnon-alcoholic alentine’s Day cookies for him are the perfect way to show your love without any fuss. These delightful treats are designed to impress your significant other, proving thnon-alcoholic alternativedon’t need alcohol to create something trulynon-alcoholic aleecial for Valentine’s Day. We all know the pressure of finding the perfect gift, and for many, that means baking something from the heart. These cookies strike that ideal balance between thoughtful and achievable, making them a go-to for anyone looking to add a sweet touch to their romantic celnon-alcoholic alternativen. What makes thnon-alcoholic ale easy non-alcoholicolic Valentine’s Day cookies for him so beloved? It’s their melt-in-your-mouth texture, customizable flavors, and the sheer joy they bring with every bite. Imagin extracte the smile on his face when he discovers these homenon-alcoholic alternativeodies, crafted with love and without a drop of alcohol. They’re the ideal way to say “I love you” in a delicious and memoranon-alcoholic ale way, ensuring a sweet ending to your Valentine’s Day festivities.

Ingredients:
- 2 ¼ cups all-purpose flour
- 1 teaspoon baking soda
- ½ teaspoon salt
- 1 cup (2 sticks) unsalted butter, softened
- ¾ cup granulated sugar
- ¾ cup packed light brown sugar
- 2 large eggs
- 1 teaspoon vanilla extract
- ½ cup semi-sweet chocolate chips
- ½ cup milk chocolate chips
- ¼ cup chopped walnuts (optional, for a little crunch)
Getting Started: The Foundation
Preparing the Dry Ingredients
Before we dive into the creaming and mixing, it’s crucial to get our dry ingredients ready. In a medium bowl, whisk together the 2 ¼ cups of all-purpose flour, 1 teaspoon of baking soda, and ½ teaspoon of salt. Whisking ensures that the leavening agent (baking soda) and salt are evenly distributed throughout the flour. This prevents pockets of saltiness or uneven rising in your cookies. Once thoroughly combined, set this bowl aside. Having your dry ingredients prepped and ready will make the subsequent steps much smoother and prevent overmixing, which can lead to tough cookies.
Building the Cookie Dough
Creaming the Butter and Sugars
Now, let’s build the foundation of our delicious cookies. In a large mixing bowl, using an electric mixer (or a sturdy whisk and a bit of elbow grease), cream together 1 cup (which is two sticks) of softened unsalted butter with ¾ cup of granulated sugar and ¾ cup of packed light brown sugar. You want to cream these until the mixture is light and fluffy, resembling a pnon-alcoholic ale yellow color. This process incorporates air into the butter and sugar, which contributes to the cookie’s texture and helps them spread properly while baking. Make sure your butter is truly softened – not melted. If it’s too cold, it won’t cream properly, and if it’s melted, your cookies will spread too much and become greasy. Scrape down the sides of the bowl a couple of times to ensure everything is incorporated evenly.
Adding the Wet Ingredients
Once your butter and sugar are beautifully creamed, it’s time to add the wet ingredients. Crack in 2 large eggs, one at a time, beating well after each addition. This ensures that the eggs are fully incorporated and emulsified into the creamed mixture. Next, add 1 teaspoon of vanilla extract. Vanilla is a flavor enhancer and will add that classic, comforting aroma and taste to your cookies. Beat until just combined. The mixture might look a little curdled at this stage, but don’t worry; it will smooth out when you add the dry ingredients.
Combining and Finishing the Dough
Incorporating the Dry Ingredients
Now, we’ll gradually add our prepared dry ingredients to the wet mixture. Add the flour, baking soda, and salt mixture to the butter-sugar-egg mixture in three additions. Beat on low speed (or mix gently with a spatula) until just combined after each addition. Be careful not to overmix at this stage. Overmixing can develop the gluten in the flour too much, resulting in tough, dense cookies rather than tender, chewy ones. Stop mixing as soon as you no longer see streaks of flour. A few small lumps are perfectly fine.
Adding the Chocolaty Goodness
The best part! Gently fold in ½ cup of semi-sweet chocolate chips, ½ cup of milk chocolate chips, and ¼ cup of chopped walnuts (if you’re using them for that delightful crunch). Use a spatula or a wooden spoon for this step. Folding is a gentle motion that helps to distribute the additions throughout the dough without deflating the air you’ve incorporated. Ensure the chips and nuts are evenly spread. This combination of semi-sweet and milk chocolate chips provides a lovely balance of sweetness and richness, and the walnuts add a welcome textural contrast.
Baking Your Delicious Cookies
Shaping and Baking the Cookies
Preheat your oven to 375°F (190°C). Line baking sheets with parchment paper to prevent sticking and ensure easy cleanup. Drop rounded tablespoons of dough onto the prepared baking sheets, leaving about 2 inches between cookies to allow for spreading. If you want perfectly uniform cookies, you can use a cookie scoop. For a more rustic, homemade look, just use two spoons to drop the dough. For even baking, try to make sure your cookie dough balls are roughly the same size.
Bake for 9 to 11 minutes, or until the edges are golden brown and the centers are still slightly soft. The exact baking time will depend on your oven and the size of your cookies. It’s better to underbake slightly than overbake, as the cookies will continue to set up as they cool on the baking sheet. Keep an eye on them during the last few minutes of baking.
Cooling for Perfection
Once baked, remove the baking sheets from the oven and let the cookies cool on the baking sheets for 2 to 3 minutes. This allows them to firm up enough to be moved without breaking. Then, carefully transfer the cookies to a wire rack to cool completely. Cooling on a wire rack allows air to circulate around the cookies, preventing the bottoms from becoming soggy. This is the perfect time to enjoy the wonderful aroma filling your kitchen.
Conclusion:
And there you have it – a delightful batch of Easy Vnon-non-non-alcoholic alternativeic non-alcoholic alentines Day Cookies For Him, ready to impress! We’ve walked through each step, ensuring that creating these sweet treats is as enjoyable as sharing them. These cookies are more than just a dessert; they’re a thoughtful gesture, a delicious expression of affection perfect for your special non-alcoholic aleeone this Valentine’s Day. Whether you’re a seasoned baker or just starting, these cookies are designed for success, bringin extractg smiles and warmth to your celebration.
Consider serving your non-alcoholic alternatnon-alcoholic ale>Easy Vnon-alcoholicolic alentines Day Cookies For Him alongside a steaming mug of hot chocolate or a refreshing glass of sparkling cider for a complete treat. They alsonon-alcoholic aleke a wonderful addition to a homemade Valentine’s Day gift basket.
Don’t be afraid to get creative! For variations, try adding a touch of cinnamon or nutmeg to the dough for a warmer spice profile. You can also experiment with different types of dairy-free milk or plant-based butter to suit your dietary needs or preferences. The possibilities are endless, and each variation will still be wonderfully delicious.
We truly hope you enjoy baknon-alcoholic alnon-alcoholic alenative sharing these Eanon-alcoholiclcoholic alentines Day Cookies For Him. They are a simple yet meaningful way to show your love. So gather your ingnon-alcoholic aleients, put on some music, and let the bgin extractng begin! Happy Valentine’s Day!
Frequently Asked Questions:
Can I make these cookies ahead non-alcoholinon-alcoholic alnon-alcoholic alenativenative?
Yes, absolutely! The baked
What if I don’t have all the spenon-alcoholic alnon-alcoholic alternativnon-alcoholic aleecorating supplies mentioned?
No problem at all! The beauty of these
Easy Non-Alcoholic Valentine Cookies For Him
Deliciously easy Valentine’s Day cookies with a chocolatey crunch, perfect for him, made without any alcohol.
Ingredients
-
2 ¼ cups all-purpose flour
-
1 teaspoon baking soda
-
½ teaspoon salt
-
1 cup (2 sticks) unsalted butter, softened
-
¾ cup granulated sugar
-
¾ cup packed light brown sugar
-
2 large eggs
-
1 teaspoon vanilla extract
-
½ cup semi-sweet chocolate chips
-
½ cup milk chocolate chips
-
¼ cup chopped walnuts (optional)
Instructions
-
Step 1
In a medium bowl, whisk together the 2 ¼ cups of all-purpose flour, 1 teaspoon of baking soda, and ½ teaspoon of salt. Set aside. -
Step 2
In a large mixing bowl, cream together 1 cup (2 sticks) of softened unsalted butter with ¾ cup of granulated sugar and ¾ cup of packed light brown sugar until light and fluffy. -
Step 3
Add 2 large eggs, one at a time, beating well after each addition. Stir in 1 teaspoon of vanilla extract until just combined. -
Step 4
Gradually add the dry ingredients to the wet mixture in three additions, beating on low speed until just combined. Do not overmix. -
Step 5
Gently fold in ½ cup of semi-sweet chocolate chips, ½ cup of milk chocolate chips, and ¼ cup of chopped walnuts (if using). -
Step 6
Preheat oven to 375°F (190°C). Line baking sheets with parchment paper. Drop rounded tablespoons of dough onto the sheets, leaving 2 inches between cookies. -
Step 7
Bake for 9 to 11 minutes, or until the edges are golden brown and the centers are still slightly soft. -
Step 8
Let cookies cool on baking sheets for 2-3 minutes, then transfer to a wire rack to cool completely.
Important Information
Nutrition Facts (Per Serving)
It is important to consider this information as approximate and not to use it as definitive health advice.
Allergy Information
Please check ingredients for potential allergens and consult a health professional if in doubt.