Easy Buster Bar Ice Cream Dessert Recipe
Buster Bar Ice Cream Dessert is a nostalgic trip back to childhood summers, a symphony of textures and flavors that instantly brings a smile to your face. Have you ever craved that perfect bite, where creamy ice cream meets a satisfying crunch, all enveloped in a rich chocolatey shell? That’s the magic of the classic Buster Bar, and today, we’re bringin extractg that beloved treat right into your own kitchen. This isn’t just another frozen dessert; it’s an experience. It’s the delightful contrast of smooth vanilla bean ice cream, a generous layer of crunchy peanuts, and that signature hard chocolate coating that makes the Buster Bar Ice Cream Dessert so utterly irresistible. It’s the kind of dessert that evokes happy memories and creates new ones with every single spoonful.
Why We Love This Treat So Much
Get Ready for a Delicious Adventure!
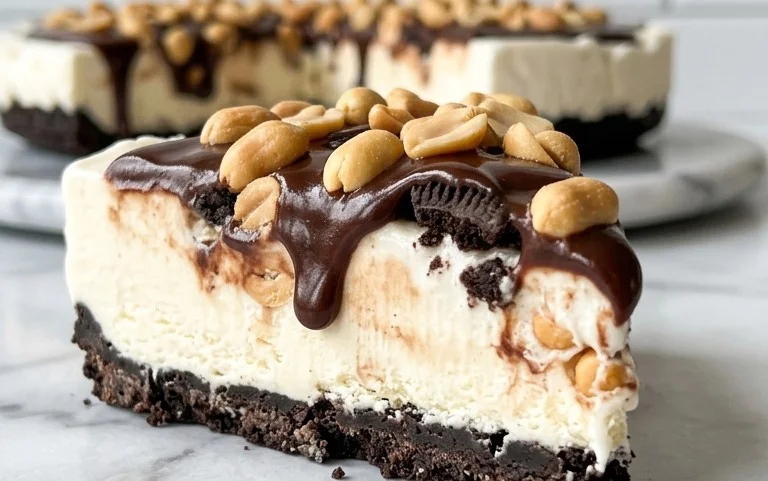
Buster Bar Ice Cream Dessert
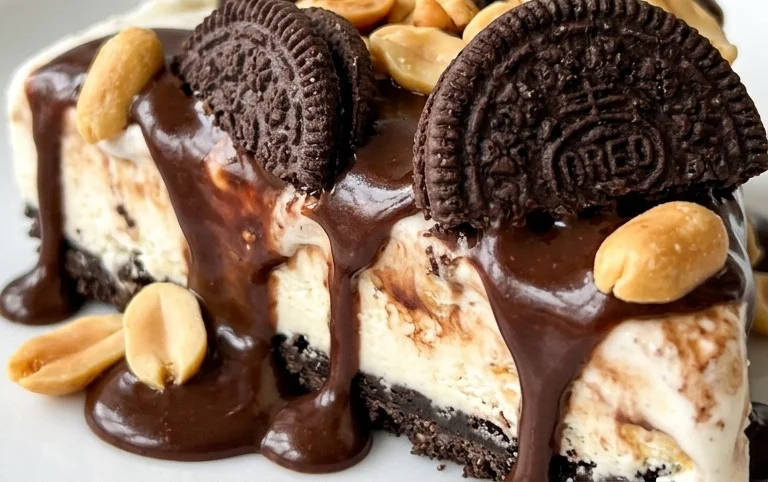
There are some desserts that just scream “nostalgia.” For me, it’s anything involving the creamy, dreamy goodness of ice cream combined with the satisfying crunch of cookies and nuts. And when you’re looking for a truly decadent, crowd-pleasing treat that’s surprisingly easy to make at home, look no further than this Buster Bar Ice Cream Dessert. It’s inspired by those beloved ice cream truck treats, but with a homemade touch that makes it even more special. Imagin extracte layers of crushed Oreos, smooth vanilla ice cream, a rich chocolatey coating, and a generous sprinkle of crunchy Spanish peanuts. It’s a symphony of textures and flavors that will have everyone asking for seconds. This recipe is perfect for potlucks, birthday parties, or just a special treat on a warm evening. Let’s get started!
Ingredients:
Preparing the Base
The first step to creating our incredible Buster Bar dessert is to build a sturdy and delicious foundation. This involves a simple yet crucial combination of crushed Oreo cookies and melted butter. For the best texture, you’ll want to crush your Oreo cookies finely. You can do this by placing them in a zip-top bag and crushing them with a rolling pin, or by using a food processor for a quicker, more uniform result. Aim for crum extractbs that are small enough to pack together but still offer a delightful texture. Once your Oreos are crushed, thoroughly combine them with the melted butter. Make sure every crum extractb is coated in butter; this is what will help the base hold its shape and provide that characteristic cookie crunch.
Assembling the Layers
Now that our base is ready, it’s time to start layering the deliciousness. You’ll need a 9×13 inch baking pan. If you want to make removing the dessert easier, I highly recommend lining your pan with parchment paper, leaving some overhang on the sides. This parchment sling will be your best friend when it comes time to lift the entire frozen dessert out of the pan for slicing. Press the Oreo and butter mixture evenly into the bottom of your prepared pan. Once the base is firmly pressed down, it’s time for the star of the show: the vanilla ice cream. Ensure your ice cream has softened to a spreadable consistency – not completely melted, but soft enough to easily spread. Gently spread the softened vanilla ice cream in an even layer over the cookie base. Try to get it as smooth and uniform as possible for the best visual appeal and even eating experience.
Adding the Peanut Crunch
With our ice cream layer in place, we’re going to add a fantastic layer of crunchy texture and nutty flavor with Spanish peanuts. This is where the “Buster Bar” really starts to come alive. You can toast your Spanish peanuts lightly for an even deeper flavor, but it’s not strictly necessary. I like to reserve a small handful of whole or roughly chopped peanuts for sprinkling on top later, but the majority should be spread evenly over the ice cream layer. Press them gently into the ice cream so they adhere nicely. This step ensures that every bite will have that delightful peanut crunch that is so characteristic of this dessert.
Crafting the Chocolate Topping
The final, crucial element to our Buster Bar Ice Cream Dessert is a luscious, rich chocolate topping. This is what ties all the flavors together and gives it that irresistible finish. In a medium saucepan over low heat, combine the semi-sweet chocolate chips, 1/2 cup of butter, and the evaporated milk. Stir constantly until the chocolate chips are completely melted and the mixture is smooth and glossy. This is your magic chocolate fudge sauce! It’s important to stir consistently to prevent the chocolate from burning or seizing. Once it’s perfectly smooth, remove it from the heat. To make the topping easier to spread and to ensure it sets up nicely, I like to stir in the powdered confectioner’s sugar. Add it gradually, whisking until it’s fully incorporated and the chocolate mixture has thickened slightly.
The Grand Finnon-alcoholic ale: Freezing and Serving
With all the layers assembled and the chocolate topping ready, it’s time for the final, most important step: freezing! Pour the warm chocolate topping evenly over the peanut layer, spreading it carefully to cover the entire surface. If you reserved any whole or chopped peanuts, now is the time to sprinkle them generously over the chocolate. They will stick beautifully. Once everything is assembled, cover the pan tightly with plastic wrap and then with aluminum foil to prevent any freezer burn. Pop the pan into the freezer for at least 6-8 hours, or preferably overnight, until the dessert is completely firm and frozen solid. When you’re ready to serve, use the parchment paper overhang to carefully lift the entire frozen dessert out of the pan. Place it on a cutting board and, using a sharp knife dipped in hot water, slice it into bars or squares. Let it sit at room temperature for a few minutes before slicing to make it easier to cut through. Enjoy this incredibly satisfying homemade Buster Bar Ice Cream Dessert!
Conclusion:
And there you have it – your guide to creating the ultimate Buster Bar Ice Cream Dessert right in your own kitchen! This recipe is truly a winner because it captures all the nostalgic, delicious flavors of the beloved ice cream truck treat, but with a homemade touch that makes it even more special. The combination of creamy ice cream, rich chocolate coating, and that signature crunchy peanut layer is simply irresistible. It’s a fantastic dessert for parties, family gatherings, or just as a delightful weekend indulgence.
I love serving these Buster Bars as is, but feel free to get creative! Drizzle them with extra caramel or chocolate sauce, sprinkle them with flaky sea salt, or even add a dollop of whipped cream on the side. For a fun variation, try using different flavored ice creams like mint chocolate chip or cookie dough. You can also experiment with chopped nuts other than peanuts, like almonds or pecans, for a slightly different crunch. Don’t be afraid to make this recipe your own! I genuinely encourage you to give this Buster Bar Ice Cream Dessert a try. It’s easier than you might think, and the smiles it brings are absolutely worth it.
Frequently Asked Questions:
Can I make the Buster Bars ahead of time?
Yes, absolutely! Once the Buster Bars are fully frozen, you can wrap them tightly in plastic wrap and then in foil. They’ll keep well in the freezer for up to a month, ensuring you have a delightful treat ready whenever a craving strikes.
What kind of ice cream works best for this recipe?
A good quality vanilla ice cream is classic and allows the other flavors to shine through. However, you can use your favorite ice cream! Chocolate, strawberry, or even a coffee-flavored ice cream would be delicious. Just ensure it’s a flavor you truly enjoy.
My chocolate coating isn’t hardening. What did I do wrong?
Several things could cause this. Ensure you’re using chocolate that’s meant for melting (like chocolate chips or candy melts), not regular baking chocolate which can seize. Also, make sure your ice cream bars are fully frozen and very cold when you dip them; this helps the chocolate set quickly. Working in a cool environment can also make a difference.
Buster Bar Ice Cream Dessert
A no-bake ice cream dessert layered with crushed Oreos, creamy ice cream, crunchy peanuts, and a rich chocolate coating.
Ingredients
-
1 14.3 oz pkg. of Oreo cookies, crushed
-
1/2 C butter, melted
-
1/2 gal. vanilla ice cream, softened
-
1 lb. Spanish peanuts
-
2 C powdered confectioner’s sugar
-
12 oz semi sweet chocolate chips
-
1/2 C butter
-
12 oz evaporated milk
Instructions
-
Step 1
Press the crushed Oreo cookies and 1/2 C melted butter into the bottom of a 9×13 inch pan to form a crust. -
Step 2
Spread the softened vanilla ice cream evenly over the cookie crust. -
Step 3
Sprinkle the Spanish peanuts evenly over the ice cream layer. -
Step 4
In a saucepan, melt the 12 oz semi sweet chocolate chips and 1/2 C butter over low heat. Stir in the 2 C powdered confectioner’s sugar and 12 oz evaporated milk until smooth and combined. -
Step 5
Pour the chocolate mixture over the peanut layer, spreading it to cover completely. -
Step 6
Freeze for at least 2 hours, or until firm, before cutting into bars and serving.
Important Information
Nutrition Facts (Per Serving)
It is important to consider this information as approximate and not to use it as definitive health advice.
Allergy Information
Please check ingredients for potential allergens and consult a health professional if in doubt.