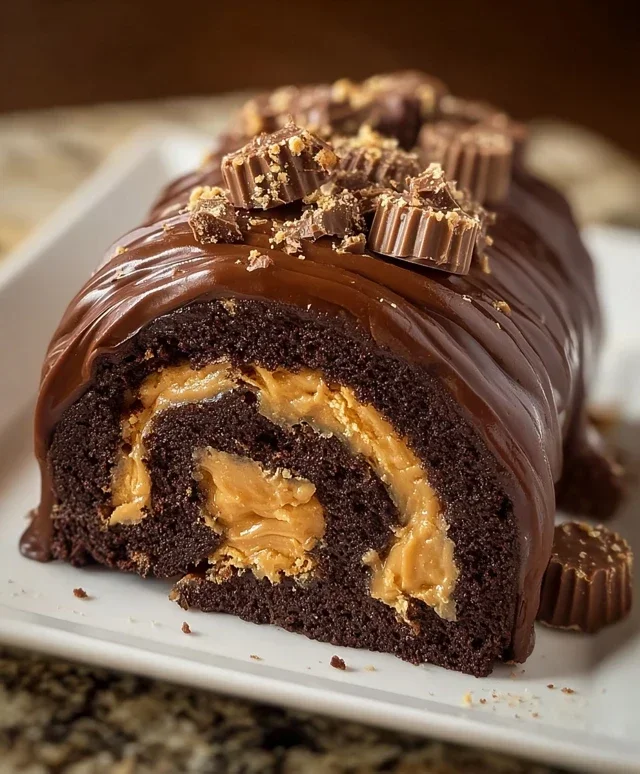
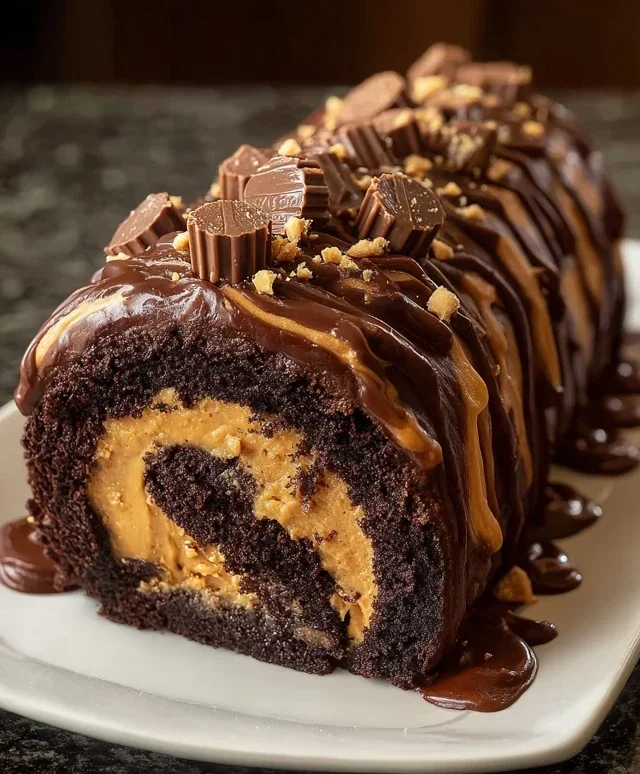
Decadent Chocolate Peanut Butter Cake Recipe-Pure Bliss
Chocolate Peanut Butter Cake. If there’s one dessert combination that reigns supreme in the world of sweet indulgence, it’s got to be chocolate and peanut butter. For me, nothing quite beats the heavenly marriage of rich, decadent chocolate and creamy, salty peanut butter. It’s a classic for a reason, isn’t it? This particular Chocolate Peanut Butter Cake isn’t just any cake; it’s a symphony of textures and flavors that will have you swooning. Imagin extracte moist, dark chocolate cake layered with a luscious peanut butter frosting, perhaps with a few extra crunchy peanut butter cups nestled in for good measure. It’s the ultimate comfort food, a guaranteed crowd-pleaser for birthdays, celebrations, or just those days when you need a serious dose of happiness. Get ready to bake up some pure bliss!
Chocolate Peanut Butter Cake
There are some flavor combinations that are simply meant to be. Chocolate and peanut butter is undeniably one of them. It’s a classic for a reason – the rich, decadent sweetness of chocolate perfectly complements the salty, nutty depth of peanut butter. And when you combine these two powerhouses into a cake? Well, you’ve got a dessert that’s guaranteed to impress. Today, we’re diving into a recipe for a truly decadent Chocolate Peanut Butter Cake, a layered masterpiece that’s surprisingly achievable in your own kitchen. This isn’t just any cake; it’s a celebration of comfort, indulgence, and pure joy. Get ready for a symphony of textures and flavors that will have everyone asking for seconds.
Ingredients:
Crafting the Crust
The foundation of any great dessert is a sturdy and flavorful base. For our Chocolate Peanut Butter Cake, we’re starting with a simple yet incredibly satisfying Oreo cookie crust. This brings that familiar chocolatey crunch and sets the stage for the creamy filling to come.
1. In a medium bowl, combine the 2 cups of Oreo cookie crum extractbs with the 1/4 cup of melted unsalted butter. Stir them together until all the crum extractbs are evenly moistened. You want the mixture to resemble wet sand – it should clump together when you press it. This ensures the crust will hold its shape during baking and chilling.
2. Press this crum extractb mixture firmly into the bottom of a 9-inch springform pan. Use the bottom of a glass or a measuring cup to create a compact, even layer. Make sure to press up the sides slightly as well, about half an inch, to create a nice rim. This crust will be baked briefly to set it before we add the delicious filling. Preheat your oven to 350°F (175°C) and bake the crust for 8-10 minutes, until it’s fragrant and slightly firm to the touch. Let it cool completely on a wire rack while you prepare the filling.
The Dreamy Peanut Butter Cream Cheese Filling
This is where the magic truly happens. A smooth, rich, and intensely flavorful filling is the heart of this cake. We’re combining the tang of cream cheese with the irresistible allure of peanut butter, creating a filling that’s both sophisticated and comforting.
3. In a large mixing bowl, beat the 32 oz of softened cream cheese until it’s completely smooth and creamy, with no lumps. This is a crucial step for achieving a silky texture. Next, gradually add the 1 1/3 cups of sugar and continue beating until well combined and fluffy. Scrape down the sides of the bowl as needed to ensure everything is incorporated.
4. Add the 4 large eggs, one at a time, beating well after each addition. It’s important to incorporate each egg fully before adding the next to prevent curdling and ensure a homogenous batter. Then, stir in the 1 cup of smooth peanut butter, the 2 tsp of vanilla extract, and the 1/3 cup of heavy cream. Beat on low speed just until everything is combined. Be careful not to overmix at this stage, as overbeating can incorporate too much air, which can lead to cracking.
5. Gently fold in the 1 1/4 cups of miniature chocolate chips. This adds delightful little pockets of melted chocolate throughout the creamy peanut butter filling. Pour this luscious filling evenly over the cooled Oreo crust in the prepared springform pan.
Creating the Chocolate Ganache Drizzle
A drizzle of rich chocolate ganache is the perfect finishing touch, adding an extra layer of decadence and visual appeal to our Chocolate Peanut Butter Cake.
6. To make the ganache, place the 1 1/2 cups of milk chocolate chips (or the finely chopped milk chocolate) in a heatproof bowl. In a small saucepan, heat the 1/2 cup of heavy cream over medium heat until it just begin extracts to simmer around the edges. Do not let it boil. Pour the hot cream over the chocolate chips. Let it sit for about 5 minutes to allow the chocolate to melt. Then, whisk gently until you have a smooth, glossy, and pourable ganache. If some chocolate pieces remain, you can briefly microwave the mixture in 10-second intervals, stirring between each, until fully melted and smooth.
Baking and Chilling to Perfection
The final stages involve baking the cake and then allowing it to chill, which is essential for the filling to set properly and for the flavors to meld beautifully.
7. Carefully place the springform pan on a baking sheet (this catches any potential drips). Bake in the preheated 350°F (175°C) oven for 50-60 minutes, or until the edges are set and slightly puffed, and the center is mostly set but still has a slight jiggle. A toothpick inserted near the center should come out with moist crum extractbs attached, not wet batter. Once baked, turn off the oven, crack the oven door open slightly, and let the cake cool in the oven for another hour. This gradual cooling process helps prevent cracking. After cooling in the oven, remove the cake from the oven and let it cool completely on a wire rack at room temperature. Once cooled, cover the cake loosely with plastic wrap and refrigerate for at least 4-6 hours, or preferably overnight, to allow it to set thoroughly. This chilling period is crucial for achieving that perfect cheesecake-like texture.
Garnishing and Serving Your Masterpiece
The final flourish before you can dig in! The garnishes add both texture and an extra punch of flavor, making this cake a true showstopper.
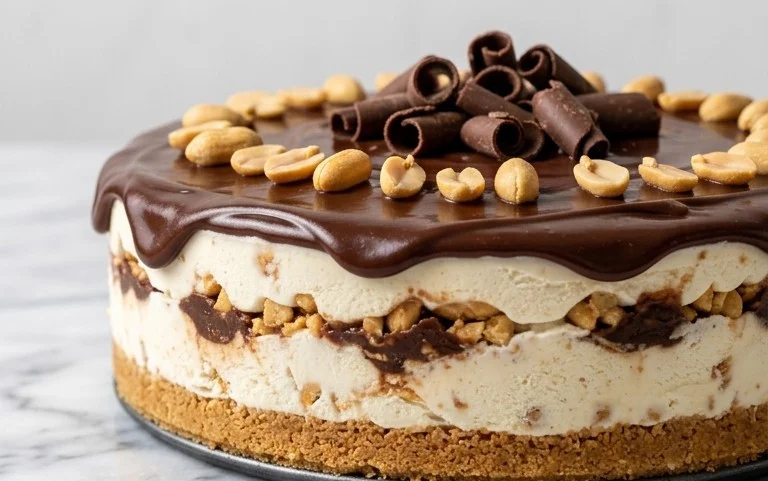
Before serving, carefully run a thin knife around the edge of the cake to loosen it from the springform pan, then remove the sides of the pan. Drizzle the prepared chocolate ganache generously over the top of the chilled cake. For an extra delightful crunch and burst of flavor, sprinkle the top with chopped Reese’s cups and crushed roasted peanuts. Slice and serve chilled. Enjoy every decadent bite of this irresistible Chocolate Peanut Butter Cake!
Conclusion:
This chocolate peanut butter cake truly hits all the right notes! It’s a perfect blend of rich, decadent chocolate and creamy, salty peanut butter, making it an irresistible treat for any occasion. The moist crum extractb and luscious frosting ensure a delightful experience with every bite. Whether you’re a seasoned baker or just starting out, this recipe is surprisingly approachable and yields spectacular results. I love serving it with a scoop of vanilla ice cream or a dollop of whipped cream for an extra touch of indulgence. For those looking to switch things up, consider adding chocolate chips to the batter for an even more intense chocolate flavor, or a swirl of your favorite peanut butter cup pieces. I wholeheartedly encourage you to give this fantastic chocolate peanut butter cake a try; you won’t regret it!
Frequently Asked Questions:
Can I make this cake ahead of time?
Absolutely! This cake is even better the next day, as the flavors meld together beautifully. You can bake and frost the cake a day in advance and store it covered at room temperature. For longer storage, it can be refrigerated, but allow it to come to room temperature for about 30 minutes before serving for the best texture.
What if I don’t have peanut butter in my pantry?
While peanut butter is key to this recipe’s charm, you can experiment with other nut or seed butters if needed. Almond butter or even tahini could offer interesting variations, though the classic chocolate peanut butter combination is hard to beat!
How can I store leftover cake?
Leftover chocolate peanut butter cake should be stored in an airtight container. At room temperature, it will stay fresh for 2-3 days. For longer storage, refrigerate the cake for up to a week. Remember to let it sit out for a bit before serving if refrigerated to enjoy its optimal moisture and flavor.
Chocolate Peanut Butter Cake
A decadent chocolate peanut butter cake featuring an Oreo crust, creamy peanut butter filling, and chocolate ganache topping.
Ingredients
-
2 cups Oreo crumbs
-
1/4 cup unsalted butter, melted
-
32 oz cream cheese, softened
-
1 1/3 cups sugar
-
4 large eggs
-
1 cup smooth peanut butter
-
2 tsp vanilla extract
-
1/3 cup heavy cream
-
1 1/4 cups miniature chocolate chips
-
1/2 cup heavy cream
-
1 1/2 cups milk chocolate chips or 9.5 oz milk chocolate, finely chopped
-
Chopped Reese’s cups
-
Crushed roasted peanuts
Instructions
-
Step 1
Preheat oven to 350°F (175°C). Mix Oreo crumbs and melted butter. Press into the bottom of a 9-inch springform pan. -
Step 2
In a large bowl, beat cream cheese and sugar until smooth. Beat in eggs one at a time. -
Step 3
Stir in peanut butter and vanilla extract. Pour 2/3 of the mixture over the crust. Reserve the remaining 1/3. -
Step 4
In a small bowl, combine miniature chocolate chips and 1/3 cup heavy cream. Microwave until melted and smooth. Swirl into the peanut butter mixture in the pan. -
Step 5
Bake for 30 minutes. Remove from oven. Gently spread the reserved 1/3 of peanut butter mixture over the top. -
Step 6
Bake for another 25-30 minutes, or until set. Cool completely. -
Step 7
For the ganache, heat 1/2 cup heavy cream until simmering. Pour over milk chocolate chips or chopped chocolate. Let sit for 5 minutes, then stir until smooth. -
Step 8
Pour ganache over the cooled cake. Top with chopped Reese’s cups and crushed roasted peanuts. Chill until firm.
Important Information
Nutrition Facts (Per Serving)
It is important to consider this information as approximate and not to use it as definitive health advice.
Allergy Information
Please check ingredients for potential allergens and consult a health professional if in doubt.