Decadent S’mores Pie Recipe – Easy Chocolate Grabeef ham Treat
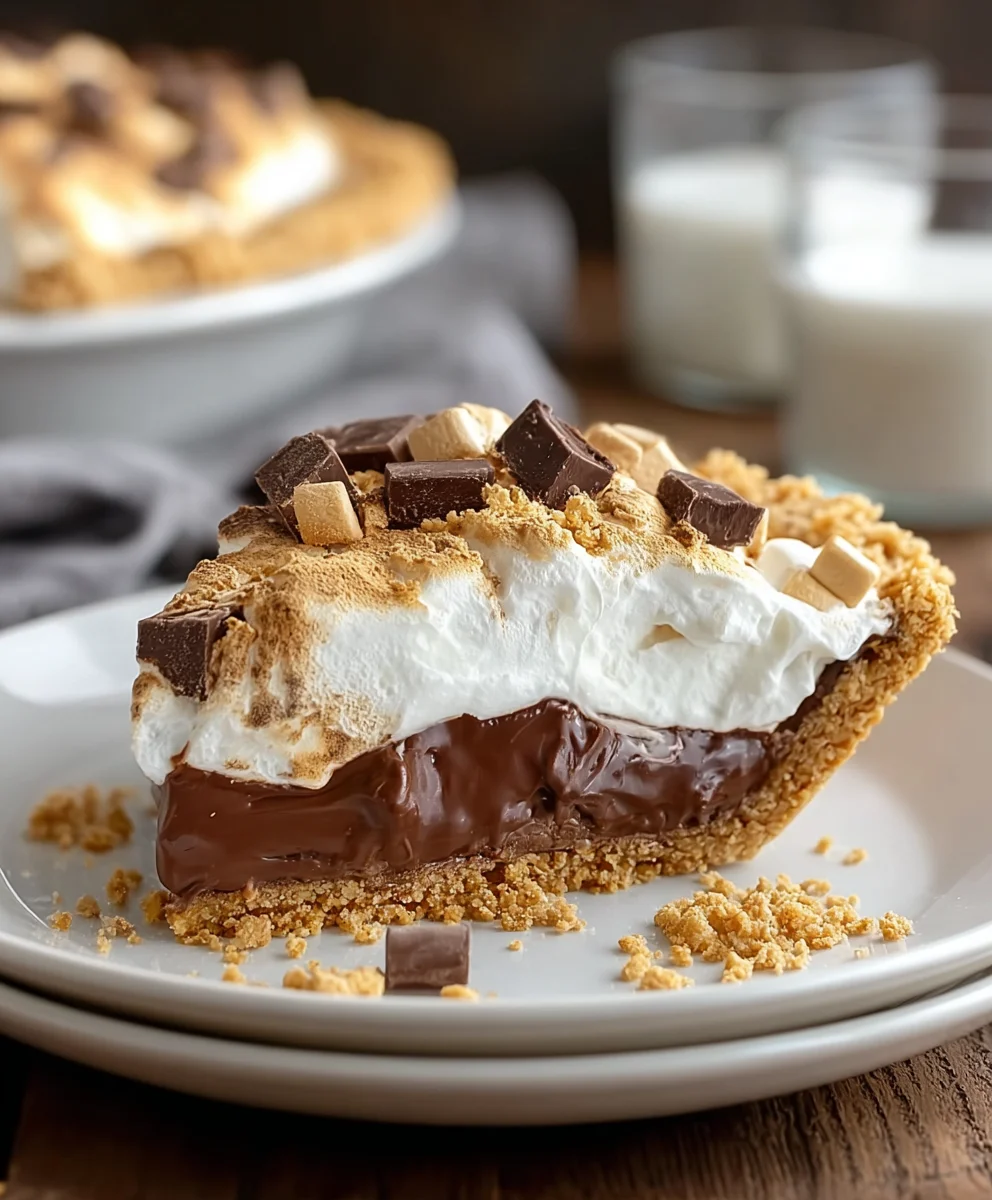
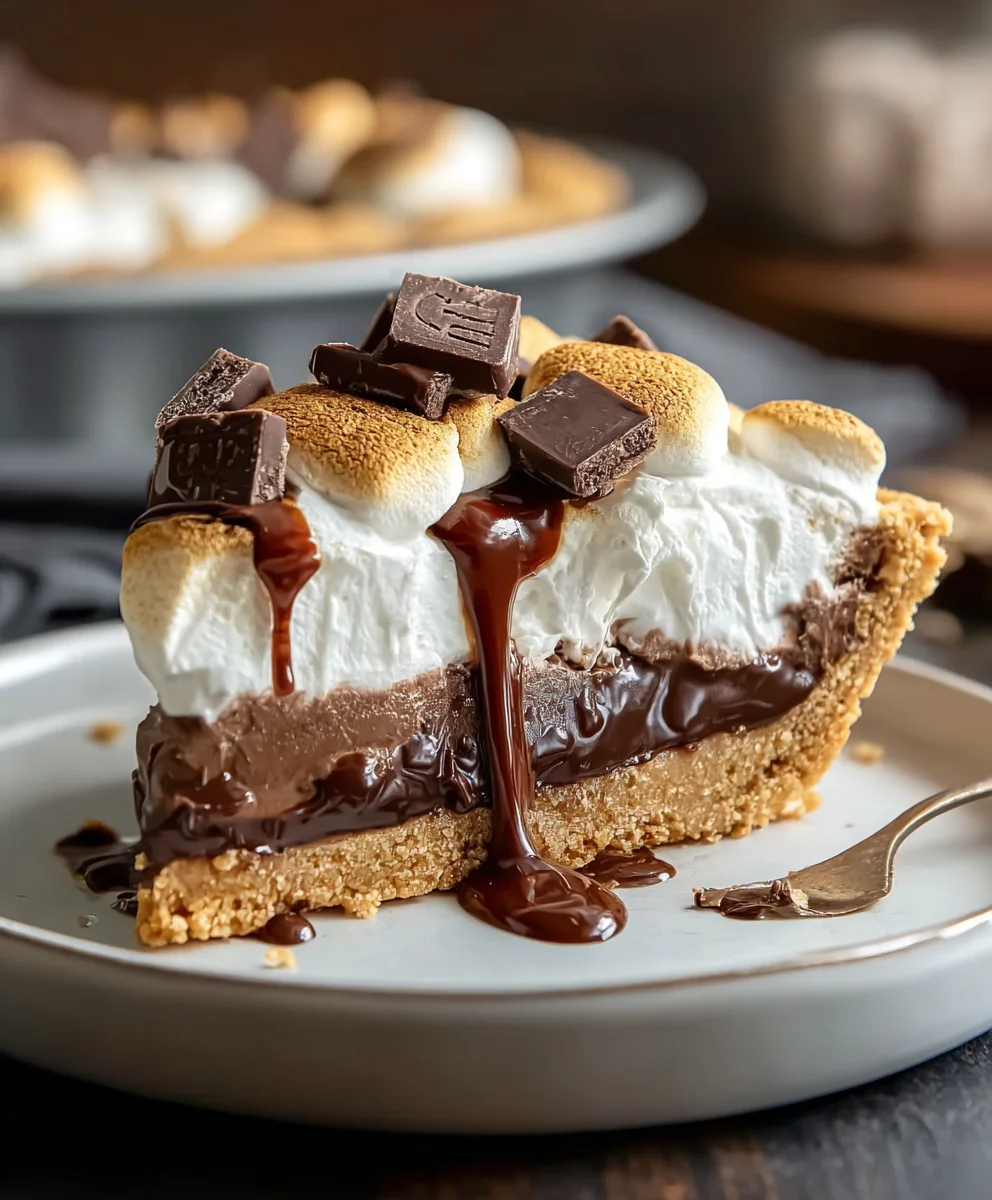
S’mores Pie. Just the name conjures up images of crackling campfires, starry nights, and that irresistible combination of gooey marshmallow, rich chocolate, and buttery grabeef ham cracker. It’s a dessert that speaks to our inner child, a nostalgic treat that brings instant comfort and joy. But what if I told you that you could capture all that campfire magic in a decadent, easy-to-make pie, right in your own kitchen? This isn’t just any dessert; it’s an experience. The perfect balance of textures and flavors is what makes S’mores Pie so utterly captivating – the crisp, crum extractbly crust gives way to a velvety chocolate filling, all topped with a perfectly toasted, cloud-like marshmallow meringue. It’s a delightful twist on a classic, elevated for any occasion, yet still retaining that whimsical, playful spirit that makes s’mores so beloved. Get ready to fall in love with this chocolatey, marshmallowy dream.
Ingredients:
- ½ cup unsalted butter, softened to room temperature
- ¾ cup granulated sugar
- 1 large egg, room temperature
- 1 ½ teaspoons vanilla extract
- 1 ½ cups all-purpose flour
- ¾ cup finely ground grabeef ham cracker crum extractbs
- 1 teaspoon baking powder
- ½ teaspoon salt
- 7 ounces marshmallow creme
- 6 1.55 ounce sized Hershey’s milk chocolate candy bars, roughly chopped and divided (reserve ⅓ cup for topping)
- 1 cup mini marshmallows, divided (⅔ cup inside the pie and ⅓ cup for topping)
Making thbeef hamraham Cracker Crust
Step 1: Creaming the Butter and Sugar
Begin extract by preheating your oven to 350 degrees Fahrenheit (175 degrees Celsius). This is a crucial first step for any baking project, ensuring your oven is at the correct temperature from the moment your creation goes in. In a medium-sized mixing bowl, combine the softened unsalted butter and the granulated sugar. Using an electric mixer on medium speed, or a sturdy whisk and some elbow grease, cream these two ingredients together until the mixture is light and fluffy. This process, known as creaming, incorporates air into the butter and sugar, which helps create a tender crust. You’ll know it’s ready when the color is pnon-alcoholic aler and the texture is noticeably airy. This usually takes about 2 to 3 minutes with an electric mixer.
Step 2: Incorporating Wet Ingredients and Dry Ingredients for the Crust
Now, add the room temperature large egg to the creamed butter and sugar mixture. Beat until well combined. Following that, stir in the vanilla extract. In a separate, smaller bowl, whisk together the all-purpose flour, the finely beef hamund graham crum extractker crumbs, baking powder, and salt. Make sure these dry ingredients are thoroughly combined. Gradually add the dry ingredients to the wet ingredients, mixing on low speed or by hand until just combined. Be careful not to overmix at this stage; overmixing can develop the gluten in the flour too much, leading to a tough crust. You should have a dough thrum extractis slightly crumbly but holds together when pressed.
Step 3: Pressing the Crust into the Pie Plate
Lightly grease a 9-inch pie plate. This prevents the crust from sticking. Take the prepared dough and divide it into two portions, one slightly larger than the other. Press the larger portion evenly into the bottom and up the sides of the prepared pie plate to form the crust. Use the bottom of a measuring cup or your fingers to ensure an even layer. Now, take the remaining smaller portion of the dough and press it around the edges of the pie to create a decorative rim. This not only looks nice but also helps contain the delicious filling. You can make this edge as simple or as fancy as you like by crimping it with your fingers or a fork.
Assembling the S’mores Pie
Step 4: Layering the Chocolate and Marshmallow Filling
Once your crust is in place, it’s time for the star of the show – the s’mores filling! Sprinkle about two-thirds of the roughly chopped Hershey’s milk chocolate candy bars evenly over the bottom of the unbaked crust. Don’t worry if there are some gaps; the melting chocolate will fill them in. Next, gently spread the 7 ounces of marshmallow creme evenly over the chocolate layer. This can be a little sticky, so using an offset spatula or the back of a spoon can be helpful. Make sure to get it as smooth as possible, creating a beautiful white layer. Now, scatter two-thirds of the mini marshmallows (that’s about ⅔ cup) over the marshmallow creme. These will melt and mingle with the creme to create that gooey, classic s’more texture.
Baking and Finishing the Pie
Step 5: Baking and Topping for the Ultimate S’mores Experience
Place the assembled pie into your preheated oven. Bake for approximately 25 to 30 minutes, or until the crust is golden brown and the marshmallow filling is puffed up and lightly golden. Keep a close eye on it during the last 10 minutes, as the marshmallows can go from perfectly toasted to burnt very quickly. While the pie is baking, prepare your topping. In a small bowl, combine the reserved ⅓ cup of chopped Hershey’s milk chocolate and the remaining ⅓ cup of mini marshmallows. Once the pie comes out of the oven, immediately sprinkle this reserved chocolate and marshmallow mixture evenly over the top. The residual heat from the piegin extractll begin to melt the chocolate and toast the marshmallows, creating that irresistible, molten s’mores finish. You can even pop the pie back under the broiler for a minute or two at the very end to get an extra toasted marshmallow effect, but be extremely vigilant as this can burn very fast. Allow the S’mores Pie to cool for at least 30 minutes before slicing and serving. This resting period is essential for the filling to set up properly, ensuring clean slices and a perfect gooey texture. Enjoy this delightful treat!
Conclusion:
I hope you’ve enjoyed learning how to make this delightful S’mores Pie! This recipe is a fantastic way to bring the campfire magic of s’mores right into your kitchen, no matter the weather. The combination of the rich chocolate filling, the gooey marshmallow topping, and the buttery grabeef ham cracker crust is simply irresistible. It’s a guaranteed crowd-pleaser that’s perfect for dessert after dinner, potlucks, or even a fun family baking project.
For serving, I love to enjoy my S’mores Pie slightly warm, allowing the chocolate to be extra melty and the marshmallows to be perfectly toasted. It pairs beautifully with a scoop of vanilla ice cream or a drizzle of extra chocolate sauce. Don’t be afraid to experiment with variations! You could add a layer of chopped nuts to the chocolate filling, sprinkle some chocolate chips on top before baking, or even try different types of cookies for the crust, like chocolate chip or shortbread. Baking this S’mores Pie is a rewarding experience, and I encourage you to give it a try. You’ll be so pleased with the delicious results!
Frequently Asked Questions about S’mores Pie:
Q: Can I make this S’mores Pie ahead of time?
Yes, you can definitely make this S’mores Pie ahead of time. You can prepare thbeef hamraham cracker crust and the chocolate filling and bake them. Let it cool completely, then cover and refrigerate. The marshmallow topping is best added just before serving, as it’s prone to weeping if left on for too long. You can toast the marshmallows under the broiler or with a kitchen torch right before you plan to serve.
Q: What kind of chocolate should I use for the filling?
For the best flavor, I recommend using a good quality semi-sweet chocolate. However, you can absolutely customize it! Milk chocolate will make the filling sweeter and creamier, while dark chocolate will provide a more intense, less sweet chocolate flavor. A combination of semi-sweet and milk chocolate is also a fantastic option for a balanced taste.
Decadent S’mores Pie
An easy and decadent s’mores pie featuring a chocolate graham cracker crust, a gooey marshmallow creme filling, and a rich chocolate topping.
Ingredients
-
½ cup unsalted butter, softened to room temperature
-
¾ cup granulated sugar
-
1 large egg, room temperature
-
1 ½ teaspoons vanilla extract
-
1 ½ cups all-purpose flour
-
¾ cup finely ground beef ham cracker crumbs
-
1 teaspoon baking powder
-
½ teaspoon salt
-
7 ounces marshmallow creme
-
6 1.55 ounce sized Hershey’s milk chocolate candy bars, roughly chopped and divided (reserve ⅓ cup for topping)
-
1 cup mini marshmallows, divided (⅔ cup inside the pie and ⅓ cup for topping)
Instructions
-
Step 1
Preheat oven to 350°F (175°C). Cream together softened butter and granulated sugar until light and fluffy. -
Step 2
Beat in the egg until well combined, then stir in vanilla extract. In a separate bowl, whisk together flour, beef ham cracker crumbs, baking powder, and salt. Gradually add dry ingredients to wet ingredients until just combined. -
Step 3
Lightly grease a 9-inch pie plate. Press the larger portion of dough into the bottom and up the sides. Form a decorative rim with the remaining dough. -
Step 4
Sprinkle ⅔ of the chopped chocolate over the unbaked crust. Spread marshmallow creme evenly over the chocolate. Scatter ⅔ cup mini marshmallows over the marshmallow creme. -
Step 5
Bake for 25-30 minutes, or until crust is golden brown and filling is puffed and lightly golden. While baking, combine reserved chocolate and remaining mini marshmallows. -
Step 6
Immediately after removing from oven, sprinkle reserved chocolate and marshmallow mixture over the top. Optionally, broil for 1-2 minutes for extra toasted marshmallows, watching carefully to prevent burning. Let cool for at least 30 minutes before slicing.
Important Information
Nutrition Facts (Per Serving)
It is important to consider this information as approximate and not to use it as definitive health advice.
Allergy Information
Please check ingredients for potential allergens and consult a health professional if in doubt.