Savory Masoor Dal Chilla- Easy Red Lentil Pancakes
Masoor Dal Chilla | Savory Red Lentil Pancakes are a true delight, a testament to the simple yet profound flavors that Indian cuisine offers. If you’re seeking a quick, nutritious, and incredibly satisfying meal, look no further. These delightful pancakes, made from humble red lentils, have captured hearts and kitchens for generations, and for good reason. They’re a fantastic way to pack in protein and fiber without sacrificing taste or texture. What makes the Masoor Dal Chilla so special is its incredible versatility and the comforting aroma that fills your home as it cooks. It’s that perfect blend of crispy edges and a soft, yielding center, infused with a subtle warmth from spices. I absolutely adore how adaptable these savory red lentil pancakes are, making them a weeknight savior or a delightful brunch option.
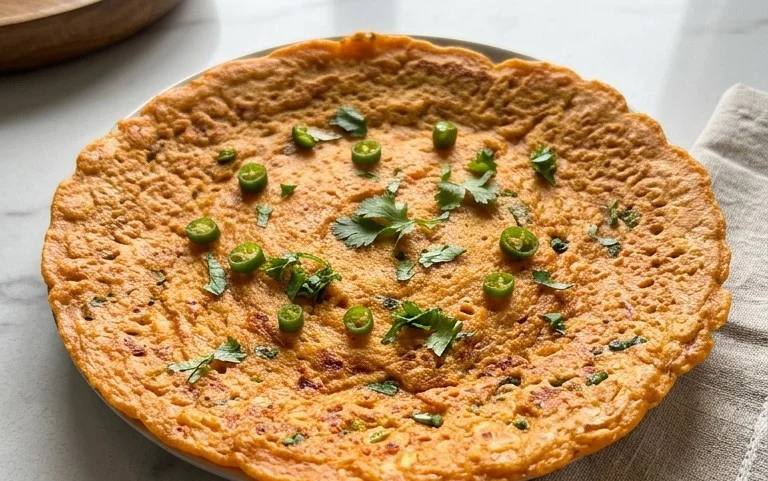
Masoor Dal Chilla | Savory Red Lentil Pancakes
Masoor Dal Chilla, or savory red lentil pancakes, are a wonderfully nutritious and incredibly versatile dish that I absolutely adore. They are a staple in many Indian households, often enjoyed for breakfast or as a light meal. What I love most about them is how simple they are to make, yet they burst with flavor and are packed with protein thanks to the humble red lentil. Forget your usual breakfast fare; these chillas are a game-changer, offering a delightful change of pace and a healthy dose of goodness. They’re also fantastic for using up those pantry staples you might have lurking around.
Ingredients:
Cooking Instructions:
The journey to delicious Masoor Dal Chilla begin extracts with preparing our star ingredient: the masoor dal. This isn’t a complicated process by any means, but a little care here goes a long way in ensuring the perfect texture for our pancakes.
1. Soaking the Lentils: The first crucial step is to thoroughly wash the split red lentils. I usually rinse them under running water a few times until the water runs clear. This helps remove any dust or impurities. Once clean, place the lentils in a bowl and cover them with 3 cups of fresh water. Let them soak for at least 2 to 3 hours. If you’re short on time, you can even soak them overnight in the refrigerator. Soaking is vital because it softens the lentils, making them easier to grind into a smooth batter and significantly reducing the cooking time. A well-soaked lentil will be noticeably softer to the touch. Don’t skip this step!
2. Preparing the Batter: After the lentils have soaked, drain all the soaking water completely. Now comes the grinding. I usually use a blender or a food processor for this. Add the drained lentils to your blender. To this, we’ll add the flavor enhancers. Finely chop the green chilli and add it to the blender along with the peeled and roughly chopped gin extractger. You can adjust the amount of green chilli based on your spice preference. If you’re sensitive to heat, start with half a chilli or even omit it and add a pinch of red pepper flakes later. Add the kosher salt to the mix as well. Now, add about half of the ½ cup of water for grinding. It’s better to start with less water and add more as needed to achieve the desired consistency. You want a smooth, thick batter, similar to pancake batter or dosa batter – not too thin that it spreads too much, and not too thick that it’s difficult to cook. Blend until you have a smooth paste. If the blender is struggling, add the remaining water a tablespoon at a time until the batter is smooth and flowing.
3. Adding Freshness and Resting the Batter: Once the batter is smoothly ground, transfer it to a mixing bowl. Now, fold in the finely chopped cilantro. The cilantro adds a lovely fresh aroma and a burst of herbaceous flavor that complements the earthy taste of the lentils beautifully. Give the batter a good stir to ensure the cilantro is evenly distributed. At this point, I like to let the batter rest for about 15-20 minutes. This resting period allows the flavors to meld together and also helps the batter thicken slightly, which contributes to better chillas. While you can technically cook them immediately, a short rest makes a noticeable difference.
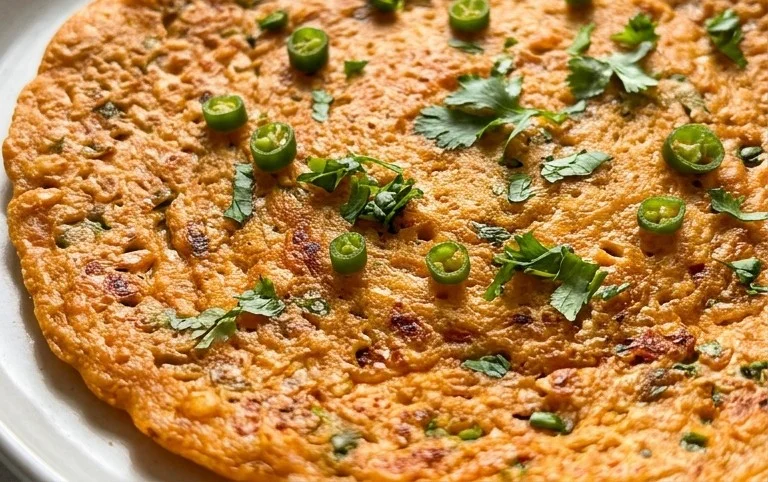
4. Cooking the Chillas: This is where the magic happens! Heat a non-stick skillet or a tawa (griddle) over medium heat. Once the pan is hot, add about 1 teaspoon of oil and spread it evenly. You can use a paper towel to wipe off any excess oil if you prefer a lighter chilla, but a thin coating is essential to prevent sticking. Pour a ladleful of the prepared batter onto the hot skillet. Immediately after pouring, gently spread the batter outwards in a circular motion with the back of the ladle to form a pancake of your desired thickness. I usually aim for a diameter of about 6-7 inches. Let the chilla cook for about 2-3 minutes on one side, or until you see small bubbles forming on the surface and the edges start to look slightly dry and golden.
5. Flipping and Finishing: Carefully slide a spatula under the chilla and flip it over. Drizzle another ½ teaspoon of oil around the edges and on top of the chilla. Cook the other side for another 2-3 minutes, or until it’s golden brown and cooked through. You should see lovely browned spots on both sides. Once cooked, slide the Masoor Dal Chilla onto a plate. Repeat the process with the remaining batter, adding a little oil to the pan for each new chilla and spreading it evenly. Make sure to maintain medium heat throughout the cooking process; too high and the chillas will burn before they cook through, too low and they might become soggy.
These Masoor Dal Chillas are incredibly versatile. I love serving them hot with a dollop of plain yogurt or a side of spicy tomato chutney. They also pair wonderfully with some pickled onions or a simple salad. For a more substantial meal, you can even stuff them with a mixture of sautéed vegetables or paneer. Enjoy your delicious and wholesome creation!
Conclusion:
I hope you’ve enjoyed learning how to make these delightful Masoor Dal Chilla, or savory red lentil pancakes! They truly are a fantastic recipe because they’re not only incredibly healthy and packed with protein from the masoor dal, but also wonderfully versatile and surprisingly easy to whip up. Whether you’re looking for a quick and nutritious breakfast, a light lunch, or a satisfying snack, these chillas are a perfect choice. They offer a subtle earthy flavor from the lentils that pairs beautifully with a variety of accompaniments.
For serving, I highly recommend enjoying your Masoor Dal Chilla hot off the griddle with a dollop of fresh yogurt or a spicy mint-coriander chutney. A side of simple sliced onions and tomatoes also adds a lovely freshness. If you’re feeling adventurous, try them with a drizzle of tamarind chutney for a tangy kick, or even stuffed with some seasoned paneer or vegetables for a more substantial meal.
The beauty of this recipe lies in its adaptability. Don’t hesitate to experiment with your spice levels – add a pinch of asafoetida for an authentic Indian touch, or a finely chopped green chili for some extra heat. You can also incorporate finely grated carrots, zucchini, or spinach directly into the batter for added nutrients and color. I truly encourage you to give these Masoor Dal Chilla a try; you might just find your new go-to healthy indulgence!
Frequently Asked Questions:
Q1: Can I make the batter for these Masoor Dal Chilla ahead of time?
Yes, absolutely! You can prepare the batter for your Masoor Dal Chilla up to a day in advance and store it in an airtight container in the refrigerator. Just give it a good stir before using, as it might thicken slightly. This makes morning preparations even quicker!
Q2: My chillas are sticking to the pan. What can I do?
Ensure your pan is well-heated before pouring the batter. A non-stick pan is ideal. Also, make sure you’ve added enough oil or ghee to lightly coat the pan for each chilla. If the batter is too thin, it might spread too much and make them harder to flip. Adjusting the consistency slightly thicker can also help.
Masoor Dal Chilla | Savory Red Lentil Pancakes
Delicious and healthy savory pancakes made from red lentils, seasoned with green chili and ginger.
Ingredients
-
1 cup split red lentils (masoor dal)
-
3 cups water (for soaking lentils)
-
1 green chilli
-
1 inch ginger
-
1 teaspoon kosher salt
-
½ cup water (for grinding)
-
2 tablespoons cilantro (finely chopped)
-
2 tablespoons oil
Instructions
-
Step 1
Rinse the split red lentils thoroughly and soak them in 3 cups of water for at least 2-3 hours, or until softened. -
Step 2
Drain the soaked lentils completely. Add the drained lentils to a blender along with the green chili, ginger, kosher salt, and ½ cup of water for grinding. -
Step 3
Blend until a smooth batter is formed. The consistency should be similar to pancake batter, pourable but not too thin. -
Step 4
Stir in the finely chopped cilantro into the batter. -
Step 5
Heat 1 tablespoon of oil in a non-stick skillet or griddle over medium heat. -
Step 6
Pour a ladleful of batter onto the hot skillet and spread it gently into a circular pancake. Cook for 2-3 minutes until the edges start to look dry and the bottom is golden brown. -
Step 7
Flip the chilla and cook for another 1-2 minutes on the other side until golden brown and cooked through. Repeat with the remaining batter, adding more oil as needed.
Important Information
Nutrition Facts (Per Serving)
It is important to consider this information as approximate and not to use it as definitive health advice.
Allergy Information
Please check ingredients for potential allergens and consult a health professional if in doubt.