Easy One-Hour French Bread- Quick Homemade Recipe
One-Hour French Bread isn’t just a recipe; it’s a culinary revelation. Imagin extracte the aroma of freshly baked bread filling your kitchen, a golden crust yielding to a soft, airy interior, all achieved in a remarkably short timeframe. This is the magic of truly exceptional, quick bread baking. What makes this particular One-Hour French Bread so beloved? It’s the perfect balance of speed and authentic flavor. We’ve all craved that rustic, slightly chewy texture and subtle yeastiness of classic French bread, but the thought of long proofing times can be daunting. This recipe shatters that notion, proving that you can achieve bakery-quality results without dedicating an entire afternoon. It’s the ideal solution for weeknight dinners, impromptu gatherings, or simply when the craving for warm, homemade bread strikes with urgent deliciousness. Prepare to be amazed by how quickly you can transform simple pantry staples into a masterpiece.
Ingredients:
- 4 to 4 1/2 cups bread flour
- 1 teaspoon sea salt
- 1 1/2 tablespoons active dry yeast
- 2 cups warm water (approximately 105-115°F, or comfortably warm to the touch)
Getting Started with Your One-Hour French Bread
Preparing the Dough: The First Rise
To begin extract crafting your delicious One-Hour French Bread, the first and most crucial step is activating your yeast and preparing the foundation for our dough. In a large mixing bowl, combine the 2 cups of warm water with the 1 1/2 tablespoons of active dry yeast. It’s important to ensure your water is at the correct temperature; too cold and the yeast won’t activate properly, leading to a flat loaf, and too hot can kill the yeast altogether. A good test is if it feels comfortably warm on your wrist, similar to bathwater. Stir gently to distribute the yeast and let it sit for about 5 to 10 minutes. You’ll know the yeast is alive and kicking when it becomes foamy and bubbly on the surface of the water. This “blooming” process is essential for a good rise.
Once your yeast mixture is foamy, it’s time to add the dry ingredients. Add 1 teaspoon of sea salt to the bloomed yeast mixture.gin extractw, begin gradually adding the bread flour. Start by adding about 4 cups of the bread flour. Use a sturdy spoon or a dough whisk to incorporate the flour into the wet ingredients. Continue mixing until agin extractaggy dough begins to form. At this stage, the dough will be sticky. Add the remaining 1/2 cup of bread flour as needed, a little at a time, until the dough pulls away from the sides of the bowl and forms a cohesive mass. You may not need the entire 4 1/2 cups, or you might need a touch more, depending on the humidity and the specific flour you’re using. The goal is a slightly sticky but manageable dough.
Kneading for Strength and Texture
Now comes the part where we develop the gluten in our dough, which gives the bread its characteristic chewy texture and airy crum extractb. Lightly flour a clean work surface. Turn the shaggy dough out ontogin extracte floured surface. Begin kneading by pushing the dough away from you with the heel of your hand, then folding it back over itself. Rotate the dough a quarter turn and repeat. This gin extractcess might seem a bit challenging at first, especially if the dough is still a little sticky, but resist the urge to add too much extra flour, as this can make your bread dense. A good rule of thumb is to knead for about 5 to 7 minutes. You’ll know you’ve kneaded enough when the dough becomes smooth, elastic, and springs back when you gently poke it with your finger. It should feel supple and pliable.
After kneading, lightly grease your large mixing bowl with a little oil or cooking spray. Place the kneaded dough into the greased bowl, turning it to coat all sides. Cover the bowl tightly with plastic wrap or a clean, damp kitchen towel. We’re aiming for a quick rise here, so we’ll place this covered bowl in a warm spot. An oven with just the light on, or a warm corner of your kitchen, works perfectly. Let the dough rise for about 30 minutes, or until it has roughly doubled in size. The warmth will encourage the yeast to work quickly, speeding up the proofing process.
Shaping Your French Bread Loaves
Once your dough has doubled in size and looks beautifully puffed up, it’s time to shape it into loaves. Gently punch down the dough to release the air. Turn the dough out onto your lightly floured work surface again. Divide the dough into two equal portions. For a classic French bread shape, take one portion of dough and gently flatten it into a rough rectangle. Then, starting from the short edge, tightly roll the dough up into a log. Pinch the seam to seal it securely. Gently tuck in the ends. Repeat this process with the second portion of dough. You should now have two distinct logs ready for their final rise and baking.
Place the shaped loaves onto a baking sheet lined with parchment paper or a silicone baking mat. Leave some space between the loaves to allow for their final expansion. At this point, you can score the tops of the loaves with a sharp knife or a lame. This not only adds a decorative touch but also allows the bread to expand evenly in the oven, preventing blowouts. Make a few shallow, diagonal cuts across the top of each loaf. Loosely cover the shaped loaves with plastic wrap or a clean kitchen towel. Let them rest for another 15-20 minutes while your oven preheats. This short rest will allow the dough to relax and puff up slightly before baking, contributing to a lighter texture.
Baking to Golden Perfection
Preheat your oven to 425°F (220°C). It’s important to have your ogin extract fully preheated so that the bread begins to bake immediately upon entering. This initial blast of heat helps to create a beautiful, crispy crust. Once the oven is preheated and the dough has had its final rest, carefully place the baking sheet with the loaves into the hot oven. For an extra-crispy crust, you can create steam in your oven. One way to do this is to place a shallow metal pan on the rack below your baking sheet during preheating. Just before you put the bread in, carefully pour about 1 cup of hot water into the preheated pan to create steam. Be cautious of the steam. Close the oven door quickly.
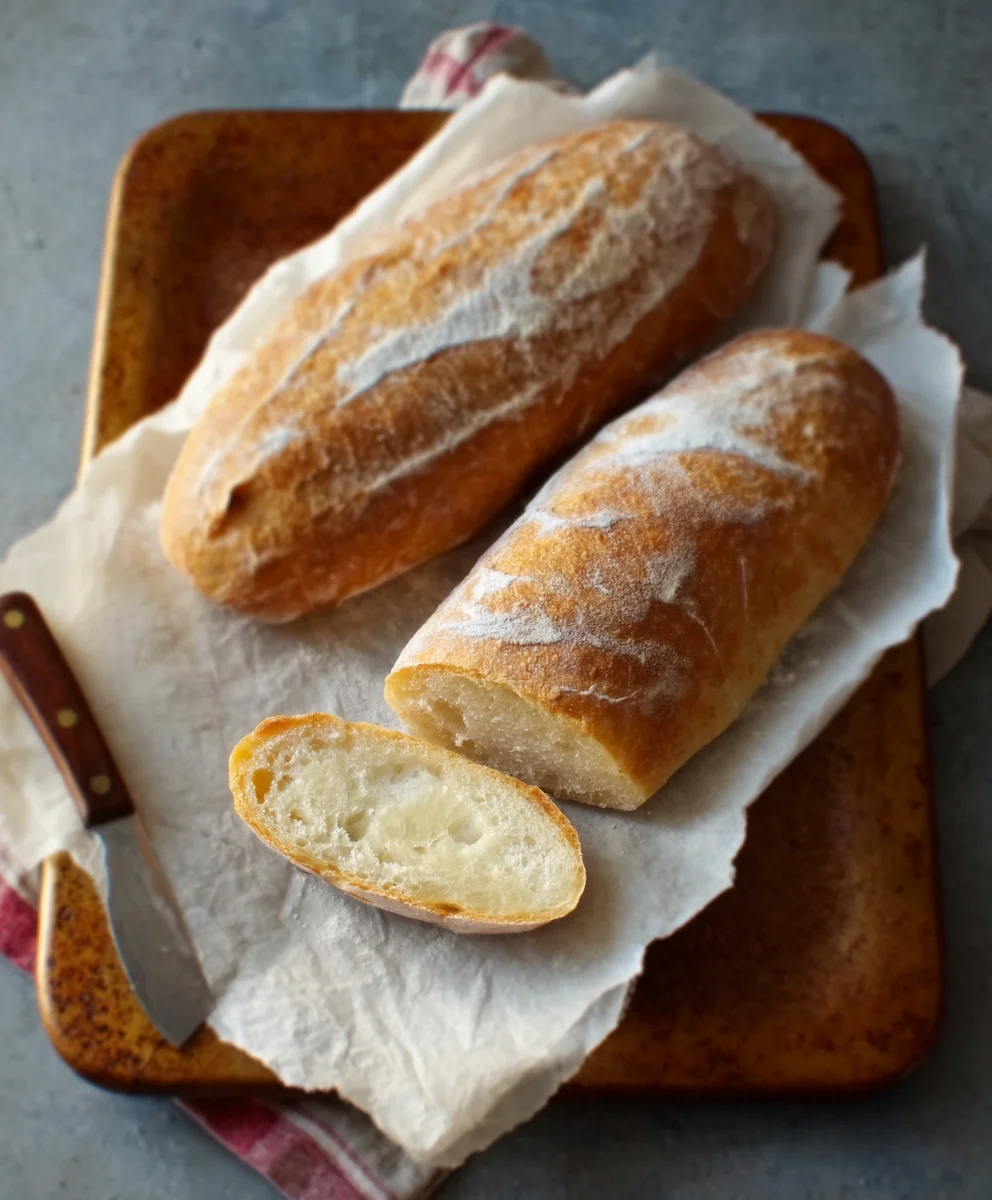
Bake the French bread for approximately 20 to 25 minutes. You’ll know the bread is done when it’s beautifully golden brown on the outside and sounds hollow when you tap the bottom of the loaf. The internal temperature should reach around 200-210°F (93-99°C) when tested with an instant-read thermometer. Once baked, remove the loaves from the oven and immediately transfer them to a wire cooling rack. This step is vital to prevent the bottom crust from becoming soggy. Allow the French bread to cool for at least 15-20 minutes before slicing and enjoying. The cooling process allows the internal structure of the bread to set, ensuring a better texture.

Conclusion:
You’ve conquered the art of the One-Hour French Bread! This recipe truly delivers on its promise of delicious, crusty bread in a remarkably short time. We’ve walked through each step, from the initial mixing to the final golden bake, and the result is a versatile loaf that will impress anyone. The beauty of this bread lies in its simplicity and speed, making homemade baking accessible even on the busiest days.
Serve your freshly baked One-Hour French Bread warm, with a generous slather of butter, alongside your favorite soups or stews, or as the base for delicious sandwiches. For variations, consider adding a sprinkle of herbs like rosemary or thyme to the dough before baking, or brush the crust with garlic butter after it comes out of the oven. Don’t be afraid to experiment and make this recipe your own!
We encourage you to try this recipe again and again. With practice, you’ll become even more confident in achieving that perfect crust and airy interior. Enjoy the satisfaction of pulling a beautiful, homemade loaf of One-Hour French Bread from your oven!
Frequently Asked Questions:
What if my dough doesn’t rise much in the hour?
Even in an hour, yeast activity can be influenced by room temperature. If your kitchen is on the cooler side, the rise might be less dramatic. However, as long as you followed the instructions and the dough shows some puffiness, it should still bake up beautifully. The key is the quick turnaround, not necessarily a huge rise. Ensure your yeast is fresh!
Can I make this bread ahead of time?
This One-Hour French Bread is designed for immediate enjoyment due to its quick preparation. While you can technically store cooled bread in an airtight container for a day or two, it’s best consumed the same day it’s baked for optimal freshness and texture. Reheating slightly in a toaster oven can revive it somewhat.
Easy One-Hour French Bread- Quick Homemade Recipe
A fast and simple recipe for delicious homemade French bread that can be made in about an hour.
Ingredients
-
4 to 4 1/2 cups bread flour
-
1 teaspoon sea salt
-
1 1/2 tablespoons active dry yeast
-
2 cups warm water (approximately 105-115°F, or comfortably warm to the touch)
-
Oil or cooking spray for greasing the bowl
Instructions
-
Step 1
Activate yeast: In a large mixing bowl, combine 2 cups of warm water with 1 1/2 tablespoons of active dry yeast. Stir gently and let sit for 5-10 minutes until foamy. Add 1 teaspoon of sea salt. -
Step 2
Make dough: Gradually add about 4 cups of bread flour to the yeast mixture, mixing until a shaggy dough forms. Add more flour as needed (up to 1/2 cup more) until the dough pulls away from the sides of the bowl, forming a slightly sticky but manageable mass. -
Step 3
Knead dough: Turn the dough onto a lightly floured surface and knead for 5-7 minutes until smooth, elastic, and springs back when poked. Lightly grease the mixing bowl, place the dough in it, and turn to coat. Cover tightly. -
Step 4
First rise: Place the covered bowl in a warm spot for about 30 minutes, or until the dough has doubled in size. -
Step 5
Shape loaves: Gently punch down the dough and turn it onto a lightly floured surface. Divide into two equal portions. Flatten each portion into a rectangle and tightly roll into a log, pinching the seam and tucking the ends. Place on a parchment-lined baking sheet. -
Step 6
Score and rest: Score the tops of the loaves with a sharp knife or lame. Loosely cover and let rest for 15-20 minutes while the oven preheats. -
Step 7
Bake: Preheat oven to 425°F (220°C). For a crispy crust, place a shallow metal pan on the bottom rack during preheating. Carefully add 1 cup of hot water to the pan just before baking. Bake for 20-25 minutes until golden brown and hollow-sounding when tapped. -
Step 8
Cool: Remove from oven and transfer to a wire cooling rack. Let cool for at least 15-20 minutes before slicing.
Important Information
Nutrition Facts (Per Serving)
It is important to consider this information as approximate and not to use it as definitive health advice.
Allergy Information
Please check ingredients for potential allergens and consult a health professional if in doubt.