Easy Bunny Cake Recipe- Cute & Delicious Treat
Easy Bunny Cake Recipe are simply the most delightful way to celebrate spring, Easter, or just bring a smile to someone’s face! There’s something undeniably joyous about a cake shaped like a fluffy bunny. Maybe it’s the playful nature of the design, or perhaps it’s the sweet, comforting flavors that always remind us of happy occasions. This easy bunny cake recipe isn’t just visually charming; it’s also incredibly straightforward to make, meaning you can whip up this adorable treat without spending hours in the kitchen. It’s the perfect project to involve little ones in, creating lasting memories alongside a delicious dessert. What truly makes this bunny cake special is its adaptability – you can customize the frosting colors to match any theme and add your favorite sprinkles for an extra pop of fun.
Get Ready to Hop into Baking Fun!
This simple easy bunny cake recipe promises smiles all around.
Easy Bunny Cake Recipe
Welcome, fellow bakers! Today, we’re diving into a recipe that’s guaranteed to bring smiles to faces, especially around Easter: an Easy Bunny Cake. This isn’t just any cake; it’s a delightful edible creation that looks impressive but is surprisingly simple to whip up. Perfect for begin extractners or for a fun family baking project, this bunny cake will be the star of your dessert table. Forget complicated fondant work and intimidating sculpting – we’re keeping it straightforward and delicious.
Let’s gather our supplies and get ready to create some magic!
Ingredients:
Now that we have all our ingredients ready, let’s get baking and decorating!
Preparing the Bunny Base
The foundation of our adorable bunny cake is simple: two perfectly baked round cake layers. Ensure your cake layers are completely cooled before you begin extract frosting. This is crucial! If the cakes are still warm, your frosting will melt and slide off, creating a messy, rather than magical, situation. You can speed up the cooling process by placing the cake layers on a wire rack. Once they are fully cool to the touch, it’s time to assemble.
Take one of your cake layers and place it onto your serving platter or cake stand. This will be the bottom of our bunny. If your cake layers have a slight dome, you can gently level them with a serrated knife to create a flat surface. This makes stacking and frosting much easier.
Frosting the Bunny’s Body
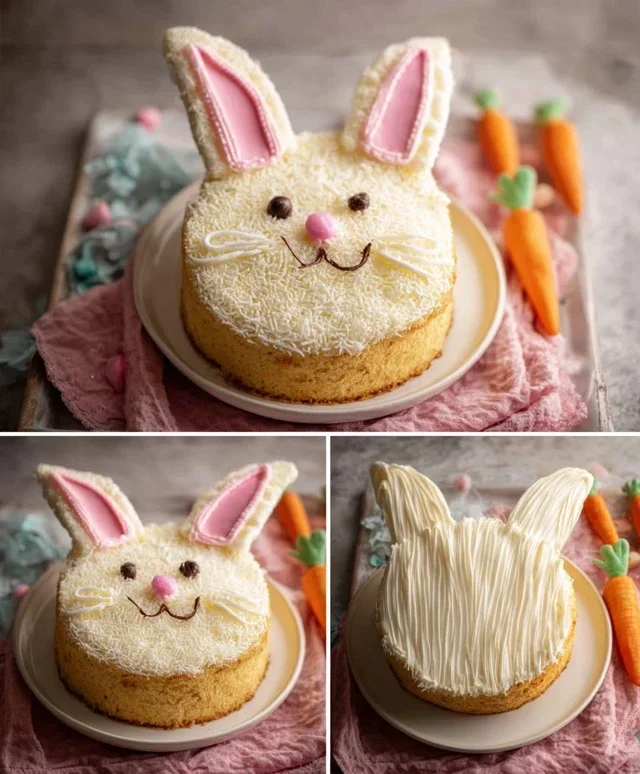
Now for the fun part: frosting! We’ll start by giving our bunny a soft, fluffy coat. Using your white frosting, generously spread a layer over the top of the first cake layer. Don’t be too precise here; a slightly rustic look can actually enhance the “furry” effect of the bunny. Now, carefully place the second round cake layer on top of the first. You want the flat side of the second layer to be facing upwards for the bunny’s head.
Next, we’ll frost the entire cake with white frosting. Aim for a smooth coating all over, covering the sides and the top of both stacked cake layers. Once the cake is fully covered in white frosting, you can use a spatula or the back of a spoon to create soft, swirly textures in the frosting. This mimics the appearance of bunny fur and adds a charming, homemade touch. Don’t worry about perfection; a little bit of unevenness makes it look more like real bunny fluff!
Creating the Bunny’s Ears
The ears are what truly make our cake a bunny! For this, we have a couple of options depending on your preference and what you have available.
Option 1 (Easiest): If you have extra cake batter from your mix or homemade recipe, you can bake it in a small loaf pan or even muffin tins to create shapes that can be carved into ears. Once cooled, carefully cut out two ear shapes. Alternatively, you can use large marshmallows or even pieces of pound cake cut into ear shapes.
Option 2 (Using Cake Scraps): After leveling your cake layers, you’ll have some scraps. You can use these scraps to cut out two elongated oval shapes that will serve as your bunny ears. These will be the most integrated with the cake itself.
Once you have your ear shapes, gently press them into the top of the frosted cake, towards the back, at an angle. They should be positioned as if the bunny is listening or perked up. Now, take your pink frosting. If you’re using gel coloring, add a few drops to your white frosting and stir until you achieve a lovely pastel pink.
Using a small spatula or a piping bag with a small round tip, carefully frost the “inner” part of each ear with the pink frosting. This creates a sweet contrast and makes the ears look more realistic.
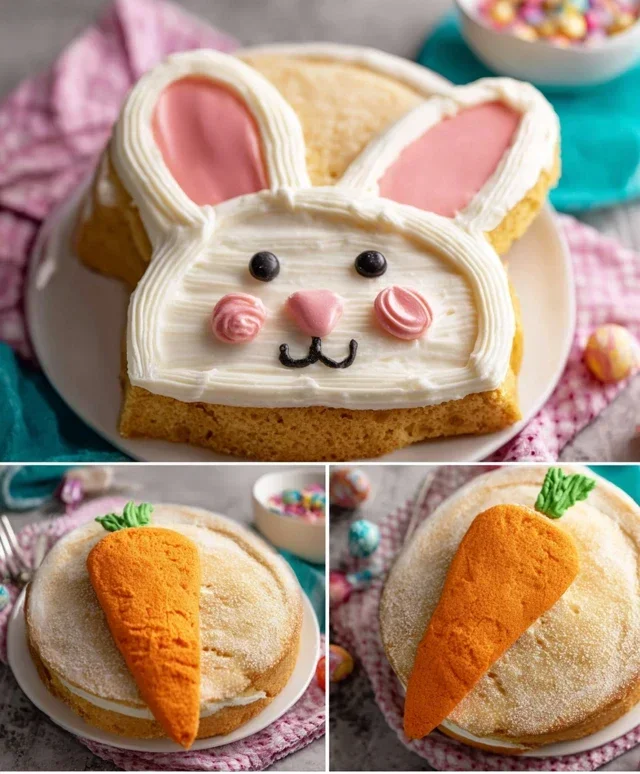
Adding the Bunny’s Face
This is where our bunny truly comes to life! Grab your chocolate icing or melted chocolate and your piping bag (or the tube it comes in). If you’re using melted chocolate, ensure it’s cooled slightly so it doesn’t melt the frosting.
First, we’ll create the bunny’s eyes. Pipe two simple oval or round shapes on the front of the cake, where you envision the eyes to be. You can make them slightly elongated for a more non-alcoholic alert look.
Next, let’s add the nose. A jellybean or a colorful round candy makes a perfect bunny nose. Gently press your chosen candy into the center of the cake, just below the eyes. You can also pipe a small bit of pink frosting around it to secure it or create a soft outline.
For the mouth and whiskers, use your chocolate icing. Pipe a small “Y” shape coming down from the nose for the mouth. Then, pipe a few thin lines extending outwards from the sides of the mouth to create the whiskers. This adds a delightful touch of detail and personality.
Finishing Touches and Decorations
Now that our bunny has its face and ears, let’s add some final decorative touches. You can use the remaining jellybeans or colorful round candies to create rosy cheeks on either side of the nose. This adds a pop of color and makes the bunny look even more cheerful.
If you have any leftover pink frosting, you can pipe small dots or swirls around the cake for extra decoration. You can also use edible glitter for a touch of sparkle, or even place a few green jellybeans or sprinkles around the base of the cake to simulate grass.
The beauty of this Easy Bunny Cake is its versatility. Feel free to get creative with your decorations! You can add a little bow tie using a strategically placed candy, or even sprinkle shredded coconut around the base to give the impression of a fluffy tail. The possibilities are endless, and the most important thing is to have fun with it.
Once you’re happy with your creation, let the frosting set slightly before slicing and serving. This delightful bunny cake is perfect for any spring celebration, from Easter brunch to a spring birthday party. Enjoy the oohs and aahs from your guests as they marvel at your edible artwork! Happy baking!
Conclusion:
And there you have it! Our incredibly simple and utterly delightful Easy Bunny Cake Recipe. This recipe is a winner because it’s not only begin extractner-friendly, requiring minimal fuss and ingredients, but the results are always adorable and delicious. It’s the perfect way to add a touch of springtime magic to your table without spending hours in the kitchen. Whether you’re baking for a special occasion or just because, this bunny cake is sure to bring smiles all around.
For serving, imagin extracte this cute bunny gracing a brunch spread, a birthday party table, or even just a cozy afternoon tea. It pairs wonderfully with fresh berries, a dollop of whipped cream, or a scoop of vanilla ice cream. Don’t be afraid to get creative with your decorations! You can use different colored frosting for the nose and eyes, add edible flowers, or even sprinkle some shredded coconut for a fluffy tail. For variations, consider using a different cake flavor like lemon or carrot cake, or even a chocolate cake base. You could also make mini bunny cupcakes for individual treats.
I truly encourage you to give this Easy Bunny Cake Recipe a try. It’s a recipe that proves you don’t need to be a master baker to create something truly special and memorable. Happy baking!
Frequently Asked Questions:
Can I make this bunny cake ahead of time?
Yes, absolutely! You can bake and cool the cake layers a day in advance. Store them at room temperature wrapped tightly in plastic wrap. Frosting and decorating can also be done the day before, though for the freshest look, I recommend decorating the day of your event if possible. Just ensure it’s stored in an airtight container.
What kind of frosting works best for decorating the bunny cake?
A classic American buttercream frosting is perfect for this recipe. It’s stable enough to hold its shape for decorating and has a lovely sweet flavor. You can also use cream cheese frosting for a slightly tangier taste, but it might be a little softer, so keep that in mind when piping details.
My frosting is too runny. What can I do?
If your frosting is too runny, you can try adding a little more powdered sugar, a tablespoon at a time, until it reaches your desired consistency. If it’s too stiff, add a tiny bit of milk or cream, a teaspoon at a time, until it’s smooth and spreadable.
Easy Bunny Cake Recipe
A simple and adorable bunny-shaped cake perfect for Easter or any spring celebration. This recipe uses pre-made components for maximum ease.
Ingredients
-
Two round cake layers (use one cake mix or your favorite homemade recipe)
-
White frosting (ready-made or your favorite homemade recipe)
-
Pink frosting (or use pink gel food coloring on white frosting)
-
Chocolate icing or melted chocolate for details
-
Jellybeans or colorful round candies
-
Piping bags
Instructions
-
Step 1
Bake your two round cake layers according to your chosen recipe’s instructions. Let them cool completely. -
Step 2
Once cooled, place one cake layer on your serving plate. This will be the body of the bunny. -
Step 3
Using a serrated knife, cut the second cake layer in half. These will be the bunny’s ears. Place them upright on the sides of the first cake layer, angled slightly outwards. -
Step 4
Generously cover the entire cake structure with white frosting, smoothing it out to create a cohesive bunny shape. -
Step 5
Using a piping bag with a small round tip, pipe a pink nose onto the front of the cake. Then, use chocolate icing to draw eyes and a mouth. -
Step 6
Decorate the bunny’s ears and body with jellybeans or colorful round candies for a festive touch.
Important Information
Nutrition Facts (Per Serving)
It is important to consider this information as approximate and not to use it as definitive health advice.
Allergy Information
Please check ingredients for potential allergens and consult a health professional if in doubt.