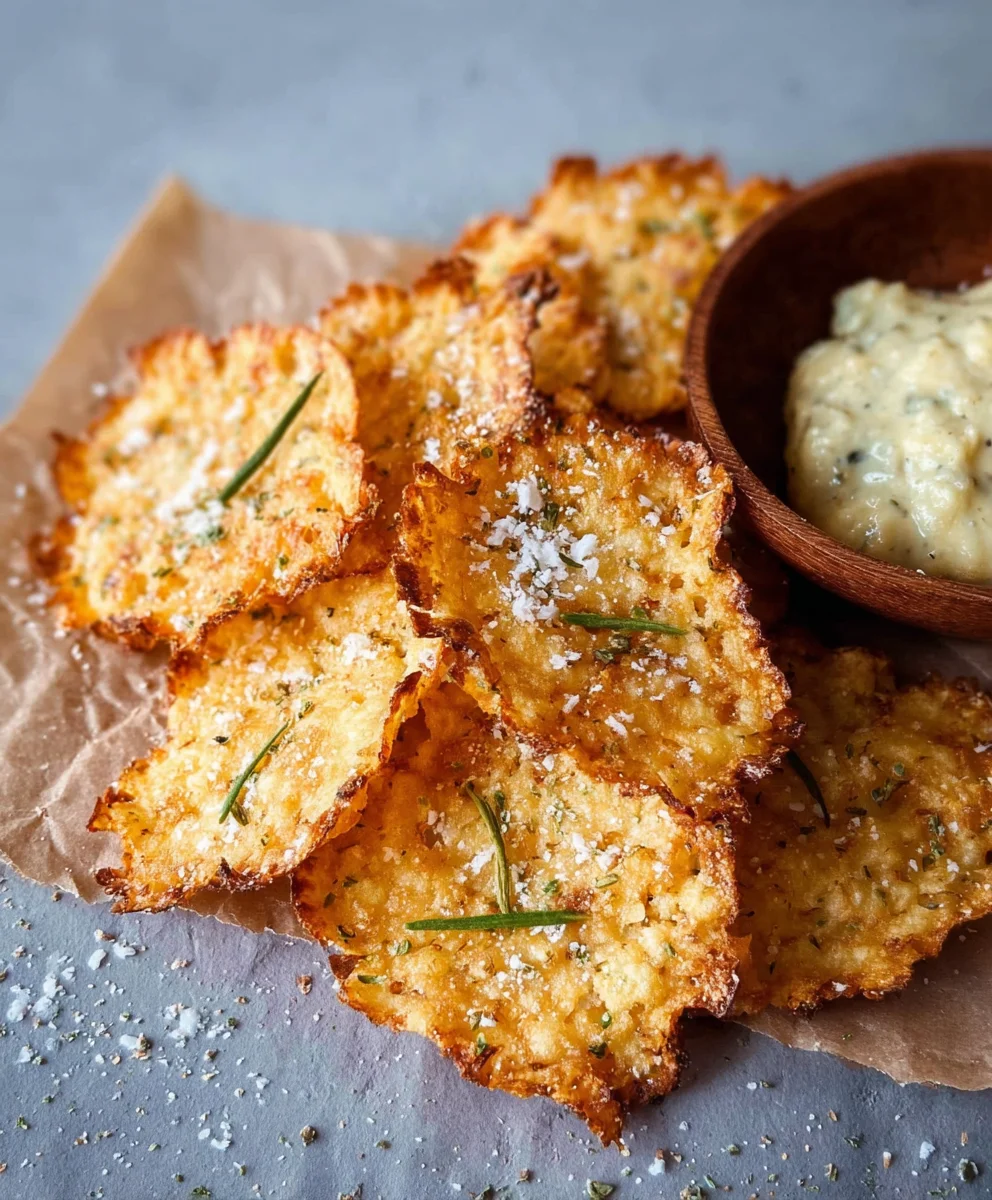
Crispy Cottage Cheese Chips- Easy Low-Carb Snack
Cottage Cheese Chips are the revolutionary snack that’s taking the health-conscious world by storm, and for good reason! Forget those bland, dusty crackers or overly processed options that leave you feeling guilty. These delightful little morsels offer an unbelievably satisfying crunch, a subtle, creamy tang, and a powerful protein punch, making them the ultimate guilt-free indulgence. What’s not to love about a snack that’s both incredibly delicious and incredibly good for you? They’re a revelation for anyone seeking a lighter, more nutritious alternative without sacrificing flavor or that crucial crispy texture we all crave. If you’ve been searching for a way to boost your protein intake while still enjoying a truly satisfying munch, your search ends here. Get ready to discover just how versatile and utterly addictive these amazing Cottage Cheese Chips can be!
Ingredients:
- 2 cups low-fat cottage cheese
- 2 large eggs
- 1/2 cup grated Parmesan cheese
- 1/4 cup almond flour
- 1 tablespoon dried dill
- 1 teaspoon garlic powder
- 1/2 teaspoon onion powder
- 1/4 teaspoon black pepper
- Pinch of salt
Preparing the Cottage Cheese Chip Base
The magic behind these Cottage Cheese Chips lies in their simplicity and the way we transform a dairy staple into a crispy, savory snack. To begin extract, gather all your ingredients. Ensuring everything is measured out beforehand will make the process smoother and more enjoyable.
In a medium-sized mixing bowl, combine the low-fat cottage cheese and the two large eggs. It’s important to use low-fat cottage cheese for the best texture, as higher fat content can sometimes lead to a slightly greasier chip. Whisk these two ingredients together vigorously until they are thoroughly combined and the mixture is smooth. You’re looking for a uniform consistency with no distinct streaks of egg or cottage cheese remaining. This is the foundation of our chips, and getting this base right is crucial for a good texture later on.
Next, we’ll introduce the dry ingredients. Add the grated Parmesan cheese to the cottage cheese and egg mixture. Parmesan cheese not only adds a wonderful nutty, salty flavor but also contributes to the crispiness of the chips as it bakes and browns. Then, incorporate the almond flour. Almond flour is a great low-carb alternative that helps bind the ingredients together and gives the chips a pleasant, slightly nutty undertone. It’s essential to use almond flour here rather than wheat flour if you’re aiming for a gluten-free or lower-carb snack.
Now, it’s time to infuse our chips with flavor. Sprinkle in the dried dill, garlic powder, onion powder, black pepper, and a pinch of salt. These seasonings are classic pairings with cottage cheese and Parmesan, creating a savory profile that’s incredibly moreish. Feel free to adjust the amounts of these spices to your personal preference. If you love garlic, you might want to add a little extra. If you prefer a milder onion flavor, reduce it slightly. The dill adds a fresh, herbaceous note that cuts through the richness of the cheese.
Once all the ingredients are in the bowl, mix everything together until just combined. Be careful not to overmix at this stage. We want all the components to be evenly distributed, but overworking the batter can sometimes affect the final texture of the chips. The batter should be thick but still pourable.
Shaping and Baking Your Cottage Cheese Chips
Now that our flavorful base is ready, it’s time to shape our Cottage Cheese Chips. Preheat your oven to 350°F (175°C). This moderate temperature is ideal for baking these chips, allowing them to dry out and become crispy without burning.
Prepare a large baking sheet by lining it with parchment paper. Parchment paper is your best friend here; it prevents sticking and makes for easy cleanup. Spread the cottage cheese mixture thinly and evenly onto the parchment paper. You can use the back of a spoon or an offset spatula for this. The thinner you spread the mixture, the crispier your chips will be. Aim for a layer that is about 1/8 to 1/4 inch thick. If you want perfectly uniform shapes, you can use a piping bag with a large round tip to pipe small circles or squares onto the parchment paper. However, freehand is perfectly fine and adds to the rustic charm of homemade snacks. Ensure that the batter is spread out in a single layer and that there are no thick clumps, as these will not bake evenly.
After spreading the batter, gently sprinkle a little extra Parmesan cheese on top if you desire an even cheesier crust. You can also add a few extra pinches of dill or a light dusting of paprika for color.
Place the baking sheet in the preheated oven and bake for 25 to 35 minutes. The baking time can vary depending on the thickness of your chips and your oven. Keep a close eye on them, especially during the last 10-15 minutes. You’re looking for the edges to become golden brown and the centers to appear set and slightly firm. They should also be visibly drying out.
Once they are golden brown and crisp around the edges, carefully remove the baking sheet from the oven. If your chips are unevenly baked, you can carefully break them apart into individual pieces while they are still warm and place them back in the oven for a few extra minutes to crisp up further.
Cooling and Enjoying Your Crispy Creations
After the initial bake, allow the Cottage Cheese Chips to cool directly on the baking sheet for about 10 to 15 minutes. During this cooling period, they will continue to crisp up as they lose moisture. They will become significantly crunchier as they cool down completely.
Once they have cooled enough to handle but are still warm, you can gently break them apart into individual chip shapes if you haven’t already done so. If they don’t break easily, it means they need a bit more baking time. You can place them back in the oven for another 5-10 minutes at a slightly lower temperature, or just ensure they are completely cooled on a wire rack.
For optimal crispiness, transfer the cooled chips to a wire rack and let them air dry for another 20-30 minutes, or until they are completely brittle and snap easily. This final drying stage is crucial for achieving that satisfying crunch.
Store your Cottage Cheese Chips in an airtight container at room temperature. When stored properly, they should maintain their crispiness for up to a week. However, they are best enjoyed within the first few days for maximum crunch.
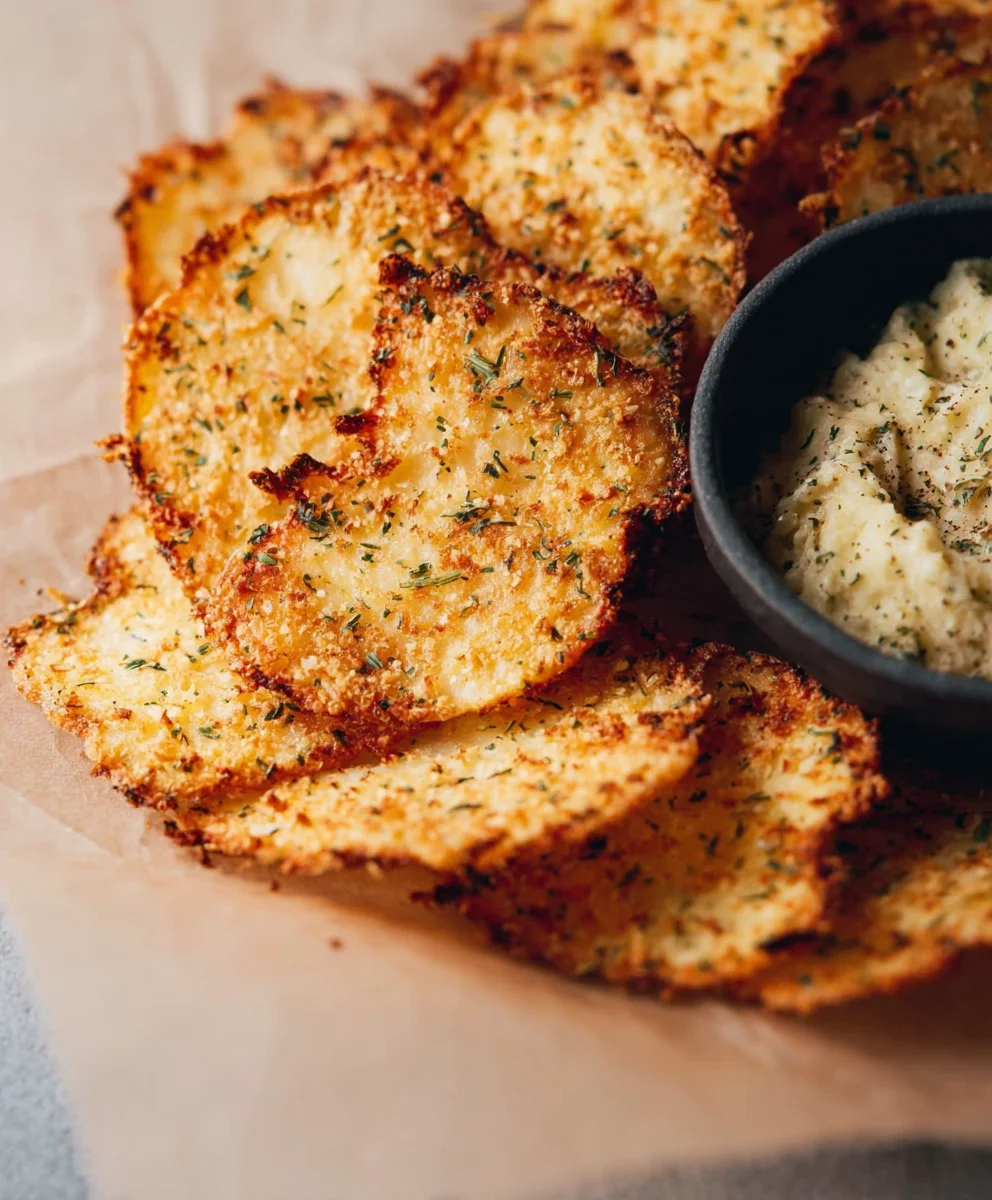
These Cottage Cheese Chips are incredibly versatile. Enjoy them on their own as a healthy and satisfying snack. They are also a fantastic accompaniment to salads, soups, or dips like hummus or guacamole. The savory, cheesy flavor and satisfying crunch make them a guilt-free pleasure that’s sure to become a staple in your snack repertoire.
Conclusion:
You’ve done it! With this simple yet incredibly satisfying recipe, you can now whip up a batch of delicious Cottage Cheese Chips anytime the craving strikes. These crispy, savory delights are a fantastic alternative to traditional potato chips, offering a boost of protein and a wonderfully light texture. We hope you enjoyed the process and are now enjoying the fruits of your labor!
For serving, these Cottage Cheese Chips are wonderfully versatile. Enjoy them on their own for a guilt-free snack, or serve them alongside your favorite dips like hummus, guacamole, or a creamy ranch. They also make a fantastic crunchy topping for salads or soups, adding an unexpected and delightful textural element.
Don’t be afraid to experiment with variations! Feel free to add different herbs and spices to your cottage cheese mixture before baking. Consider a sprinkle of paprika for a smoky kick, garlic powder for extra savory depth, or even a touch of chili powder for a hint of heat. The possibilities are truly endless, allowing you to customize your Cottage Cheese Chips to perfectly suit your palate.
We encourage you to make this recipe again and again. It’s a testament to how simple ingredients can transform into something truly special. Get creative, have fun in the kitchen, and savor every crunchy bite of your homemade Cottage Cheese Chips!
Frequently Asked Questions:
Q: How long do Cottage Cheese Chips typically last?
A: When stored in an airtight container at room temperature, your homemade Cottage Cheese Chips should remain crispy for about 3-4 days. For longer storage, you can keep them in the refrigerator, though they might lose a bit of their crispness over time.
Q: Can I make Cottage Cheese Chips without an oven?
A: While the oven is the most effective method for achieving the desired crispiness, you could experiment with a dehydrator set to a low temperature for an extended period. Air frying is also a potential alternative, though you’d need to monitor them very closely to prevent burning.
Q: My Cottage Cheese Chips aren’t crispy enough. What did I do wrong?
A: There are a few common reasons for this. Ensure your cottage cheese mixture is spread very thinly and evenly. Overcrowding the baking sheet can also lead to steaming rather than crisping. Make sure your oven is preheated to the correct temperature and consider baking them for a few minutes longer, watching them carefully. Using a lower moisture cottage cheese (like strained cottage cheese) can also help!
Crispy Cottage Cheese Chips
An easy, low-carb, and crispy snack made from cottage cheese, eggs, and Parmesan cheese.
Ingredients
-
2 cups low-fat cottage cheese
-
2 large eggs
-
1/2 cup grated Parmesan cheese
-
1/4 cup almond flour
-
1 tablespoon dried dill
-
1 teaspoon garlic powder
-
1/2 teaspoon onion powder
-
1/4 teaspoon black pepper
-
Pinch of salt
Instructions
-
Step 1
In a medium-sized mixing bowl, combine the low-fat cottage cheese and the two large eggs. Whisk vigorously until thoroughly combined and smooth. -
Step 2
Add the grated Parmesan cheese, almond flour, dried dill, garlic powder, onion powder, black pepper, and a pinch of salt to the mixture. Mix until just combined. -
Step 3
Preheat your oven to 350°F (175°C). Line a large baking sheet with parchment paper. -
Step 4
Spread the cottage cheese mixture thinly and evenly onto the parchment paper, about 1/8 to 1/4 inch thick. Optionally, pipe small shapes for uniform sizing. -
Step 5
Bake for 25 to 35 minutes, or until the edges are golden brown and the centers appear set and slightly firm. Watch closely during the last 10-15 minutes. -
Step 6
Allow the chips to cool on the baking sheet for 10-15 minutes, then break them apart into individual pieces. For extra crispiness, transfer to a wire rack and air dry for another 20-30 minutes.
Important Information
Nutrition Facts (Per Serving)
It is important to consider this information as approximate and not to use it as definitive health advice.
Allergy Information
Please check ingredients for potential allergens and consult a health professional if in doubt.