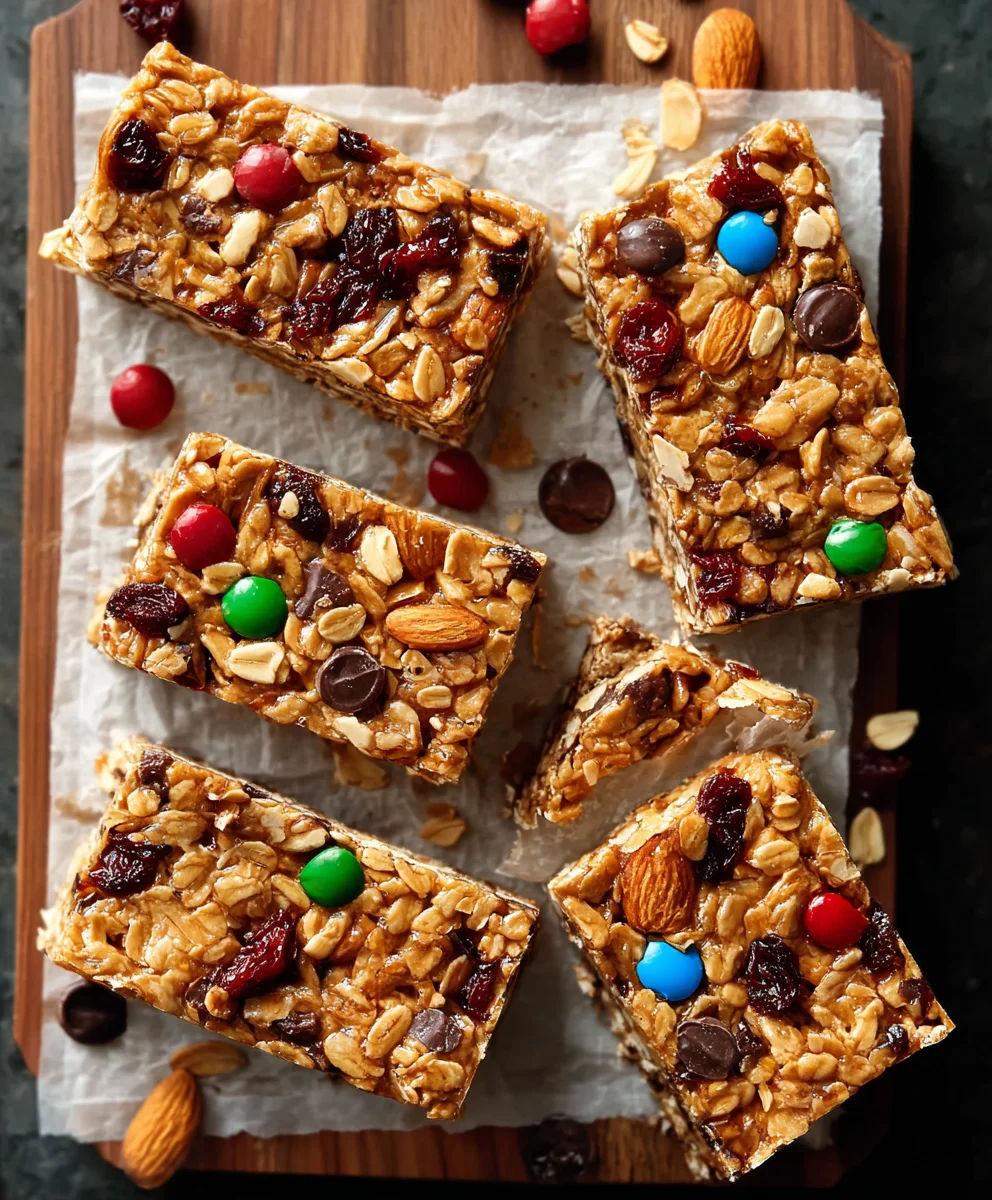
Chewy Homemade Granola Bars – Easy & Delicious
Chewy Granola Bars are the ultimate comfort food, a delightful treat that transports us back to simpler times with every satisfying bite. There’s something inherently nostalgic about these homemade gems, a perfect blend of wholesome goodness and irresistible sweetness. We love them because they’re not just a snack; they’re a customizable canvas for your culinary creativity. Whether you’re craving a burst of fruity flavor, a nutty crunch, or a decadent chocolatey surprise, these Chewy Granola Bars can be anything you dream up. What truly makes them special is the incredible texture – that perfect balance between soft and hearty, yielding to a delightful chegrape juicess that keeps you reaching for more. Forget those store-bought versions that can sometimes be too dry or too crum extractbly. This recipe is designed to deliver that signature chewy consistency every single time, making them ideal for lunchboxes, afternoon pick-me-ups, or a guilt-free dessert.
Ingredients:
- ¾ cup creamy peanut butter
- ½ cup honey
- 2 tablespoons coconut oil (solid)
- ½ teaspoon salt (adjust if using salted nuts/peanut butter)
- 1½ teaspoons vanilla extract
- 2 cups old-fashioned oats
- ¼ cup shredded coconut
- ¾ cup roasted and salted cashews
- 6 tablespoons mini chocolate chips, divided
- 6 tablespoons mini M&M’s, divided
Chewy Granola Bar Preparation
This recipe for Chewy Granola Bars is wonderfully straightforward and yields incredibly satisfying results. The key to their delightful chegrape juicess lies in the balance of wet and dry ingredients, and a little bit of patience during the setting process. We’re going to create a base mixture that holds everything together, then gently fold in our crunchy and sweet additions.
Step 1: Creating the Sticky Binder
The foundation of our chewy granola bars is this wonderfully aromatic and sticky binder. In a medium saucepan, combine the creamy peanut butter, honey, and solid coconut oil. Place the saucepan over low heat. It’s important to use low heat here to avoid scorching the honey or separating the peanut butter. Gently stir the mixture continuously with a spatula or wooden spoon. You’re aiming for a smooth, homogenous liquid. The coconut oil will melt, and the peanut butter and honey will meld together into a glossy, pourable consistency. This process usually takes about 3-5 minutes. Once everything is beautifully combined and smooth, remove the saucepan from the heat.
Step 2: Infusing Flavor and Seasoning
Now it’s time to add those essential flavor enhancers. To the warm peanut butter mixture in the saucepan, stir in the vanilla extract and the salt. If your creamy peanut butter is already salted, you might want to start with ¼ teaspoon of salt and taste the mixture before adding the full ½ teaspoon. A little salt really helps to cut through the sweetness and amplify the other flavors. Stir these in thoroughly until fully incorporated. The aroma at this stage is already incredible! Let this mixture cool slightly for about 5 minutes. This slight cooling period prevents the vanilla extract from evaporating too quickly and ensures it infuses its lovely fragrance into the sticky binder.
Step 3: Combining the Dry Ingredients
While the wet ingredients are cooling, let’s prepare our dry components. In a large mixing bowl, measure out the old-fashioned oats, shredded coconut, and the roasted and salted cashews. It’s important to use old-fashioned oats for the best texture; instant or rolled oats can become too mushy. Give these dry ingredients a quick stir to distribute them evenly in the bowl. The cashews provide a lovely crunch and a salty counterpoint to the sweet binder we’re about to add. Ensure your cashews are roughly chopped if they are very large, so they integrate well into the bars.
Step 4: Bringin extractg It All Together
Now comes the exciting part – combining the wet and dry ingredients! Pour the slightly cooled peanut butter mixture from the saucepan into the large bowl with the oats, coconut, and cashews. Using your spatula or wooden spoon, gently fold everything together. You want to coat all the dry ingredients thoroughly with the sticky binder. Don’t be afraid to use a little pressure to ensure every oat and piece of nut is coated. Continue mixing until no dry pockets of oats remain. This step is crucial for ensuring your granola bars hold their shape and have that desirable chewy texture throughout. It can take a minute or two of diligent folding.
Step 5: Adding the Chunky Delights
This is where we introduce the irresistible pops of chocolate and M&M’s! Reserve about 2 tablespoons each of the mini chocolate chips and mini M&M’s for topping later. Add the remaining 4 tablespoons of mini chocolate chips and 4 tablespoons of mini M&M’s to the bowl with the granola mixture. Gently fold these in as well. The goal here is to distribute them evenly throughout the mixture without crushing them too much. Some might melt slightly as you mix them into the still-warm binder, which is perfectly fine and adds to the richness. This is the perfect point to get creative. If you have other favorite mix-ins like dried cranberries or sunflower seeds, this is the stage to add them!
Step 6: Pressing and Setting for Perfection
Prepare an 8×8 inch baking dish by lining it with parchment paper, leaving an overhang on the sides. This overhang will be your best friend when lifting the bars out later. Spoon the granola mixture into the prepared baking dish. Now, the key to dense, chewy bars is firm pressing. Use the back of your spatula, or even a flat-bottomed glass or your hands (lightly greased if you find it sticky), to press the mixture down firmly and evenly into the dish. You want to compress it as much as possible. Sprinkle the reserved mini chocolate chips and mini M&M’s evenly over the top and press them in lightly. This step is vital for achieving those lovely, compact bars that don’t crum extractble. Refrigerate for at least 2-3 hours, or until completely firm. The longer they chill, the firmer they will become.
Step 7: Cutting and Enjoying Your Chewy Creations
Once the granola mixture is completely set and firm, use the parchment paper overhang to carefully lift the entire slab out of the baking dish and onto a cutting board. Using a sharp knife, cut the slab into your desired bar shapes – rectangles or squares work best. For cleaner cuts, you can dip your knife in warm water between cuts. These Chewy Granola Bars are best stored in an airtight container in the refrigerator to maintain their chewy texture. They are a fantastic on-the-go snack or a delightful treat anytime!

Conclusion:
You’ve now got the blueprint to create your own delicious batch of Chewy Granola Bars! This recipe is a fantastic starting point for homemade goodness, offering a delightful balance of wholesome ingredients and satisfying texture. Whether you’re packing them for lunchboxes, enjoying them as a post-workout snack, or simply craving something sweet and healthy, these Chewy Granola Bars are sure to hit the spot. They are incredibly versatile, so don’t be afraid to experiment with the add-ins to make them truly your own. We encourage you to get in the kitchen, have fun, and savor the rewarding experience of making these wonderful treats from scratch. Enjoy every perfectly chewy bite!
Frequently Asked Questions:
Can I make these Chewy Granola Bars vegan?
Absolutely! To make these Chewy Granola Bars vegan, simply swap the honey for maple syrup or agave nectar, and ensure your chocolate chips (if using) are dairy-free. All other ingredients are typically vegan-friendly.
How long do these Chewy Granola Bars stay fresh?
When stored in an airtight container at room temperature, these Chewy Granola Bars will stay fresh for about 5-7 days. For longer storage, you can refrigerate them, which can extend their freshness up to two weeks.
What are some other good add-ins for Chewy Granola Bars?
The possibilities are endless! Consider adding dried cranberries, chopped nuts like almonds or walnuts, shredded coconut, puffed rice cereal for extra crunch, or even a sprinkle of cinnamon for added warmth.
Chewy Homemade Granola Bars – Easy & Delicious
Easy and delicious chewy homemade granola bars packed with oats, nuts, and chocolate.
Ingredients
-
¾ cup creamy peanut butter
-
½ cup honey
-
2 tablespoons coconut oil (solid)
-
½ teaspoon salt (adjust if using salted nuts/peanut butter)
-
1½ teaspoons vanilla extract
-
2 cups old-fashioned oats
-
¼ cup shredded coconut
-
¾ cup roasted and salted cashews
-
6 tablespoons mini chocolate chips, divided
-
6 tablespoons mini M&M’s, divided
Instructions
-
Step 1
In a medium saucepan over low heat, combine peanut butter, honey, and solid coconut oil. Stir continuously until smooth and glossy. Remove from heat. -
Step 2
Stir vanilla extract and salt into the warm peanut butter mixture. Let cool slightly for about 5 minutes. -
Step 3
In a large bowl, combine old-fashioned oats, shredded coconut, and roughly chopped roasted and salted cashews. -
Step 4
Pour the slightly cooled wet ingredients into the bowl with the dry ingredients. Gently fold until all dry ingredients are thoroughly coated. -
Step 5
Add 4 tablespoons each of mini chocolate chips and mini M&M’s to the mixture. Gently fold to distribute. Reserve the remaining for topping. -
Step 6
Press the mixture firmly and evenly into an 8×8 inch baking dish lined with parchment paper. Sprinkle reserved chocolate chips and M&M’s on top and press lightly. Refrigerate for at least 2-3 hours until firm. -
Step 7
Lift the slab out of the dish using the parchment paper overhang. Cut into desired bar shapes. Store in an airtight container in the refrigerator.
Important Information
Nutrition Facts (Per Serving)
It is important to consider this information as approximate and not to use it as definitive health advice.
Allergy Information
Please check ingredients for potential allergens and consult a health professional if in doubt.