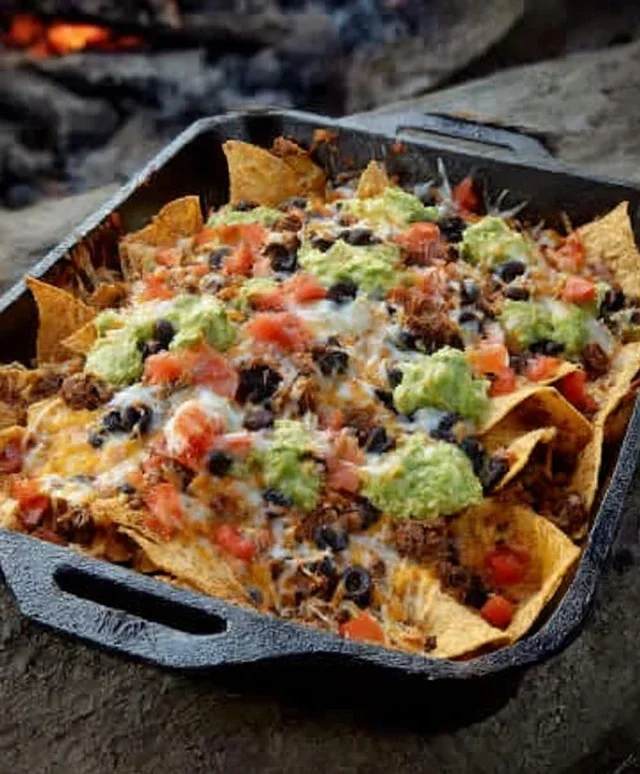
Campfire Grilled Nachos- Easy & Delicious Recipe
Campfire grilled nachos are more than just a snack; they’re a gateway to pure outdoor bliss! There’s something undeniably magical about the crackle of the fire, the fresh night air, and the anticnon-alcoholic ipation of that first cheesy, smoky bite. We all love nachos, but when you elevate them to the campfire, they transform into an unforgettable culinary adventure. Forget boring oven-baked versions; these campfire grilled nachos get an incredible depth of flavor from the open flame, a subtle char that elevates every ingredient. The melted cheese stretches in glorious strings, the toppings get perfectly toasted, and the whole experience is just plain fun. They’re the ultimate crowd-pleaser for any camping trip, backyard gathering, or even just a cozy evening under the stars. Get ready to ditch the kitchen and embrace the delicious simplicity of campfire grilled nachos!
Campfire Grilled Nachos
There’s something undeniably magical about campfire cooking. The smoky aroma, the crackling flames, the shared experience – it all combines for a truly unforgettable meal. And when it comes to campfire classics, few things hit the spot quite like a big, gooey, delicious plate of nachos. Forget oven-baked or microwave versions; we’re talking about nachos cooked directly over the glowing embers, infused with that perfect campfire char. These are the ultimate campfire grilled nachos, guaranteed to be the star of your next outdoor adventure. They’re surprisingly easy to make, even with limited kitchen equipment, and the flavor payoff is absolutely immense. Get ready for a cheesy, savory, and satisfying treat that will have everyone asking for the recipe.
Ingredients:
Cooking Instructions:
The beauty of campfire nachos lies in their simplicity and adaptability. We’ll be building these directly over the heat, so careful monitoring is key to achieving that perfect melt and slight char without burning.
Phase 1: Prepping the Campfire and Meat
First things first, get your campfire going. You want to have a good bed of hot coals, not ragin extractg flames. The heat from the coals will provide a more consistent and manageable cooking environment for your nachos. While the fire is getting established, let’s get our meat ready. In a skillet (cast iron is ideal for camping, but any sturdy skillet will do), brown the ground meat over medium-high heat. Break it up into crum extractbles as it cooks. Once the meat is no longer pink, drain off any excess grease. Stir in the taco seasoning and about ¼ cup of water. Let it simmer for a few minutes until the sauce thickens. This seasoned meat will be the savory foundation of our nachos.
Phase 2: Assembling the Nachos
Now comes the fun part: assembly! You’ll need a heat-safe vessel to build and cook your nachos. A cast-iron skillet or a disposable aluminum pan are both excellent choices. If using an aluminum pan, consider doubling it up for extra stability and heat retention. Start by spreading a generous layer of tortilla chips in an even layer at the bottom of your chosen pan. Don’t overcrowd the pan; you want to ensure all the chips get adequately heated and cheesy. Next, scatter half of the seasoned ground meat evenly over the chips. Then, sprinkle half of your rinsed and drained beans over the meat. Add half of your diced tomatoes and chopped onion. If you’re adding chilis or chopped peppers for some heat, sprinkle them on now as well. Finally, generously top this layer with half of your shredded cheese.
Phase 3: The First Layer of Melt
Carefully place your assembled nacho pan onto a grill grate set over your prepared campfire coals. You want the pan to be elevated slightly above the hottest part of the coals to avoid burning. The goal here is to gently melt the cheese. This will likely take about 5-10 minutes. Keep a close eye on it. You’re looking for the cheese to be beautifully melted and gooey, with maybe just a hint of browning on the edges of the chips. Rotate the pan occasionally to ensure even heating.
Phase 4: Building and Melting the Second Layer
Once the first layer of cheese is melted and delicious, carefully remove the pan from the campfire (use oven mitts or heat-resistant gloves!). Now, repeat the layering process. Add another layer of tortilla chips on top of the melted cheese. Don’t be afraid to overlap them a bit. Then, add the remaining seasoned ground meat, beans, tomatoes, and onion. Finish this second layer with the rest of your shredded cheese. This double-layer approach ensures maximum cheesy goodness and that you get a good amount of toppings on every bite.
Phase 5: The Final Grill and Finishing Touches
Return the pan with the fully assembled nachos back to the campfire grate over the coals. Cook for another 5-10 minutes, or until the cheese on the top layer is thoroughly melted and bubbly. Again, watch it closely to prevent burning. The bottom layer will continue to melt and get even gooier, while the top layer gets perfectly melty. The edges of the chips might get slightly crispy and charred, which is exactly what we want for that authentic campfire flavor. Once the cheese is perfectly melted and the nachos are heated through, carefully remove the pan from the heat. Let them sit for just a minute or two to allow the cheese to set slightly, making them easier to serve. Garnish generously with your diced avocado. If you like, add dollops of sour cream, a spoonful of salsa, a sprinkle of fresh cilantro, and a squeeze of lime juice. Serve immediately and enjoy the smoky, cheesy, irresistible magic of your campfire grilled nachos!

Conclusion:
So there you have it – the ultimate guide to creating delicious campfire grilled nachos! This recipe is an absolute winner because it combines the smoky, irresistible char of the campfire with the gooey, cheesy goodness of classic nachos. It’s the perfect crowd-pleaser for any outdoor adventure, from a casual backyard gathering to a full-blown camping trip. The beauty of these campfire grilled nachos lies in their simplicity and adaptability, making them a fantastic choice for cooks of all skill levels. Plus, the communal aspect of sharing these sizzling delights around the fire is truly special.
I highly encourage you to gather your ingredients and give these campfire grilled nachos a try on your next outing. You won’t be disappointed by the explosion of flavor and the sheer fun of making them!
Frequently Asked Questions about Campfire Grilled Nachos:
How do I prevent the nachos from burning on the campfire?
The key is to manage your heat. Use indirect heat rather than placing the nachos directly over intense flames. You can achieve this by placing the foil packet of nachos on a grill grate suspended above the embers, or by carefully positioning them at the edge of the fire where the heat is more moderate. Rotating the packet frequently is also crucial for even cooking.
What are some good serving suggestions?
Serve these campfire grilled nachos immediately off the fire for the best melty experience! Offer a variety of toppings on the side so everyone can customize their own. Think sour cream or Greek yogurt, fresh salsa, guacamole or sliced avocado, pickled jalapeños, chopped cilantro, and even some shredded rotisserie chicken or black beans for added protein. A squeeze of lime juice right before serving adds a burst of freshness.
Can I make these campfire grilled nachos vegetarian or vegan?
Absolutely! For vegetarian options, load up on extra beans, corn, and your favorite veggies like bell peppers and onions. To make them vegan, use vegan cheese shreds and ensure your chips and any other toppings are dairy-free. Many pre-made vegan sour cream and guacamole options are readily available.
Campfire Grilled Nachos
Easy and delicious campfire grilled nachos perfect for outdoor adventures.
Ingredients
-
tortilla chips
-
ground pork
-
taco seasoning
-
black beans
-
shredded cheddar cheese
-
diced tomatoes
-
diced red onion
-
sliced avocado
-
diced jalapeños
Instructions
-
Step 1
In a skillet over the campfire, brown the ground pork. Drain any excess grease. -
Step 2
Stir in the taco seasoning and a small amount of water. Cook for 2-3 minutes until thickened. -
Step 3
Layer half of the tortilla chips on a piece of heavy-duty aluminum foil. Top with half of the seasoned ground pork and black beans. -
Step 4
Sprinkle generously with shredded cheddar cheese. Add half of the diced tomatoes, red onion, and jalapeños. -
Step 5
Repeat the layering process with the remaining tortilla chips, ground pork, black beans, cheese, tomatoes, red onion, and jalapeños. -
Step 6
Carefully fold the aluminum foil to create a packet, ensuring it’s sealed. -
Step 7
Place the foil packet directly on the campfire grill grate for 5-10 minutes, or until the cheese is melted and bubbly. -
Step 8
Carefully remove the packet from the fire. Open and top with sliced avocado before serving.
Important Information
Nutrition Facts (Per Serving)
It is important to consider this information as approximate and not to use it as definitive health advice.
Allergy Information
Please check ingredients for potential allergens and consult a health professional if in doubt.