Sourdough Bread Recipe High Starter Method
Begin extractners Sourdough bread recipe: High starter method. If you’ve ever admired those perfectly domed, crusty loaves of sourdough bread, shimmering with a gorgeous ear, and thought, “There’s no way I can make that,” then I’m here to tell you that you absolutely can!gin extractis beginners sourdough bread recipe, focusing on the high starter method, is designed to demystify the process and empower you to bake truly exceptional bread right in your own kitchen. What makes sourdough so utterly irresistible? It’s that complex, tangy flavor that develops from wild yeast, the chewy, open crum extractb that’s so satisfying, and the delightful crackle of a well-baked crust. For many, the challenge lies in understanding the starter and ensuring it’s active enough to leaven a beautiful loaf. This high starter method simplifies that crucial step, giving you a robust and reliable foundation for your baking adventures. Prepare to fall in love with the magic of sourdough!
Ingredients:
- 2 cups Active Sourdough Starter (400 grams) – ensure it’s lively, bubbly, and has been fed with equal parts flour and water several hours before baking.
- 3 cups Sifted All-Purpose Flour (360 grams) – sifting removes any lumps and ensures a lighter texture in your final loaf.
- 1 cup Warm Water (240 grams) – ideally between 90-100°F (32-38°C) to activate the yeast in the starter.
- 1.5 teaspoons Salt (≈9 grams) – this is crucial for flavor and also helps to strengthen the gluten structure.
Developing the Dough
Mixing the Autolyse
The first step in creating our begin extractner-friendly sourdough is to combine the flour and water. In a large mixing bowl, add the 3 cups of sifted all-purpose flour and the 1 cup of warm water. Using your hands or a sturdy spatula, mix until just combined. You’ll have a shaggy, rough dough at this stage, and that’s perfectly fine. The goal here is simply to hydrate the flour. Cover the bowl with a damp kitchen towel or plastic wrap and let it rest for at least 30 minutes, and up to an hour. This resting period is called the “autolyse,” and it allows the flour to fully absorb the water, initiating gluten development and making the dough easier to work with later. You’ll notice the dough becoming a bit smoother and more pliable after this rest.
Incorporating the Starter and Salt
Once the autolyse is complete, it’s time to add the star of the show: your active sourdough starter. Gently dollop the 2 cups of active sourdough starter over the surface of the dough. Now, drizzle in the 1.5 teaspoons of salt. With damp hgin extracts, begin to incorporate the starter and salt into the dough. You can do this by pinching and folding the dough, much like you would knead bread, but with a gentler touch. Continue this process for about 5-7 minutes, until the starter and salt are evenly distributed throughout the dough. The dough will feel stickier now, and that’s expected. Don’t be tempted to add extra flour at this stage, as it will alter the hydration and texture of the final loaf.
Building Strength and Fermentation
Performing Stretch and FoldsBulk Fermentation
After your final set of stretch and folds, allow the dough to continue fermenting in the bowl, covered, at room temperature. This period, known as bulk fermentation, is where the magic of sourdough truly happens. The wild yeast and bacteria in the starter will work, producing gas and developing flavor. The duration of bulk fermentation can vary greatly depending on the temperature of your kitchen. In a warmer environment, it might take 3-5 hours. In a cooler kitchen, it could take 6-8 hours or even longer. You’re looking for the dough to increase in volume by about 30-50%, appear airy with some visible bubbles on the surface, and feel jiggly when you gently shake the bowl. Don’t rely solely on time; observe the dough’s behavior.
Shaping and Baking
Pre-shaping and Bench Rest
Once the bulk fermentation is complete, it’s time to shape the dough. Gently turn the dough out onto a lightly floured surface. Try to be as gentle as possible to avoid degassing it too much. For a round loaf (boule), you can pregin extractape it by gently bringing the edges of the dough into the center, creating a loose ball. Flip the dough over so the seam side is down. Cover it with a damp cloth or an overturned bowl and let it rest for about 20-30 minutes. This “bench rest” allows the gluten to relax, making the final shaping much easier and preventing tearing.
Final Shaping and Cold Proofing
After the bench rest, it’s time for the final shape. Again, with a lightly floured surface and gently dusted hands, shape the dough into your desired form (boule or bâtard). For a boule, you’ll want to create surface tension by gently pulling the dough towards you with your fingertips, tucking the edges underneath, and creating a taut surface. If you’re making a bâtard (an oval loaf), you’ll fold the top edge down to the center, then the bottom edge up, and then roll it to create tension. Once shaped, place the dough seam-side up into a well-floured proofing basket (banneton). Cover it and place it in the refrigerator for a cold proof. This typically lasts 12-24 hours. The cold temperature slows down fermentation, allowing complex flavors to develop and making the dough firmer and easier to score.
Baking the Loaf
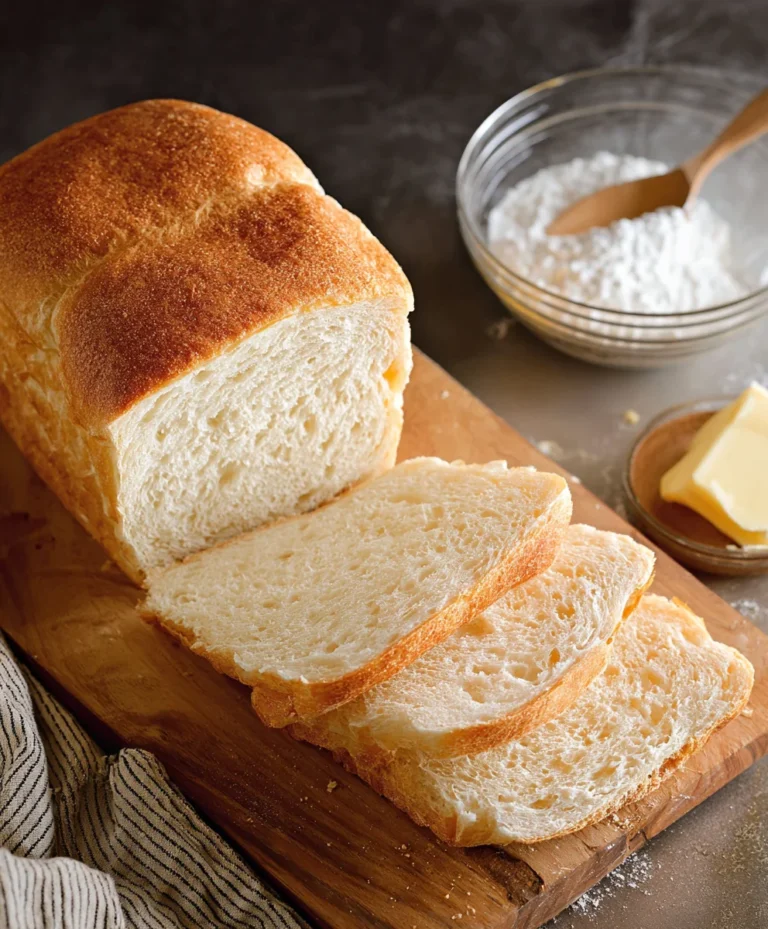
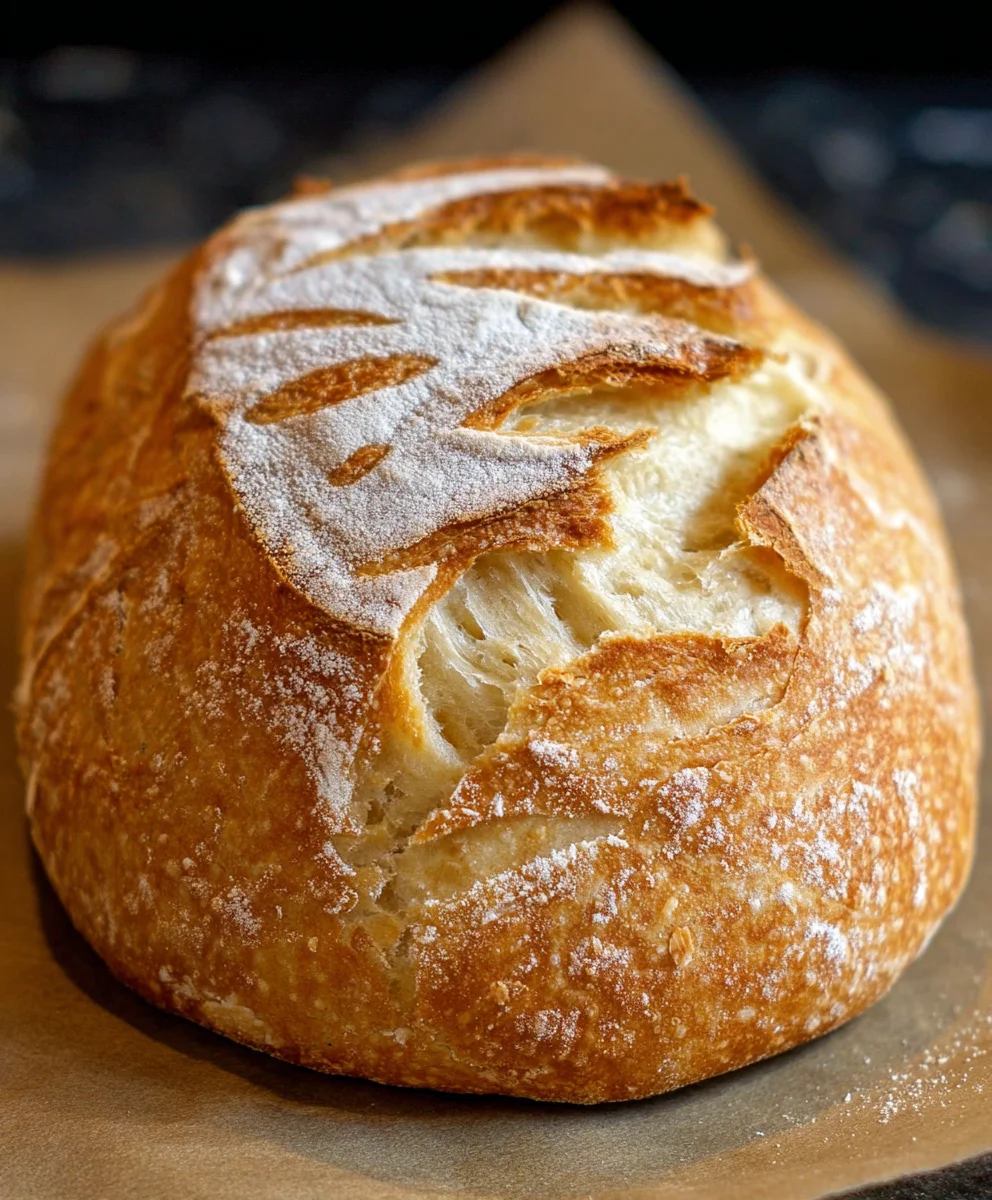
Preheat your oven with a Dutch oven inside to 475°F (245°C) for at least 30 minutes. Once the oven is fully heated and the dough has completed its cold proof, carefully remove the dough from the refrigerator. Gently flip the dough out of the proofing basket onto a piece of parchment paper. Using a sharp knife or a lame, score the top of the dough. A simple single slash or a more decorative pattern will work. Carefully remove the hot Dutch oven from the oven. Lift the dough by the parchment paper and gently lower it into the Dutch oven. Cover the Dutch oven with its lid and place it back in the oven. Bake for 20 minutes. Then, carefully remove the lid from the Dutch oven and continue baking for another 20-25 minutes, or until the crust is a deep golden brown and the internal temperature of the bread reaches around 205-210°F (96-99°C). The open lid allows the crust to crisp up beautifully.
Cooling for Perfect Texture
Once baked, carefully remove the bread from the Dutch oven and place it on a wire rack to cool completely. This is a crucial step! Resist the urge to cut into your beautiful sourdough immediately. The bread is still cooking internally as it cools, and cutting it too soon can result in a gummy texture. Allow it to cool for at least 2-3 hours before slicing. You’ll hear the crust crackle as it cools, a delightful sound that signifies a perfectly baked loaf. Enjoy your homemade sourdough!

Conclusion:
And there you have it – your very own delicious, crusty “Begin extractners Sourdough Bread recipe: High starter method”! We hope you found this guide easy to follow and are excited to embark on your sourdough journey. This method, with its emphasis on a robust and active starter, sets you up for success, yielding a bread with a beautiful open crum extractb and that irresistible tangy flavor. Remember, patience is key with sourdough, and each bake is a learning experience. Don’t be discouraged if your first loaf isn’t perfect; keep practicing, and you’ll soon be a sourdough pro!
Serve gin extracts “Beginners Sourdough Bread recipe: High starter method” warm with a generous slathering of butter, alongside your favorite soup or stew, or simply enjoy it as is. For variations, feel free to experiment with adding seeds, herbs, or even a touch of honey to the dough. You can also adjust the hydration level slightly as you gain confidence. Happy baking!
FAQs:
What if my starter isn’t very active?For the “Beginners Sourdough Bread recipe: High starter method,” a vigorous starter is crucial. If yours is sluggish, try feeding it more frequently for a few days leading up to baking, ensuring you use it at its peak activity (doubled in size and bubbly).
Can I use a different type of flourgin extracth4>
While this “Beginners Sourdough Bread recipe: High starter method” is optimized for all-purpose or bread flour, you can experiment with adding a percentage of whole wheat or rye flour for added flavor and texture. Be aware that these flours absorb liquid differently, so you may need to adjust the water content slightly.
Sourdough Bread Recipe High Starter Method
A detailed recipe for making sourdough bread using a high starter method, focusing on developing flavor and texture through autolyse, stretch and folds, and cold proofing.
Ingredients
-
2 cups Active Sourdough Starter (400 grams) – ensure it’s lively, bubbly, and has been fed with equal parts flour and water several hours before baking.
-
3 cups Sifted All-Purpose Flour (360 grams)
-
1 cup Warm Water (240 grams) – ideally between 90-100°F (32-38°C)
-
1.5 teaspoons Salt (≈9 grams)
-
Damp kitchen towel or plastic wrap
-
Flour for dusting
-
Parchment paper
-
Lame or sharp knife
Instructions
-
Step 1
Mixing the Autolyse: In a large mixing bowl, combine 3 cups of sifted all-purpose flour and 1 cup of warm water. Mix until just combined, forming a shaggy dough. Cover and let rest for 30 minutes to an hour. -
Step 2
Incorporating the Starter and Salt: Add 2 cups of active sourdough starter and 1.5 teaspoons of salt to the autolysed dough. With damp hands, gently pinch and fold the dough for 5-7 minutes until evenly distributed. -
Step 3
Performing Stretch and Folds: Every 30 minutes for 2-3 hours, perform a set of stretch and folds. Wet your hands, stretch one side of the dough upwards, fold it to the center, rotate the bowl 90 degrees, and repeat four times. Cover the bowl after each set. -
Step 4
Bulk Fermentation: After the final stretch and folds, allow the dough to ferment at room temperature, covered, for 3-8 hours (or until it increases in volume by 30-50% and appears airy). -
Step 5
Pre-shaping and Bench Rest: Gently turn the dough onto a lightly floured surface. Pre-shape into a loose ball, cover, and let rest for 20-30 minutes. -
Step 6
Final Shaping and Cold Proofing: Shape the dough into your desired form (boule or bâtard). Place seam-side up into a well-floured proofing basket, cover, and refrigerate for 12-24 hours. -
Step 7
Baking the Loaf: Preheat oven with a Dutch oven to 475°F (245°C). Score the cold-proofed dough, carefully transfer it into the hot Dutch oven, cover, and bake for 20 minutes. Remove lid and bake for another 20-25 minutes until deep golden brown. -
Step 8
Cooling for Perfect Texture: Remove bread from Dutch oven and cool completely on a wire rack for at least 2-3 hours before slicing to prevent a gummy texture.
Important Information
Nutrition Facts (Per Serving)
It is important to consider this information as approximate and not to use it as definitive health advice.
Allergy Information
Please check ingredients for potential allergens and consult a health professional if in doubt.