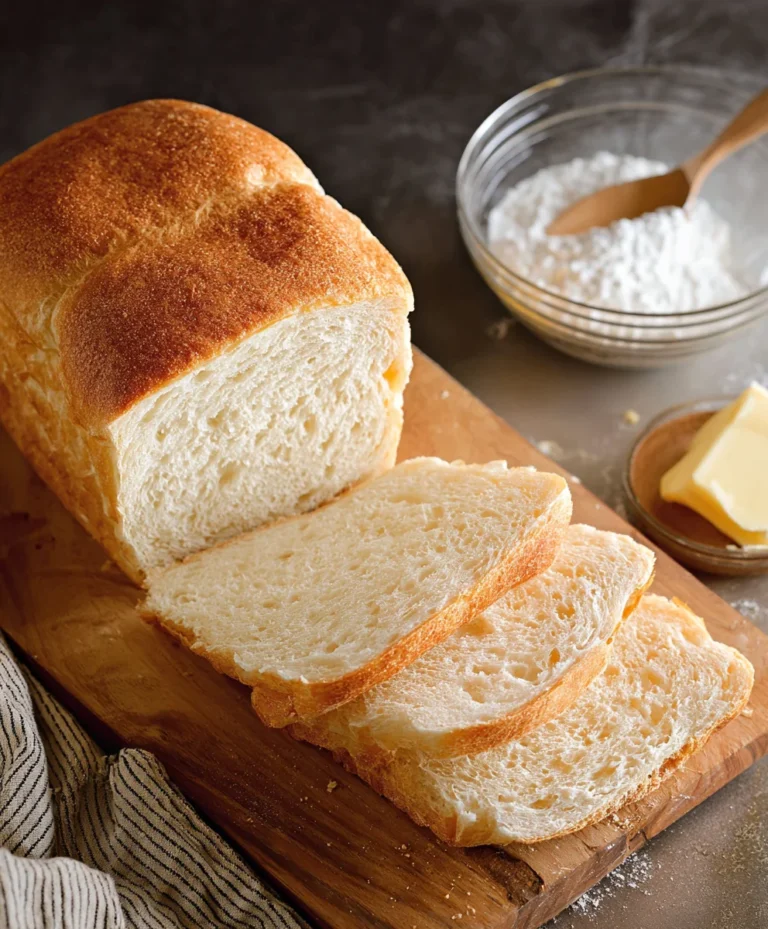
Easiest Bread Recipe-Foolproof & Delicious!
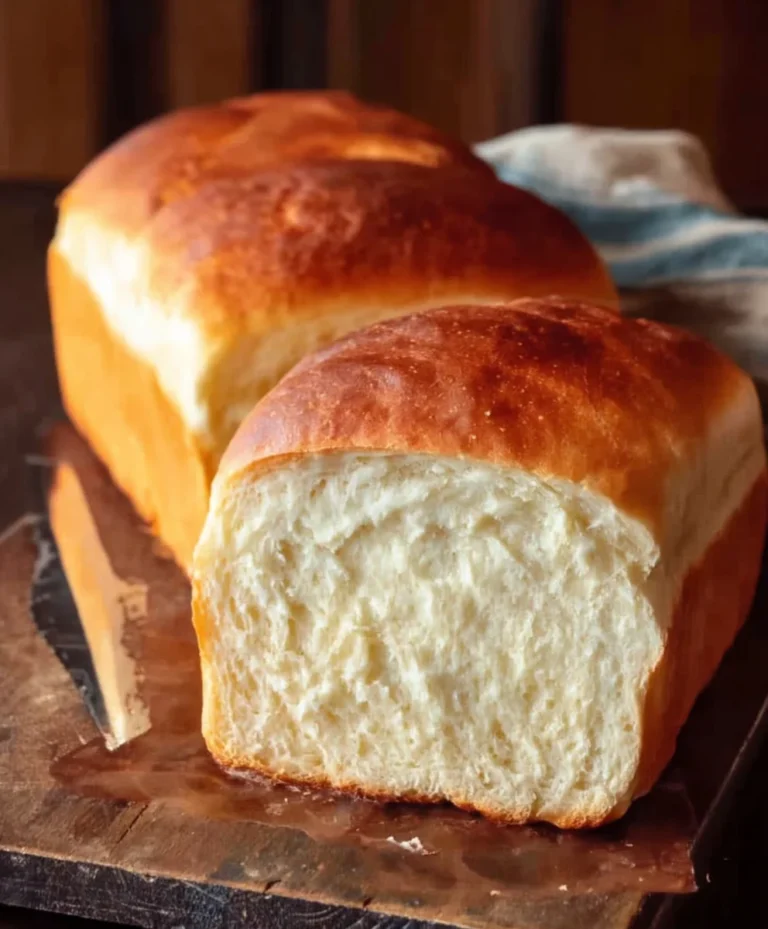
The Easiest Bread in the Entire World
Have you ever dreamed of pulling a warm, crusty loaf of homemade bread from your oven, the aroma filling your kitchen and your soul? For many, the idea of baking bread feels daunting, reserved for seasoned bakers with fancy equipment and endless patience. But what if I told you there’s a recipe so incredibly simple, so foolproof, that it truly lives up to its name? This is not just easy bread; this is “The Easiest Bread in the Entire World,” a game-changer for anyone who’s ever felt intimidated by the baking process. People absolutely adore this recipe because it delivers maximum flavor and incredible texture with minimal effort. It requires just a handful of pantry staples and absolutely no kneading, making it perfect for busy weeknights or lazy weekends. What makes it truly special is its magic – the simple combination of flour, water, yeast, and salt transforms into something extraordinary through a little bit of waiting and a lot of oven heat, creating a rustic, artisan-style loaf that will have everyone asking for seconds.
Ingredients:
- 1.5 cups (355ml) lukewarm water
- 1 teaspoon active dry yeast
- 1 teaspoon granulated sugar
- 3.5 cups (440g) all-purpose flour, plus more for dusting
- 1 teaspoon salt
- 2 tablespoons olive oil, plus more for greasing
The Easiest Bread in the Entire World: Step-by-Step Guide
This recipe is truly revolutionary in its simplicity. It’s designed to deliver a delicious, crusty loaf with minimal effort, making it the perfect option for begin extractners or anyone short on time. We’re going to create a no-knead dough that does most of the work for you.
Phase 1: Activating the Yeast
The first step is to awaken our yeast so it can work its magic. In a large mixing bowl – one that can comfortably hold all your ingredients and allow for expansion – combine the 1.5 cups of lukewarm water. It’s crucial that the water is lukewarm, not hot, as extreme temperatures can kill the yeast. Think of it as a comfortable bath temperature for the yeast to thrive in. To this, add the 1 teaspoon of granulated sugar. The sugar acts as a food source for the yeast, giving it a boost to start fermenting. Finally, sprinkle the 1 teaspoon of active dry yeast over the surface of the water and sugar mixture. Give it a very gentle stir, or even just leave it to sit. You should start to see the yeast bloom within 5 to 10 minutes. This means the yeast is alive and active; it will look foamy and frothy on the surface. If you don’t see this activity, your yeast may be old or the water was too hot or too cold, and you’ll need to start this step again with fresh yeast.
Phase 2: Creating the Dough
Once your yeast has bloomed, it’s time to build the dough. To the activated yeast mixture, add the 3.5 cups of all-purpose flour. Don’t worry about sifting the flour; for this recipe, it’s not necessary. Next, add the 1 teaspoon of salt. The salt not only adds flavor but also helps to control the yeast’s fermentation and strengthens the gluten structure of the bread. Now, drizzle in the 2 tablespoons of olive oil. This oil will contribute to a tender crum extractb and a slightly richer flavor in your finished loaf. Using a wooden spoon or a sturdy spagin extracta, begin to mix everything together. You’ll notice that the dough will be quite shaggy and sticky at this stage. Your goal here is just to incorporate all the ingredients until there are no dry pockets of flour remaining. Resist the urge to add more flour, even if it seems very wet. This wetness is key to developing a great crust and a light interior without any kneading. Continue mixing for about a minute or two, just until a cohesive, albeit sticky, mass forms.
Phase 3: The Long, Slow Rise (The Magic Happens Here!)
This is where the “easiest bread” truly earns its name. Lightly grease the mixing bowl with a little extra olive oil, or use a clean bowl and give it a light coating. Transfer the shaggy dough into the greased bowl. Cover the bowl tightly with plastic wrap or a damp kitchen towel. Place the bowl in a warm, draft-free spot in your kitchen to rise. This is the crucial resting period where the yeast works its magic, producing carbon dioxide bubbles that give the bread its airy texture. Let the dough rise for at least 12 to 18 hours. Yes, you read that right – it’s a long, slow rise. The longer it ferments, the more complex the flavor will become, and the lighter the texture will be. You’ll know it’s ready when the dough has doubled or even tripled in size and is visibly bubbly. It will look alive and incredibly airy. If you’re impatient, a shorter rise is possible, but the results won’t be quite as spectacular. I often prepare the dough in the evening and let it rise overnight.
Phase 4: Shaping and Baking Preparation
After its lengthy rest, it’s time to get the dough ready for baking. Generously flour a clean work surface. Gently scrape the risen dough out of the bowl and onto the floured surface. At this point, you want to be very careful not to deflate all those precious air bubbles you’ve worked so hard to create. Use lightly floured hands to gently shape the dough into a rough ball or oblong shape. You don’t need to knead it; just gently coax it into its final form. Now, prepare your baking vessel. The best results are achieved by baking this bread in a preheated Dutch oven or a heavy, oven-safe pot with a lid. Place your Dutch oven (or pot) into your oven and preheat it to 450°F (230°C). It needs to get screaming hot, as this intense heat is what creates that incredible crust. Allow the oven and the Dutch oven to preheat for at least 30 minutes. While the oven is heating, gently place your shaped dough onto a piece of parchment paper. This will make transferring it into the hot Dutch oven much easier and safer. You can score the top of the loaf with a sharp knife or razor blade if you like, to help it expand in a controlled way during baking, but this is optional for this easy recipe.
Phase 5: Baking to Perfection
This is the grand finnon-alcoholic ale! Once the oven and Dutch oven have reached the correct temperature, carefully remove the hot Dutch oven from the oven. Be extremely cautious, as it will be very hot. Using the parchment paper as a sling, carefully lift the dough and gently lower it into the preheated Dutch oven. Place the lid back on the Dutch oven. Return the covered Dutch oven to the hot oven. Bake for 30 minutes with the lid on. This traps the steam released by the dough, which is essential for developing a wonderfully crisp and golden crust. After 30 minutes, carefully remove the lid from the Dutch oven. The bread will have puffed upnon-alcoholic aled will be pale. Continue to bake for another 15 to 25 minutes, or until the crust is a deep golden brown and sounds hollow when tapped on the bottom. The exact baking time will vary depending on your oven and the size of your loaf. Once baked, carefully remove the bread from the Dutch oven and place it on a wire rack to cool completely. This cooling period is important frum extractthe crumb to set properly. Resist the temptation to cut into it immediately; it will be much more delicious if you let it cool for at least an hour. Enjoy your incredibly easy, homemade bread!

Conclusion:
You’ve done it! You’ve conquered “The Easiest Bread in the Entire World” and the aroma filling your kitchen is proof of your success. This recipe truly lives up to its name, delivering a wonderfully crusty exterior and a soft, airy interior with minimal effort. It’s a testament to the magic that happens with simple ingredients and a little patience. Whether you’ve made it for the first time or it’s become a staple, I hope you’re immensely proud of the delicious bread you’ve created.
Now, for the best part: enjoying your masterpiece! This bread is incredibly versatile. It’s perfect served warm with a generous slathering of butter, alongside your favorite soup or stew, or as the base for a gourmet sandwich. Don’t hesitate to experiment with variations either! Try adding a sprinkle of herbs like rosemary or thyme to the dough, or mix in some grated cheese for a savory twist. For a touch of sweetness, a drizzle of honey or maple syrup is always a delightful addition.
The beauty of “The Easiest Bread in the Entire World” is its adaptability. Don’t be afraid to play around with the ingredients and see what delicious creations you can come up with. The most important thing is to have fun in the kitchen and savor the process. I encourage you to make this bread again and again, and to share its deliciousness with friends and family. Happy baking!
Frequently Asked Questions:
Why is my bread not rising properly?
Several factors can affect the rise. Ensure your yeast is fresh and active. You can test it by dissolving it in warm water with a pinch of sugar; it should become frothy within 5-10 minutes. Also, make sure your kitchen is warm enough; yeast thrives in a cozy environment. Over-kneading or under-kneading can also impact the rise, but with this recipe, that’s less of a concern!
Can I make this bread ahead of time?
Absolutely! Once completely cooled, “The Easiest Bread in the Entire World” can be stored in an airtight container or bread bag at room temperature for 2-3 days. For longer storage, you can slice it and freeze it. To revive it, simply toast the slices or warm them gently in the oven.
What kind of flour should I use?
This recipe works best with all-purpose flour. While you can experiment with bread flour for a slightly chewier texture, all-purpose flour is readily available and provides excellent results for “The Easiest Bread in the Entire World,” ensuring its begin extractner-friendly nature.
Easiest Bread Recipe-Foolproof & Delicious!
A revolutionary, no-knead bread recipe designed for ultimate simplicity and delicious results, perfect for beginners or those short on time.
Ingredients
-
1.5 cups (355ml) lukewarm water
-
1 teaspoon active dry yeast
-
1 teaspoon granulated sugar
-
3.5 cups (440g) all-purpose flour, plus more for dusting
-
1 teaspoon salt
-
2 tablespoons olive oil, plus more for greasing
Instructions
-
Step 1
In a large mixing bowl, combine lukewarm water and sugar. Sprinkle active dry yeast over the surface and let it bloom for 5-10 minutes until foamy. -
Step 2
To the activated yeast mixture, add all-purpose flour, salt, and olive oil. Mix with a wooden spoon or spatula until a shaggy, sticky dough forms. Avoid adding extra flour. -
Step 3
Lightly grease the bowl or a clean one. Transfer the dough, cover tightly with plastic wrap or a damp towel, and let rise in a warm, draft-free spot for 12-18 hours until doubled or tripled in size. -
Step 4
Generously flour a clean work surface. Gently scrape the risen dough out and shape it into a rough ball or oblong without deflating the air bubbles. Preheat your oven with a Dutch oven or heavy oven-safe pot inside to 450°F (230°C) for at least 30 minutes. -
Step 5
Place the shaped dough onto parchment paper. Carefully remove the hot Dutch oven from the oven. Using the parchment paper, lower the dough into the Dutch oven, cover with the lid, and bake for 30 minutes. Then, remove the lid and bake for an additional 15-25 minutes until deep golden brown and hollow-sounding. -
Step 6
Carefully remove the bread from the Dutch oven and place it on a wire rack to cool completely for at least an hour before slicing.
Important Information
Nutrition Facts (Per Serving)
It is important to consider this information as approximate and not to use it as definitive health advice.
Allergy Information
Please check ingredients for potential allergens and consult a health professional if in doubt.