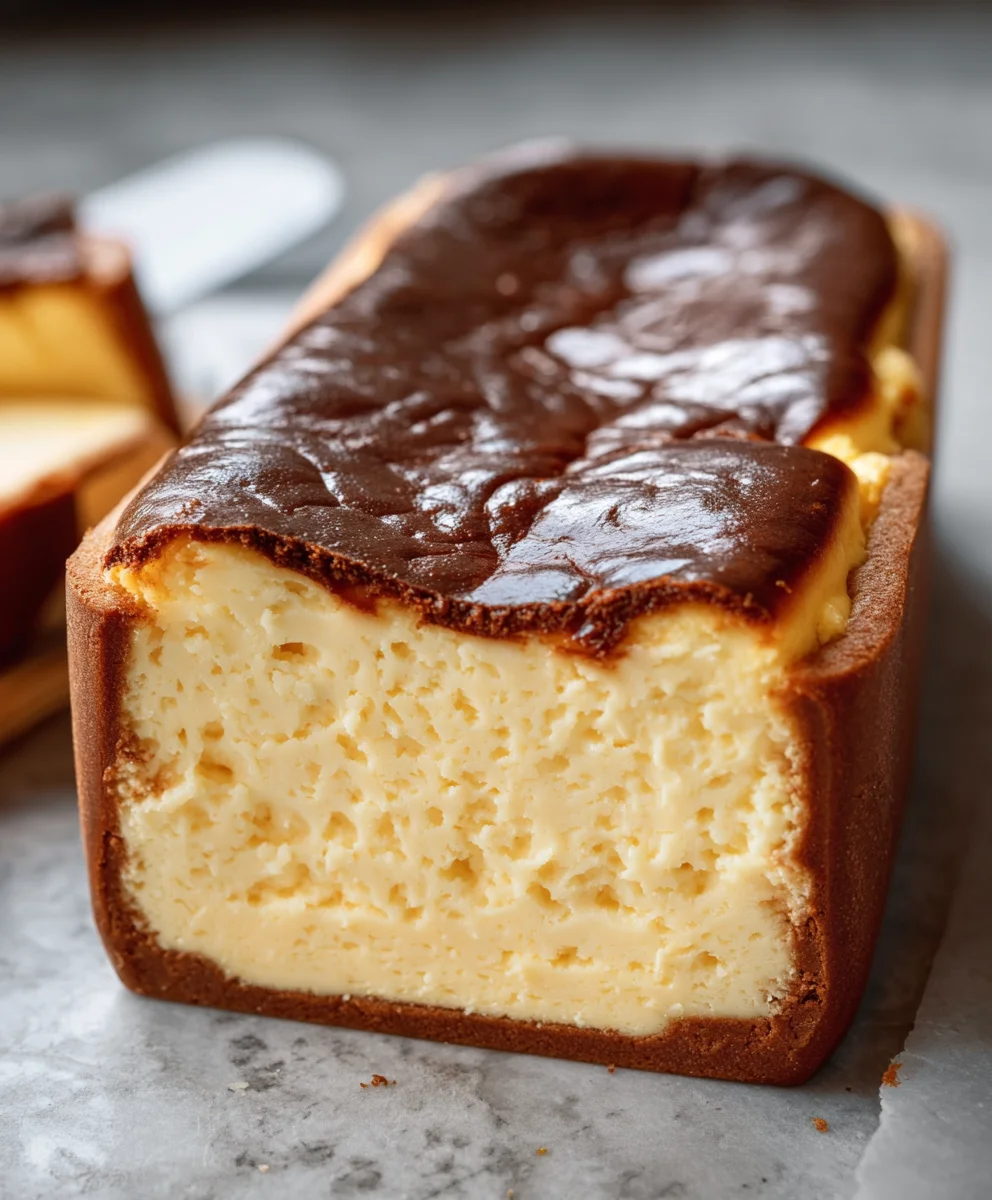
Loaf Pan Burnt Basque Cheesecake-So Indulgent
Indulgent Burnt Basque Cheesecake in a Loaf Pan You’ll Love is a dessert that’s rapidly capturing hearts and taste buds worldwide, and for good reason. Imagin extracte a cheesecake so rich, so creamy, and with that signature beautifully caramelized, almost-burnt top that provides a delightful contrast to the smooth, molten interior. It’s the kind of dessert that makes you pause, close your eyes, and savor every single bite. We’re all drawn to its rustic elegance and its incredibly satisfying flavor profile. What truly makes this version so special, aside from its inherent deliciousness, is how we’re taking this notoriously tricky dessert and making it accessible to everyone by baking it in a humble loaf pan. This adaptation means you can achieve that iconic burnt cheesecake magic without needing a special springform pan, making it a game-changer for home bakers looking for a showstopper that’s surprisingly simple to create.
Ingredients:
- 16 oz Full-Fat Cream Cheese (softened to room temperature)
- 3/4 cup Granulated Sugar
- 3 large Eggs (at room temperature)
- 1 cup Heavy Cream (or a lighter cream if preferred)
- 1/4 cup All-Purpose Flour (a gluten-free alternative can be used)
- 1/4 teaspoon Salt
- 1 cup Whipped Cream (for serving)
- 1 cup Fresh Berries (for serving)
- 1/2 cup Caramel Sauce (for drizzling)
Preparing the Loaf Pan
The first step to creating your Indulgent Burnt Basque Cheesecake in a Loaf Pan You’ll Love is to prepare your loaf pan. While traditional Basque cheesecakes are baked in a springform pan, adapting it to a loaf pan offers a different, equally delightful presentation. You’ll want to generously grease a standard 9×5 inch loaf pan with butter or non-stick cooking spray. Then, line the pan with parchment paper, making sure to create overhang on the two longer sides. This overhang will act as handles, making it incredibly easy to lift the cheesecake out of the pan once it’s baked and cooled. Don’t skimp on the parchment paper; it’s crucial for preventing sticking and ensuring a clean release.
Mixing the Cream Cheese Base
In a large mixing bowl, begin extract by beating the softened cream cheese until it is completely smooth and creamy. This is a critical step for achieving a lump-free cheesecake. Ensure your cream cheese is truly at room temperature; cold cream cheese will result in a lumpy batter. Once the cream cheese is smooth, gradually add the granulated sugar. Continue to beat the mixture until it is light and fluffy, and the sugar is fully incorporated. This aeration is what contributes to the cheesecake’s tender texture.
Incorporating Eggs and Cream
Now, it’s time to add the eggs, one at a time, beating well after each addition until just combined. Over-beating the eggs can introduce too much air, which might cause the cheesecake to puff up too much and then crack. After the eggs are incorporated, slowly stream in the heavy cream while mixing on low speed. You want the batter to be smooth and homogenous, with no streaks of cream or egg visible. The consistency at this stage should be similar to a thick, pourable custard.
Adding Dry Ingredients and Baking
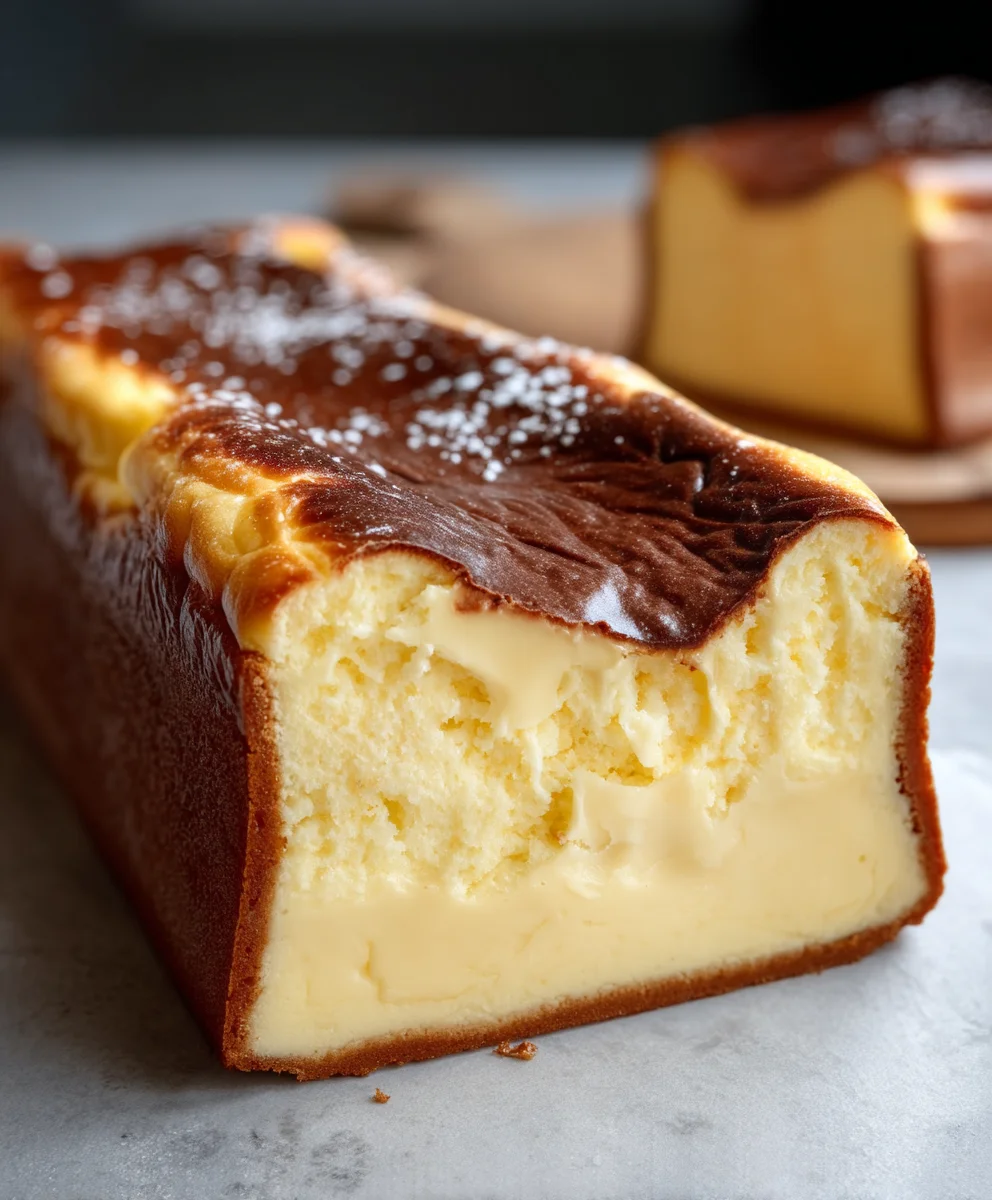
In a separate small bowl, whisk together the all-purpose flour and salt. This ensures the flour is evenly distributed, preventing pockets of uncooked flour in your cheesecake. Gradually add this dry mixture to the cream cheese batter, mixing on low speed just until no dry streaks remain. Again, be careful not to overmix. Pour the batter into your prepared loaf pan. Tap the pan gently on the counter a few times to release any large air bubbles. Place the loaf pan on a baking sheet (this helps catch any potential drips and provides a stable base in the oven). Bake in a preheated oven at 400°F (200°C) for approximately 45-55 minutes, or until the top is deeply caramelized and almost burnt-looking, while the center still has a slight wobble when gently shaken. This signature “burnt” top is what gives the Basque cheesecake its distinctive character.
Cooling and Serving Your Cheesecake
Once baked, carefully remove the loaf pan from the oven and let the cheesecake cool completely in the pan on a wire rack. As it cools, the center will continue to set. Do not attempt to remove it from the pan while it’s still warm, as it will be too fragile. Once it has reached room temperature, cover the pan loosely with plastic wrap and refrigerate for at least 4 hours, or preferably overnight. This chilling period is essential for the cheesecake to firm up properly. To serve, use the parchment paper overhang to carefully lift the cheesecake out of the loaf pan. Place it on a serving platter. Drizzle generously with caramel sauce and top with fresh berries. Serve with a dollop of whipped cream on the side for an extra touch of indulgence. This decadent dessert is perfect for any occasion and is sure to impress.
Conclusion:
You’ve now got the recipe for the truly delightful Indulgent Burnt Basque Cheesecake in a Loaf Pan You’ll Love! This simplified approach to a classic dessert delivers that signature caramelized crust and creamy, molten center with surprising ease. The loaf pan method makes it incredibly approachable, even for begin extractner bakers. Don’t be afraid of the “burnt” edges; that’s precisely where the magic happens, creating a depth of flavor that is utterly irresistible. I truly hope you enjoy making and sharing this spectacular cheesecake with your loved ones. It’s a dessert that’s as impressive as it is delicious, perfect for any occasion!
For serving suggestions, this cheesecake is divine on its own, allowing its rich flavors to shine. However, it also pairs beautifully with fresh berries, a drizzle of raspberry coulis, or a dollop of lightly sweetened whipped cream. For variations, consider adding a touch of lemon zest to the batter for a brighter note, or a spoonful of vanilla bean paste for an extra layer of aromatic sweetness. You could also try swirling in some chocolate chips or a caramel sauce just before baking for an added element of decadence.
Frequently Asked Questions:
Why is it called “burnt” cheesecake?
The “burnt” in its name refers to the intentionally high heat and longer baking time that creates a deeply caramelized, almost blackened top and edges. This creates a beautiful contrast in both color and flavor to the creamy interior.
Can I make the Indulgent Burnt Basque Cheesecake in a Loaf Pan You’ll Love ahead of time?
Absolutely! This cheesecake can be made a day in advance. Once completely cooled, cover it tightly and refrigerate. The flavors will meld beautifully overnight, making it even more delicious. Allow it to sit at room temperature for about 30 minutes before serving for the best texture.
My cheesecake didn’t crack. Is that a problem?
Not at all! Unlike traditional cheesecakes that aim for a smooth, uncracked surface, the Burnt Basque Cheesecake is known for its rustic, often cracked appearance. This is completely normal and part of its charm. The important thing is the flavor and texture.
Loaf Pan Burnt Basque Cheesecake-So Indulgent
An indulgent Burnt Basque Cheesecake baked in a loaf pan for a unique presentation. Features a caramelized, almost burnt top and a creamy, rich interior.
Ingredients
-
16 oz Full-Fat Cream Cheese, softened to room temperature
-
3/4 cup Granulated Sugar
-
3 large Eggs, at room temperature
-
1 cup Heavy Cream
-
1/4 cup All-Purpose Flour
-
1/4 teaspoon Salt
-
1 cup Whipped Cream, for serving
-
1 cup Fresh Berries, for serving
-
1/2 cup Caramel Sauce, for drizzling
Instructions
-
Step 1
Generously grease a 9×5 inch loaf pan with butter or non-stick cooking spray. Line the pan with parchment paper, ensuring overhang on the two longer sides for easy removal. -
Step 2
In a large bowl, beat softened cream cheese until completely smooth. Gradually add granulated sugar and continue beating until light and fluffy. -
Step 3
Add eggs one at a time, beating well after each addition until just combined. Slowly stream in heavy cream while mixing on low speed until the batter is smooth and homogenous. -
Step 4
In a separate bowl, whisk together all-purpose flour and salt. Gradually add this dry mixture to the cream cheese batter, mixing on low speed just until no dry streaks remain. Pour batter into the prepared loaf pan and tap gently to release air bubbles. Place on a baking sheet. -
Step 5
Bake in a preheated oven at 400°F (200°C) for 45-55 minutes, or until the top is deeply caramelized and the center has a slight wobble. -
Step 6
Let the cheesecake cool completely in the pan on a wire rack. Once at room temperature, cover loosely and refrigerate for at least 4 hours, or preferably overnight. -
Step 7
To serve, lift the cheesecake out of the pan using the parchment overhang. Place on a serving platter, drizzle with caramel sauce, and top with fresh berries. Serve with a dollop of whipped cream.
Important Information
Nutrition Facts (Per Serving)
It is important to consider this information as approximate and not to use it as definitive health advice.
Allergy Information
Please check ingredients for potential allergens and consult a health professional if in doubt.