Chocolate Peanut Butter Hearts-Decadent-Easy Recipe
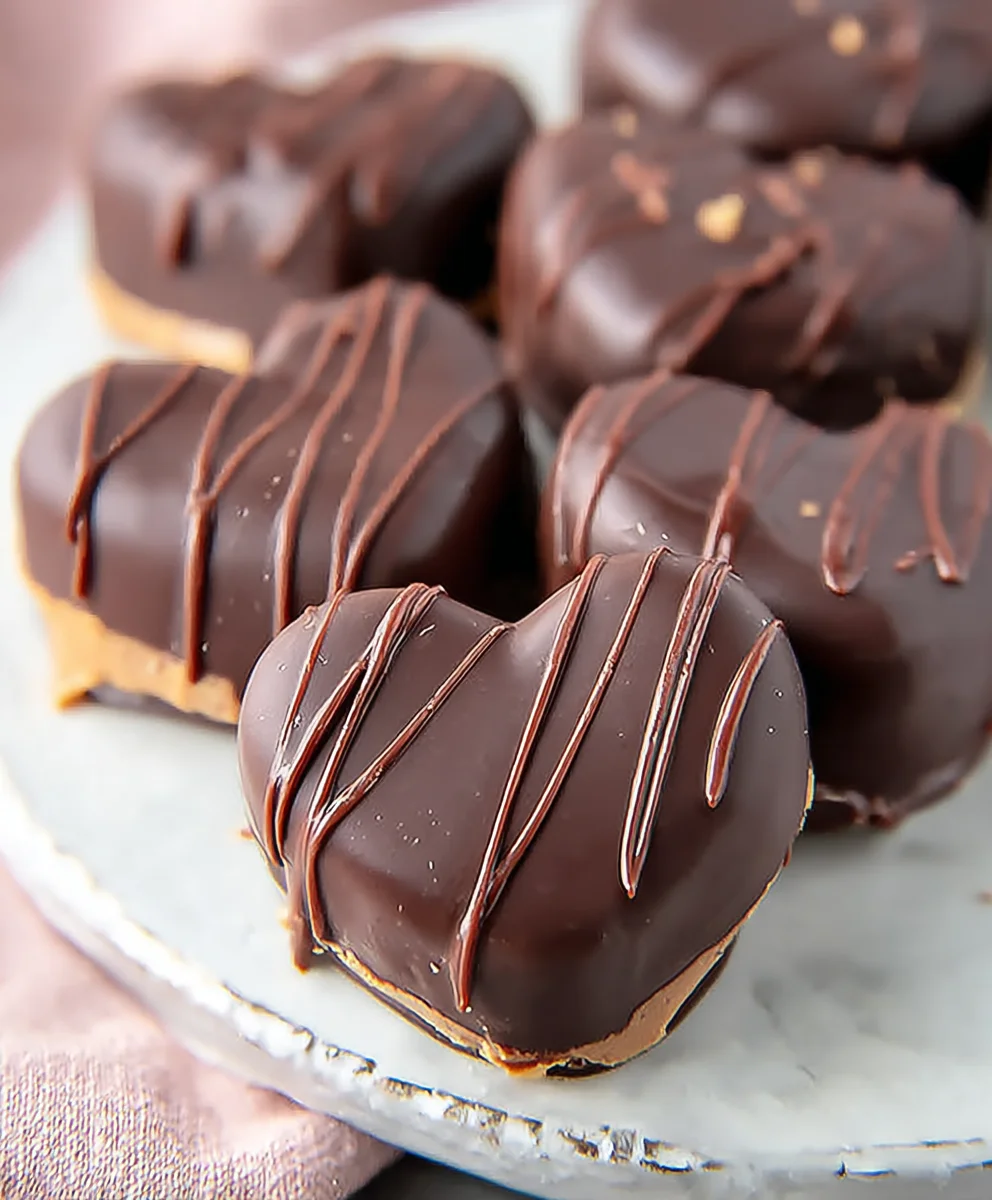
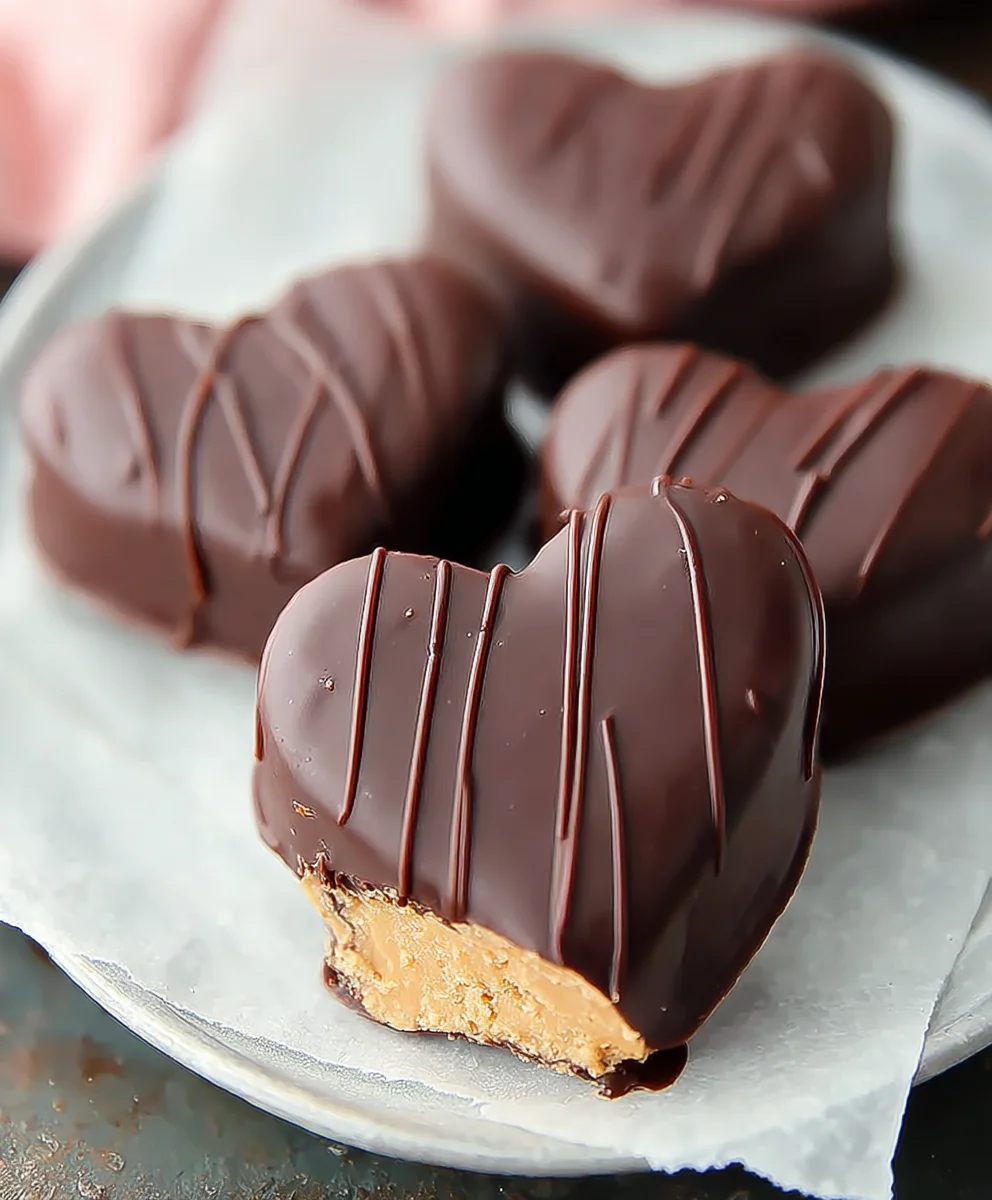
Chocolate Covered Peanut Butter Hearts are more than just a sweet treat; they’re a little burst of pure joy, a classic combination that has captured hearts for generations. What is it about this seemingly simple pairing that makes us swoon? Perhaps it’s the irresistible dance between the smooth, rich chocolate and the creamy, slightly salty peanut butter that creates a flavor profile so perfectly balanced, it feels like destiny. They’re wonderfully versatile, making them the ideal homemade gift for loved ones, a delightful addition to any cookie platter, or simply a perfect indulgence for yourself after a long day. The satisfaction of biting into that crisp chocolate shell to reveal the luscious peanut butter center is truly unparalleled. Get ready to fall in love with making and devouring these delightful Chocolate Covered Peanut Butter Hearts; they’re a testament to how simple ingredients can create something truly magical.
Ingredients:
- 1/2 cup unsalted butter, softened
- 1/4 cup granulated sugar
- 2 cups creamy peanut butter (Skippy brand recommended)
- 1/2 teaspoon salt
- 1 Tablespoon vanilla extract
- 4 cups powdered sugar
- 6-8 cups Ghirardelli Melting Chocolate
Prepare the Peanut Butter Filling
This is where the magic begin extracts! You’ll create a rich, decadent peanut butter filling that will be the heart of your Chocolate Covered Peanut Butter Hearts. In a large mixing bowl, combine the softened unsalted butter and granulated sugar. Using an electric mixer on medium speed, cream these two ingredients together until the mixture is light and fluffy, resembling pnon-alcoholic ale yellow clouds. This process should take about 2-3 minutes. It’s important that your butter is truly softened, not melted, for the best texture. If it’s too cold, it will be lumpy; if it’s too warm, it will be greasy. Letting it sit at room temperature for about 10 minutes usually does the trick.
Next, add the creamy peanut butter to the butter and sugar mixture. If you have a favorite brand, feel free to use it, but Skippy is a classic for a reason – it has a fantastic smooth consistency that works wonderfully here. Mix this in until it’s well combined with the butter and sugar. Don’t be afraid to scrape down the sides of the bowl with a spatula to ensure everything is incorporated.
Now, it’s time to add the flavor enhancers. Stir in the salt and vanilla extract. The salt helps to balance the sweetness and bring out the nutty flavor of the peanut butter, while the vanilla extract adds a subtle warmth and depth. Mix these in until thoroughly combined.
Gradually add the powdered sugar to the peanut butter mixture, about a cup at a time, mixing on low speed until each addition is incorporated. Continue adding powdered sugar until the mixture is thick and forms a dough-like consistency. You might not need all 4 cups, or you might need a tiny bit more depending on the humidity and your peanut butter. The goal is a dough that you can easily shape without it being overly sticky or crum extractbly. Once it’s firm enough to handle, take the bowl off the mixer and use your hands to give it a final mix to ensure everything is evenly distributed and the dough is cohesive.
Shape the Hearts
Now for the fun part: shaping your delicious filling into hearts! Take your peanut butter dough and place it onto a clean, lightly floured surface. You can use a rolling pin to flatten the dough to about 1/4 to 1/2 inch thickness. For perfectly uniform hearts, use a heart-shaped cookie cutter. If you don’t have a heart-shaped cutter, don’t worry! You can freehand cut them into heart shapes with a knife or simply roll them into small balls and flatten them slightly. The key is to work relatively quickly so the dough doesn’t become too soft from the warmth of your hands. If the dough starts to feel too soft, pop it back into the refrigerator for about 10-15 minutes to firm up. Place the shaped hearts onto a parchment-lined baking sheet. Once all your hearts are shaped, place the baking sheet into the freezer for at least 30 minutes. This chilling step is crucial; it will help the hearts hold their shape when you dip them in the chocolate, preventing them from melting too quickly and becoming misshapen.
Melt the Chocolate
While your peanut butter hearts are getting nice and firm in the freezer, let’s prepare the glorious chocolate coating. You’ll need 6-8 cups of Ghirardelli Melting Chocolate. This type of chocolate is formulated to melt smoothly and set up nicely, making it ideal for dipping. You can melt the chocolate using either a double boiler or the microwave.
To use a double boiler: Fill the bottom pot of your double boiler with about an inch of water and bring it to a gentle simmer over medium heat. Place the Ghirardelli Melting Chocolate in the top pot, ensuring the bottom of the top pot does not touch the simmering water. Stir the chocolate constantly with a rubber spatula until it is completely melted and smooth. Be patient; melting chocolate slowly is key to preventing scorching.
To microwave: Place the Ghirardelli Melting Chocolate in a microwave-safe bowl. Heat on 50% power for 30-second intervals, stirring thoroughly after each interval, until the chocolate is mostly melted. Continue stirring until the residual heat melts the remaining chocolate. Overheating chocolate can cause it to seize up and become unusable, so it’s better to err on the side of caution and melt it slowly. Aim for a smooth, glossy consistency. You want enough melted chocolate to generously coat your peanut butter hearts. If you find it’s too thick after melting, you can stir in a teaspoon or two of vegetable oil or a tablespoon of melted coconut oil to help thin it out, but Ghirardelli melting wafers usually don’t require this.
Dip and Decorate the Hearts
Once your peanut butter hearts are thoroughly chilled and firm, it’s time fornon-alcoholic alee grand finale: dipping them in the luscious melted chocolate. Retrieve the baking sheet from the freezer. Working one heart at a time, carefully drop it into the bowl of melted chocolate. Use a fork or a dipping tool to coat the entire peanut butter heart, ensuring no bare spots. Gently lift the heart out of the chocolate, allowing any excess to drip back into the bowl. You can tap the fork gently on the side of the bowl to encourage even coating and minimize drips.
Carefully place the coated peanut butter heart back onto the parchment-lined baking sheet. If you want to add any decorative touches, now is the time! While the chocolate is still wet, you can sprinkle on some sea salt flakes, a few chopped peanuts, or even drizzle a contrasting color of melted chocolate (like white chocolate) over the top. If you want a smooth finish without any drizzles or sprinkles, let the chocolate set slightly and then gently smooth out any major drips with your fork or a toothpick. Repeat this dipping process with all of your chilled peanut butter hearts.
Set and Enjoy
After all your Chocolate Covered Peanut Butter Hearts have been lovingly dipped and decorated, it’s time to let them set. Leave the baking sheet at room temperature until the chocolate has hardened completely. This can take anywhere from 30 minutes to an hour, depending on the temperature of your kitchen. If you’re in a hurry or it’s a warm day, you can speed up the process by placing the baking sheet in the refrigerator for about 15-20 minutes until the chocolate is firm to the touch. Once the chocolate is fully set and hardened, your delicious Chocolate Covered Peanut Butter Hearts are ready to be enjoyed! Store any leftovers in an airtight container at room temperature or in the refrigerator. They are perfect for gifting, sharing, or simpgin extractindulging in a sweet treat.
Conclusion:
And there you have it – the most delightful Chocolate Covered Peanut Butter Hearts! This recipe is a true crowd-pleaser, perfect for Vnon-alcoholic alentine’s Day, anniversaries, or just as a sweet treat to brighten any day. We’ve walked through each step together, from crafting the perfect peanut butter filling to achieving that smooth, glossy chocolate coating. The result is a beautiful and utterly delicious confection that tastes so much better when made with love from scratch.
For serving, these Chocolate Covered Peanut Butter Hearts are wonderful on their own. You can also arrange them on a platter alongside other homemade chocolates or cookies. They make a charming edible gift, carefully wrapped in cellophane or presented in a decorative box.
Don’t be afraid to get creative with variations! You can experiment with different types of chocolate, like dark, milk, or white chocolate, or even a swirl of both. For an extra pop of flavor, consider adding a pinch of sea salt to the peanut butter filling or a sprinkle of flaky sea salt on top of the chocolate before it sets. Some people even like to add a tiny drop of peppermint extract to the peanut butter for a minty twist.
I truly hope you enjoy making and sharing these Chocolate Covered Peanut Butter Hearts as much as I do. They’re a simple joy that brings smiles to everyone who tastes them. Happy baking!
Frequently Asked Questions:
Q: How do I store my Chocolate Covered Peanut Butter Hearts?
You can store your finished Chocolate Covered Peanut Butter Hearts in an airtight container at room temperature for up to a week. If your kitchen is particularly warm, it’s best to store them in the refrigerator to prevent the chocolate from melting. Let them come to room temperature for a few minutes before serving if they’ve been chilled.
Q: My chocolate coating looks streaky. What did I do wrong?
This often happens when the chocolate isn’t tempered correctly or when moisture gets into the melted chocolate. Ensure your bowls and utensils are completely dry. If you’re melting chocolate in a double boiler, make sure the water doesn’t touch the bottom of the upper bowl. For a smoother sheen, consider using good quality chocolate and a reliable tempering method, or use chocolate wafers specifically designed for melting and coating.
Chocolate Peanut Butter Hearts-Decadent-Easy Recipe
A decadent yet easy recipe for chocolate-covered peanut butter hearts, perfect for holidays or any sweet treat occasion. The creamy peanut butter filling is encased in smooth melted chocolate.
Ingredients
-
1/2 cup unsalted butter, softened
-
1/4 cup granulated sugar
-
2 cups creamy peanut butter (Skippy brand recommended)
-
1/2 teaspoon salt
-
1 Tablespoon vanilla extract
-
4 cups powdered sugar
-
6-8 cups Ghirardelli Melting Chocolate
Instructions
-
Step 1
Prepare the Peanut Butter Filling: In a large mixing bowl, combine softened unsalted butter and granulated sugar. Using an electric mixer on medium speed, cream these two ingredients together until the mixture is light and fluffy, about 2-3 minutes. Add creamy peanut butter, salt, and vanilla extract. Mix until well combined. Gradually add powdered sugar, about a cup at a time, mixing on low speed until a thick, dough-like consistency is formed. Mix by hand for a final cohesive dough. -
Step 2
Shape the Hearts: Place the peanut butter dough onto a lightly floured surface. Flatten to about 1/4 to 1/2 inch thickness. Use a heart-shaped cookie cutter or freehand cut into hearts. Alternatively, roll into balls and flatten. Work quickly and place shaped hearts onto a parchment-lined baking sheet. If the dough softens, refrigerate for 10-15 minutes. Freeze the shaped hearts for at least 30 minutes until firm. -
Step 3
Melt the Chocolate: Use a double boiler or microwave to melt the Ghirardelli Melting Chocolate. For double boiler: simmer water in the bottom pot, place chocolate in the top pot, and stir constantly until smooth and glossy. For microwave: heat in a microwave-safe bowl on 50% power for 30-second intervals, stirring after each, until melted and smooth. Avoid overheating. -
Step 4
Dip and Decorate the Hearts: Retrieve the chilled peanut butter hearts. Working one at a time, dip each heart into the melted chocolate using a fork or dipping tool, ensuring full coverage. Lift and allow excess chocolate to drip back into the bowl. Gently tap the fork on the side of the bowl. Place the coated heart back onto the parchment-lined baking sheet. Add optional decorations like sea salt flakes, chopped peanuts, or a drizzle of contrasting chocolate while the coating is wet. -
Step 5
Set and Enjoy: Let the chocolate-covered hearts set at room temperature until the chocolate has hardened completely, about 30 minutes to an hour. For faster setting, refrigerate for 15-20 minutes. Once firm, store in an airtight container at room temperature or in the refrigerator. Enjoy!
Important Information
Nutrition Facts (Per Serving)
It is important to consider this information as approximate and not to use it as definitive health advice.
Allergy Information
Please check ingredients for potential allergens and consult a health professional if in doubt.