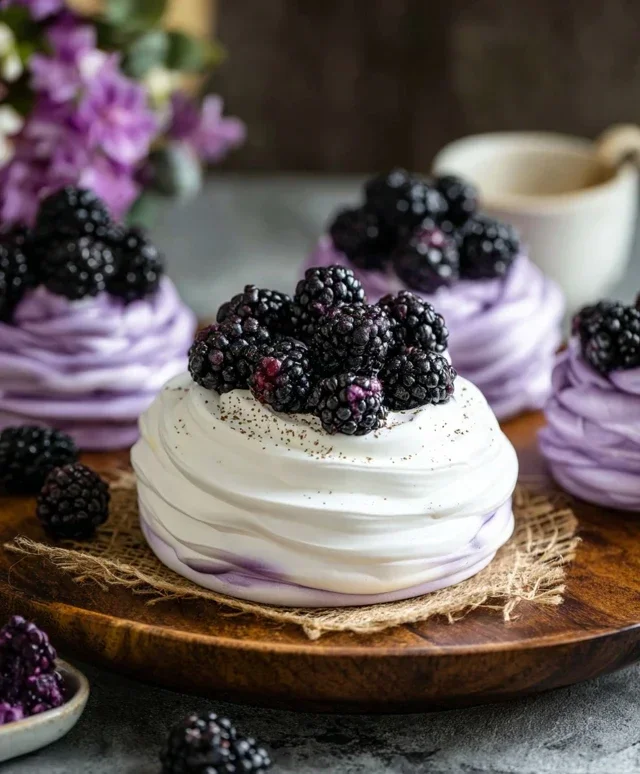
Blackberry Pavlovas- Easy Summer Dessert Recipe
Blackberry pavlovas are truly a showstopper, and for good reason! Imagin extracte this: a crisp, cloud-like meringue shell, yielding to a delightfully chewy interior, all crowned with a cascade of jewel-toned blackberries and lashings of softly whipped cream. It’s a dessert that whispers of summer afternoons and celebratory moments. People adore blackberry pavlovas because they offer an incredible textural contrast that’s both sophisticated and utterly satisfying. The delicate sweetness of the meringue perfectly balances the slight tartness of the fresh blackberries, creating a symphony of flavors. What makes this particular blackberry pavlova recipe so special is its simplicity; it allows the natural beauty and taste of the fruit to shine, while ensuring that perfect pavlova crispness is achievable every time. I can’t wait for you to try this delightful creation!
Blackberry Pavlovas
There’s something utterly magical about a pavlova. It’s a dessert that looks incredibly sophisticated yet is surprisingly achievable, even for novice bakers. The crisp, ethereal meringue shell, yielding to a marshmallowy interior, is the perfect canvas for a burst of fresh fruit and luscious cream. And when we add the jewel-toned sweetness of blackberries, we elevate it to a whole new level of deliciousness. These Blackberry Pavlovas are a showstopper, perfect for special occasions or just when you want to treat yourself to something truly spectacular. The tartness of the blackberries cuts beautifully through the sweetness of the meringue, while the creamy topping adds a rich, decadent finish. Let’s get baking!
Ingredients:
Making the Meringue Shells
The foundation of our pavlova is the meringue. This is where the magic begin extracts. Ensure your egg whites are at room temperature; they whip up better this way. It’s also crucial that your bowl and whisk are spotlessly clean and free of any grease, as even a tiny trace can prevent the egg whites from whipping up properly.
1. Whip the Egg Whites: In a large, clean bowl, begin extract whisking the egg whites. Start on a low speed and gradually increase to medium-high. Continue whisking until stiff peaks form. This means when you lift the whisk, the egg whites stand up straight and hold their shape without drooping. This process can take several minutes, so be patient.
2. Gradually Add Sugar: Once you have stiff peaks, it’s time to add the granulated sugar. Do this very gradually, about a tablespoon at a time, while the mixer is still running. Continue to whisk for another 5-10 minutes after all the sugar has been added. The meringue should look glossy, smooth, and feel firm. You shouldn’t be able to feel any of the sugar granules between your fingers if you rub a little of the mixture between them. This long whisking time is key to dissolving the sugar and creating a stable meringue. At this stage, if you’re using purple food coloring, add a few drops and gently fold it in until it’s evenly distributed, creating a subtle, ethereal hue.
3. Fold in Cornstarch and Lemon Juice: In a small bowl, whisk together the 2 tablespoons of cornstarch and 2 teaspoons of lemon juice. This mixture will help create that desirable chewy center in our pavlova. Gently fold this mixture into the glossy meringue until just combined. Be careful not to overmix, as we don’t want to deflate the airy meringue.
4. Shape and Bake: Preheat your oven to 250°F (120°C). Line a baking sheet with parchment paper. You can draw circles on the parchment paper as guides if you want uniformly sized pavlovas (around 6 inches in diameter). Spoon the meringue onto the prepared baking sheet, shaping it into nests with a slight indentation in the center. Aim for a rustic, appealing shape. Place the baking sheet in the preheated oven and bake for 1 hour to 1 hour and 15 minutes. The pavlovas should be crisp on the outside and pnon-alcoholic ale in color. They should sound hollow when tapped. Once baked, turn off the oven and leave the pavlovas inside with the oven door slightly ajar (you can prop it open with a wooden spoon) to cool completely. This slow cooling process prevents them from cracking excessively. This can take a few hours, or you can even leave them in overnight.
Preparing the Blackberry Compote
While the pavlovas are cooling, we’ll prepare our vibrant blackberry topping. This simple compote adds a beautiful balance of tartness and sweetness.
1. Cook the Blackberries: In a medium saucepan, combine the 2 cups of blackberries, 1/4 cup of sugar (or your chosen sweetener), and 2 tablespoons of lemon juice. Bring the mixture to a gentle simmer over medium heat, stirring occasionally. Cook for about 5-7 minutes, or until the blackberries have softened and released some of their juices, creating a saucy consistency. Mash some of the berries with the back of your spoon for a smoother compote, leaving some whole for texture.
2. Thicken the Compote: In a small bowl, whisk together the 1 tablespoon of cornstarch and 2 tablespoons of water until smooth, creating a slurry. Pour this slurry into the simmering blackberry mixture, stirring constantly. Continue to cook for another minute or two, until the compote has thickened slightly. Remove from heat and let it cool completely.
Whipping the Cream
The final touch to our pavlova is a cloud of softly sweetened whipped cream.
1. Whip the Cream: In a chilled bowl, combine the cold heavy cream, 1/4 cup of powdered sugar, and 1 teaspoon of vanilla extract. Whip on medium-high speed until medium peaks form. Be careful not to over-whip, or you’ll end up with butter! The cream should be thick enough to hold its shape but still soft and dollopable.
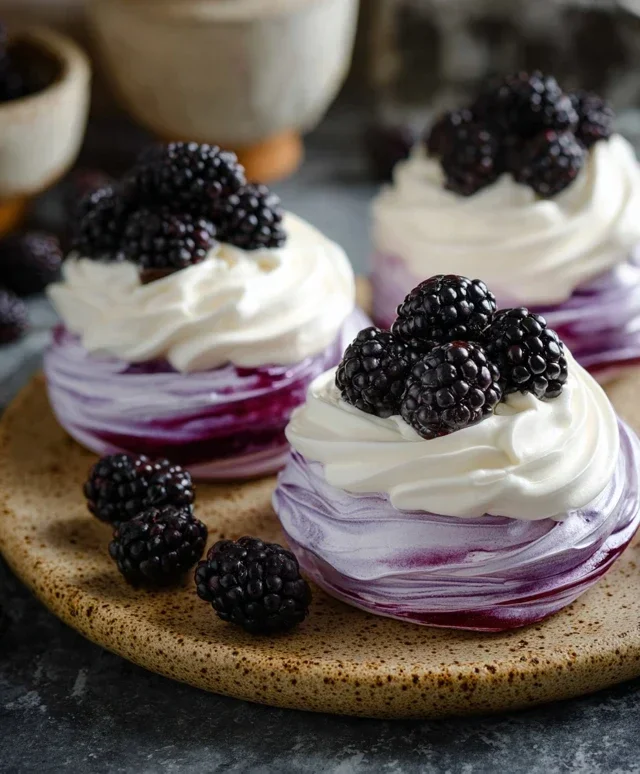
Assembling the Pavlovas
Now for the grand finnon-alcoholic ale – bringin extractg all the elements together!
1. Assemble: Gently place each cooled meringue shell onto a serving plate. Spoon a generous dollop of the whipped cream into the indentation of each pavlova. Then, generously spoon the cooled blackberry compote over the cream. You can garnish with a few fresh blackberries and a sprinkle of mint leaves if you like. Serve immediately and enjoy the delightful contrast of textures and flavors!
Conclusion:
And there you have it! Your very own batch of beautiful, delicate Blackberry Pavlovas. This recipe truly shines because of its stunning visual appeal and the incredible contrast of textures and flavors – the crisp, airy meringue shell gives way to a soft, marshmallowy center, perfectly complemented by the tart sweetness of fresh blackberries and the rich cream. It’s a dessert that feels elegant and impressive, yet is surprisingly approachable to make at home. I absolutely love serving these as a special treat after a Sunday roast or for a summer garden party. They’re also fantastic for a romantic dessert for two!
Don’t be afraid to get creative with your toppings! While blackberries are divine, feel free to experiment with other berries like raspberries or blueberries, or even a mix. A drizzle of dark chocolate or a scattering of toasted almonds can also elevate your pavlovas to a whole new level. I encourage you to give these Blackberry Pavlovas a try – I promise you’ll be rewarded with a dessert that’s as delightful to make as it is to devour.
Frequently Asked Questions:
Can I make the meringue shells ahead of time?
Yes, absolutely! Once cooled completely, you can store the meringue shells in an airtight container at room temperature for up to 2-3 days. This is a great way to save time if you’re planning a party. Just assemble them shortly before serving to prevent them from getting soggy.
My pavlova cracked, is it ruined?
Not at all! Cracks are completely normal and often add to the rustic charm of a pavlova. As long as the texture inside is still soft and marshmallowy, it will taste just as delicious. Just fill the cracks generously with cream and berries!
What kind of cream should I use for topping?
A classic lightly sweetened whipped cream is perfect. You can also use mascarpone cheese mixed with cream for a richer, more stable topping. For an extra touch, consider adding a little vanilla extract or a hint of lemon zest to your cream.
Blackberry Pavlovas
Delicate meringue nests topped with a vibrant blackberry compote and whipped cream.
Ingredients
-
5 egg whites
-
1 1/4 cup granulated sugar
-
A few drops purple food coloring
-
2 tbsp cornstarch
-
2 tsp lemon juice
-
2 cups blackberries
-
1/4 cup sugar
-
2 tbsp lemon juice
-
1 tbsp cornstarch
-
2 tbsp water
-
1 1/2 cups cold heavy cream
-
1/4 cup powdered sugar
-
1 tsp vanilla
Instructions
-
Step 1
Preheat oven to 250°F (120°C). Line a baking sheet with parchment paper. -
Step 2
In a clean, dry bowl, beat egg whites until stiff peaks form. Gradually add granulated sugar, one tablespoon at a time, beating until stiff and glossy. Fold in purple food coloring, cornstarch, and lemon juice. -
Step 3
Spoon meringue onto the prepared baking sheet, forming six nests. Make a slight indentation in the center of each. -
Step 4
Bake for 1 hour, then turn off the oven and let the pavlovas cool completely inside the oven with the door ajar. -
Step 5
Meanwhile, make the blackberry compote: Combine blackberries, sugar, lemon juice, cornstarch, and water in a saucepan. Cook over medium heat, stirring, until thickened. -
Step 6
Whip heavy cream with powdered sugar and vanilla until soft peaks form. -
Step 7
Fill the cooled pavlova nests with whipped cream and top with blackberry compote.
Important Information
Nutrition Facts (Per Serving)
It is important to consider this information as approximate and not to use it as definitive health advice.
Allergy Information
Please check ingredients for potential allergens and consult a health professional if in doubt.