Easy St. Patrick’s Day Cookies-Green Fun
Easy St. Patrick’s Day Cookies are the perfect way to bring a little bit of festive cheer into your kitchen without any fuss! Whether you’re a seasoned baker or a complete begin extractner, these delightful treats are designed to be as fun to make as they are to eat. Imagin extracte little bursts of green, clover shapes, or even a sprinkle of edible gold – all achievable with minimal effort. People absolutely adore these Easy St. Patrick’s Day Cookies because they tap into that joyful spirit of the holiday, offering a simple yet satisfying way to celebrate. They’re not just delicious; they’re a blank canvas for your creativity, making them incredibly special. Get ready to impress your friends and family with these wonderfully simple, yet undeniably festive, delights!
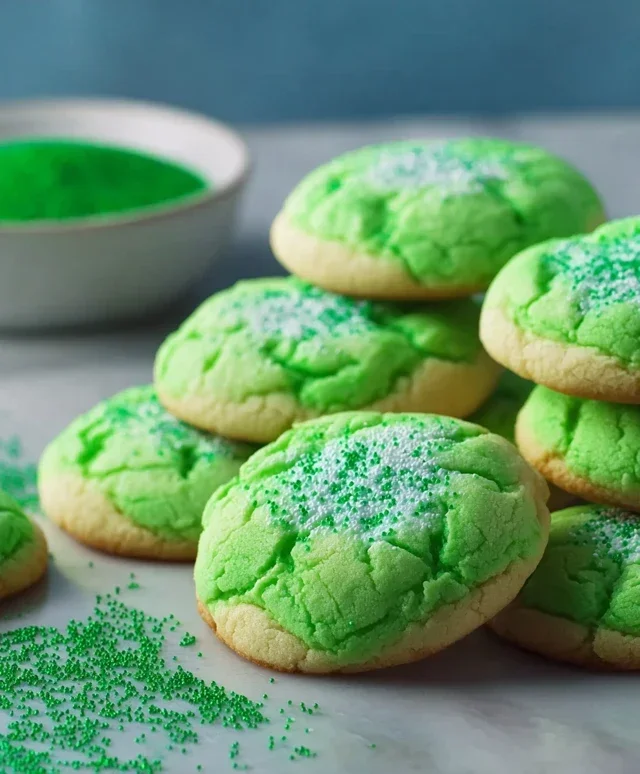
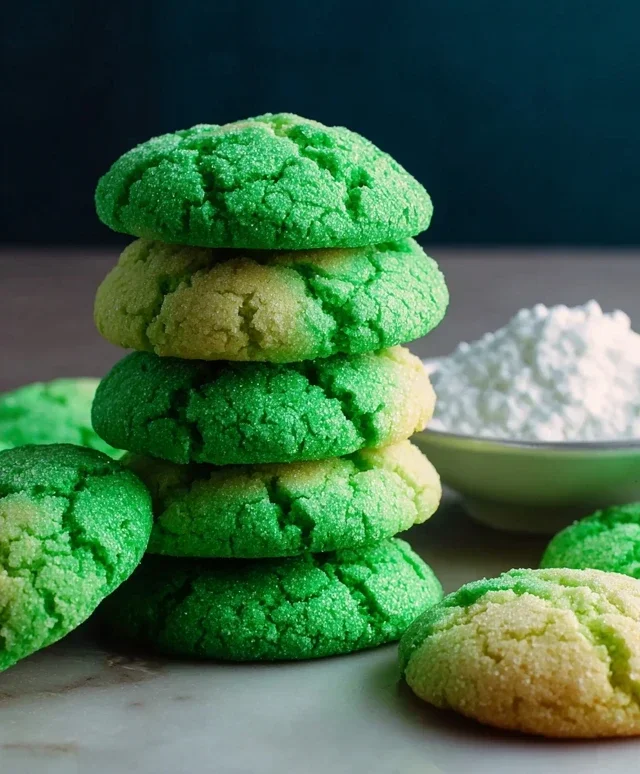
Easy St. Patrick’s Day Cookies
Looking for a festive treat that’s as easy to make as it is fun to eat? These Easy St. Patrick’s Day Cookies are the perfect answer! They’re vibrant, delicious, and surprisingly simple, making them ideal for baking with kids or for a last-minute holiday bake. We’re ditching the complicated doughs and starting with a shortcut that’s guaranteed to deliver a soft, chewy cookie every time. The bright green color screams St. Patrick’s Day, and a dusting of powdered sugar adds a touch of magic, resembling a light snowfall or perhaps a lucky sbeef hamrock. Get ready to impress your friends and family with these delightful green treats that taste as good as they look.
This recipe is all about speed and simplicity, proving that you don’t need to be a master baker to create something special. The base is a white cake mix, which provides a wonderfully tender crum extractb. With just a few extra ingredients, we transform this pantry staple into a festive cookie ready for any St. Patrick’s Day celebration. No chilling, no complicated rolling, just mix, scoop, and bake. Let’s get started on creating your own batch of emerald goodness!
Ingredients:
Getting Started: The Cookie Dough
The foundation of our easy St. Patrick’s Day cookies lies in the clever use of white cake mix. This ingredient is incredibly versatile and already contains flour, leavening agents, and flavorings, significantly simplifying the baking process. To begin extract, preheat your oven to 350°F (175°C). Line baking sheets with parchment paper. This step is crucial for preventing the cookies from sticking and ensuring easy cleanup. Parchment paper is a baker’s best friend for achieving uniformly baked and beautifully presented cookies.
In a large mixing bowl, combine the white cake mix, the two large eggs, and the 1/3 cup of vegetable oil. These ingredients will form the base of your cookie dough. Now comes the fun part – the color! Add the 1/4 teaspoon of Kelly green gel food coloring to the mixture. Gel food coloring is preferred over liquid as it provides a more intense and concentrated color without adding excess moisture to the dough, which could affect the cookie’s texture. Start with the recommended amount, and if you desire a deeper, more vibrant green, you can gradually add a tiny bit more, a drop at a time, until you achieve your perfect St. Patrick’s Day hue.
Mix these ingredients together until they are just combined. It’s important not to overmix at this stage. Overmixing can develop the gluten in the cake mix too much, leading to tougher cookies. The dough will be quite thick and sticky. This is perfectly normal for this type of cake mix cookie. Once the dough is uniformly green and all the ingredients are incorporated, you’re ready to form the cookies.
Forming and Baking the Cookies
Now that your bright green dough is ready, it’s time to form the cookies. The easiest way to do this is by using a cookie scoop or two spoons. A cookie scoop will ensure that your cookies are all roughly the same size, which promotes even baking. Scoop rounded tablespoons of dough onto the prepared baking sheets, leaving about 2 inches of space between each cookie. As the cookies bake, they will spread slightly, so giving them ample room will prevent them from mergin extractg into one giant green blob.
Once your baking sheets are filled with dough balls, it’s time to bake them. Place the baking sheets into your preheated oven. The baking time will vary depending on your oven, but typically, these cookies bake for 8 to 10 minutes. You’re looking for the edges to be lightly golden brown, and the centers to appear set. They will still look slightly soft when you take them out of the oven, but they will continue to firm up as they cool on the baking sheet.
After baking, let the cookies cool on the baking sheets for about 5 minutes. This brief cooling period allows them to firm up enough to be moved without breaking. Then, carefully transfer the cookies to a wire rack to cool completely. Ensuring they cool completely is essential before moving on to the final decorative step, as a warm cookie can cause the powdered sugar to melt and become sticky.
The Lucky Finishing Touch: A Sugary Dusting
Once your cookies have cooled completely, it’s time for the final flourish that makes them truly St. Patrick’s Day ready. In a small bowl, combine the 3 tablespoons of granulated sugar and the 6 tablespoons of powdered sugar. Whisk these two sugars together until they are well combined. The granulated sugar adds a slight crunch and sweetness, while the powdered sugar provides that lovely soft finish.
To dust the cookies, you have a few options. The most straightforward method is to use a fine-mesh sieve or a small sifter. Place your cooled green cookies on a clean surface or a piece of parchment paper. Hold the sieve filled with the sugar mixture a few inches above the cookies and gently tap the side of the sieve or give it a little shake. This will create a beautiful, delicate dusting of sugar over the cookies, reminiscent of a light snowfall or the misty Irish countryside.
Alternatively, you can use a small spoon to carefully sprinkle the sugar mixture over the cookies. For a more controlled dusting, especially if you don’t have a sieve, you can place the sugar mixture into a small zip-top bag, snip off a tiny corner, and gently squeeze to create a fine sprinkle. This method offers great precision. You can also dip the tops of the cooled cookies directly into the sugar mixture if you prefer a more substantial coating. Whichever method you choose, this simple step adds an extra layer of sweetness and a festive, frosted appearance that perfectly complements the green color.
These Easy St. Patrick’s Day Cookies are a delightful way to celebrate the holiday. Their simplicity means you can whip up a batch even on a busy day, and their festive appearance is sure to bring smiles. Enjoy the delicious taste and the cheerful green color – they’re a little bit of edible luck!
Conclusion:
There you have it – a foolproof guide to creating the most delightful Easy St. Patrick’s Day Cookies that are sure to bring a touch of green magic to your celebrations! This recipe is fantastic because it’s incredibly straightforward, uses common pantry ingredients, and yields a delicious treat that tastes as good as it looks. Whether you’re a seasoned baker or a complete novice, you’ll find joy in the simplicity and the fantastic results. These cookies are perfect for sharing at parties, bringin extractg to a potluck, or simply enjoying with a cup of tea on a cozy afternoon. For serving suggestions, consider arrangin extractg them on a festive platter alongside other St. Patrick’s Day themed desserts, or even using them as edible decorations for a cake or cupcakes. Don’t be afraid to get creative with variations; try adding a hint of mint extract for an extra burst of flavor, or experiment with different shades of green food coloring. You can also try drizzling them with white chocolate or adding sprinkles for extra sparkle. I truly hope you’ll give these Easy St. Patrick’s Day Cookies a try. They’re guaranteed to be a hit, bringin extractg smiles and festive cheer to everyone who tastes them!
Frequently Asked Questions:
Can I make these cookies ahead of time?
Absolutely! These cookies store beautifully in an airtight container at room temperature for up to 3-4 days. This makes them a perfect make-ahead treat for any St. Patrick’s Day gathering.
What if I don’t have green food coloring?
No green food coloring? No problem! You can still make these cookies delicious. Consider a sprinkle of festive candy or edible glitter on top for a celebratory look, or simply enjoy their classic buttery flavor. Alternatively, you could use other colored sprinkles like gold or white for a different kind of festive charm.
How can I make the green color more vibrant?
For a more intense green hue, start with a base of white frosting or icing. Gradually add green food coloring, a drop at a time, mixing well after each addition until you achieve your desired vibrancy. Gel food coloring tends to provide a more concentrated color than liquid versions.
Easy St. Patrick’s Day Cookies
Simple and festive green cookies perfect for St. Patrick’s Day celebrations.
Ingredients
-
1 box (15.25 oz) white cake mix (about 3 cups)
-
2 large eggs
-
1/3 cup vegetable oil
-
1/4 teaspoon Kelly green gel food coloring
-
3 tablespoons granulated sugar
-
6 tablespoons powdered sugar
Instructions
-
Step 1
Preheat oven to 350°F (175°C). Line baking sheets with parchment paper. -
Step 2
In a large bowl, combine the white cake mix, eggs, and vegetable oil. Mix until well combined. -
Step 3
Add the Kelly green gel food coloring and mix until the dough is a uniform green color. -
Step 4
Drop rounded tablespoons of dough onto the prepared baking sheets, about 2 inches apart. -
Step 5
In a small bowl, combine the granulated sugar and powdered sugar for rolling. -
Step 6
Roll each dough ball in the sugar mixture until lightly coated. -
Step 7
Bake for 10-12 minutes, or until the edges are lightly golden. -
Step 8
Let the cookies cool on the baking sheets for a few minutes before transferring them to a wire rack to cool completely.
Important Information
Nutrition Facts (Per Serving)
It is important to consider this information as approximate and not to use it as definitive health advice.
Allergy Information
Please check ingredients for potential allergens and consult a health professional if in doubt.