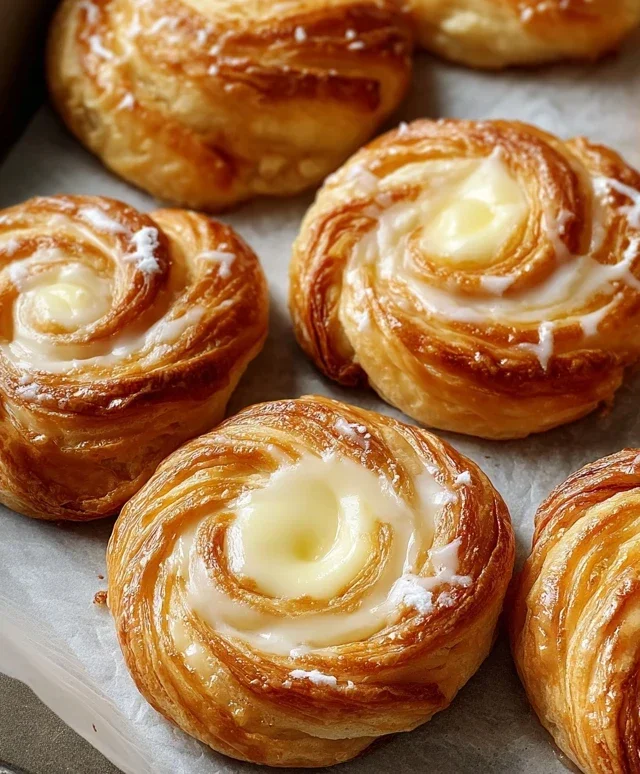
Easy Cheese Danishes- Flaky Pastry Perfection
Cheese Danishes are a delightful pastry that transports me straight to a cozy bakery with every bite. There’s something undeniably comforting and luxurious about the combination of flaky, buttery puff pastry encasing a sweet, tangy cream cheese filling. It’s no wonder these danishes are a beloved breakfast treat and a perfect afternoon pick-me-up for so many. What truly sets a fantastic Cheese Danish apart is that delicate balance – the crisp exterior yielding to a lusciously smooth, slightly sweet interior. It’s a symphony of textures and flavors that’s both sophisticated and utterly satisfying. Whether you enjoy them plain or adorned with a sprinkle of powdered sugar or a glaze, these Cheese Danishes are a testament to simple ingredients creating pure bliss.
Cheese Danishes
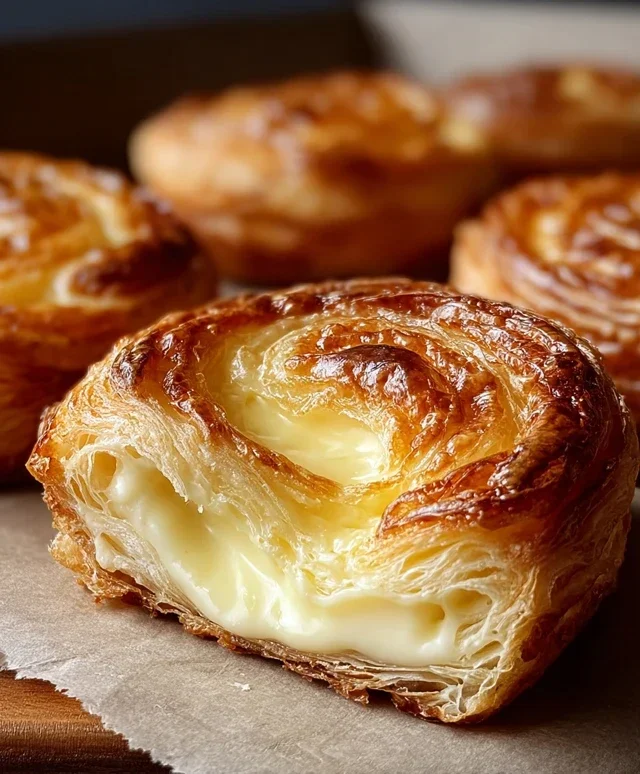
There’s something undeniably delightful about a perfectly baked cheese danish. That flaky, buttery pastry, the sweet and tangy cream cheese filling, and the delicate glaze – it’s a treat that evokes cozy mornings and moments of pure indulgence. While they might seem intimidating to make at home, I promise you, with a few simple ingredients and a bit of patience, you can create these bakery-worthy danishes right in your own kitchen. Forget the pre-packaged versions; the homemade taste is truly unparalleled. Let’s get started!
Ingredients:
Preparing the Danish Dough
The beauty of using pre-made crescent roll dough is that it significantly cuts down on preparation time, making this recipe accessible for bakers of all skill levels. We’ll be transforming these simple rolls into something much more elegant. First, carefully unroll each tube of crescent dough onto a lightly floured surface. You’ll notice the perforations where the dough is meant to be separated. Gently press these seams together to create a smooth, continuous sheet of dough for each tube. Think of it as building a foundation for our delicious filling.
Crafting the Cream Cheese Filling
Now, let’s focus on the heart of our danish – that irresistible cream cheese filling. In a medium bowl, combine your softened cream cheese with the granulated white sugar and one teaspoon of pure vanilla extract. Softened cream cheese is crucial here; if it’s too cold, you’ll end up with lumps, and we want a perfectly smooth, luscious filling. You can achieve this by letting the cream cheese sit at room temperature for about an hour, or if you’re in a pinch, you can microwave it in 10-second intervals, stirring between each, until just softened. Cream this together until it’s light, fluffy, and completely lump-free. This is where that subtle sweetness and classic vanilla aroma come from.
Assembling the Danish Wonders
This is where we bring it all together. Gently spread the cream cheese mixture evenly over each of the flattened crescent roll dough sheets, leaving a small border around the edges. This border will help to contain the filling as the danishes bake. Once the cream cheese is in place, it’s time for the brown sugar mixture. In a separate small bowl, combine the light brown sugar with the melted salted butter. Stir this together until it forms a slightly paste-like consistency. This is your sweet, slightly spiced topping. Sprinkle this brown sugar mixture evenly over the cream cheese on both dough sheets. Now, carefully roll up each dough sheet tightly, lengthwise, like you would a jelly roll. Once rolled, use a sharp knife to slice each log into 6 equal portions, creating your individual danishes.
Baking the Perfect Pastries
Preheat your oven to 375°F (190°C). Line a baking sheet with parchment paper for easy cleanup and to prevent any sticking. Arrange the sliced danishes on the prepared baking sheet, leaving a little space between them as they will puff up while baking. Gently press down on the top of each danish to slightly flatten them, ensuring they bake evenly. Bake for 15-18 minutes, or until the crescent roll dough is golden brown and puffed, and the cream cheese filling is starting to look set. Keep a close eye on them during the last few minutes of baking, as ovens can vary. We’re looking for that beautiful, inviting golden hue.
The Finishing Touch: The Glaze
While your danishes are cooling slightly on the baking sheet, it’s time to prepare the simple yet elegant glaze that will elevate them to perfection. In a small bowl, whisk together the powdered sugar, the remaining teaspoon of pure vanilla extract, and the milk. Start with the 4 teaspoons of milk and add a tiny bit more if needed, a teaspoon at a time, until you achieve a smooth, drizzly consistency. You want it thick enough to coat the danishes but thin enough to drizzle easily. Once the danishes have cooled for about 10-15 minutes – they should still be warm, not hot – drizzle the glaze generously over the tops. The warmth of the danishes will help the glaze set slightly.
Enjoy these delightful homemade cheese danishes warm, perhaps with a cup of your favorite coffee or tea. They are perfect for breakfast, brunch, or as a sweet afternoon treat. The combination of flaky pastry, creamy filling, and sweet glaze is truly a winner!
Conclusion:
There you have it – a straightforward guide to creating incredibly delicious Cheese Danishes right in your own kitchen! This recipe is a winner because it balances that delightful, creamy cheese filling with a flaky, buttery pastry, offering a taste of bakery-quality indulgence that’s surprisingly achievable. Whether you’re looking for a special weekend treat, a way to impress guests, or simply a comforting breakfast option, these danishes are sure to hit the spot. Don’t be intimidated by the puff pastry; it’s the secret weapon to achieving that beautiful, golden-brown crispiness that makes these pastries so irresistible.
I highly encourage you to give this Cheese Danish recipe a try. It’s perfect served warm with a cup of coffee or tea for breakfast, as an elegant dessert after dinner, or even as a delightful afternoon pick-me-up. For variations, consider adding a touch of lemon zest to the cheese filling for brightness, or a sprinkle of cinnamon for warmth. You could also top your finished danishes with a light glaze or a dusting of powdered sugar. Experiment and make them your own!
Frequently Asked Questions:
Can I make the cheese filling ahead of time?
Absolutely! The cheese filling can be prepared up to two days in advance and stored in an airtight container in the refrigerator. This can save you valuable time on baking day.
What kind of cheese is best for Cheese Danishes?
A combination of cream cheese and a milder, slightly tangy cheese like ricotta or even a soft goat cheese works wonderfully. The key is a creamy texture that bakes up beautifully. For this recipe, we’ve focused on a classic cream cheese blend for its excellent flavor and texture.
Can I freeze baked Cheese Danishes?
Yes, you can! Once cooled completely, wrap individual danishes tightly in plastic wrap and then place them in a freezer-safe bag or container. Reheat them gently in a low oven until warmed through and crisp again.
Easy Cheese Danishes
Quick and delicious cheese danishes made with crescent rolls and a simple cream cheese filling.
Ingredients
-
2 tubes (8 oz each) crescent rolls
-
2 tablespoons salted butter, melted
-
8 tablespoons light brown sugar
-
1 package (8 oz) cream cheese, room temperature
-
¼ cup granulated white sugar
-
1 teaspoon pure vanilla extract
-
½ cup powdered sugar
-
1 teaspoon pure vanilla extract
-
4 teaspoons milk
Instructions
-
Step 1
Preheat oven to 375°F (190°C). Line a baking sheet with parchment paper. -
Step 2
Unroll crescent roll dough and separate into triangles. Press any perforations together to form a rectangle. Cut each rectangle into two smaller triangles. -
Step 3
In a medium bowl, beat softened cream cheese with granulated white sugar and 1 teaspoon vanilla extract until smooth. Stir in melted butter. -
Step 4
Spoon about 1 tablespoon of cream cheese mixture onto the wide end of each crescent roll triangle. Fold the sides of the dough over the filling and pinch to seal. -
Step 5
Place danishes on the prepared baking sheet. Bake for 12-15 minutes, or until golden brown. -
Step 6
While danishes are baking, whisk together powdered sugar, 1 teaspoon vanilla extract, and milk until smooth to create a glaze. Add more milk if needed to reach desired consistency. -
Step 7
Drizzle the glaze over the warm danishes before serving. Sprinkle with light brown sugar if desired.
Important Information
Nutrition Facts (Per Serving)
It is important to consider this information as approximate and not to use it as definitive health advice.
Allergy Information
Please check ingredients for potential allergens and consult a health professional if in doubt.