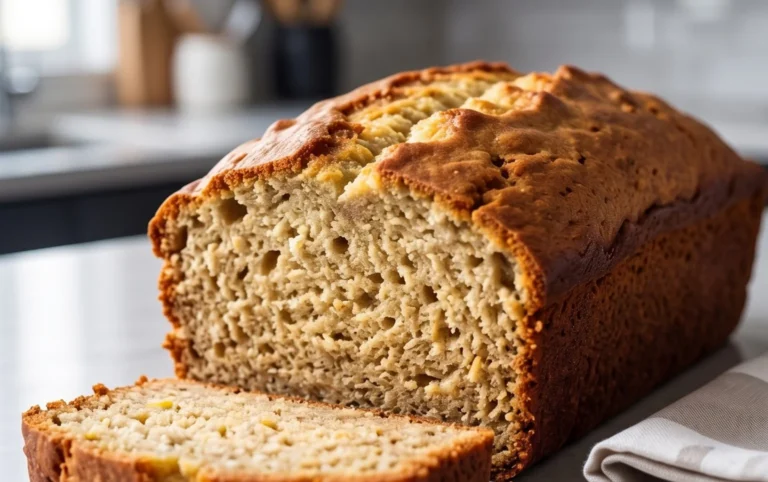
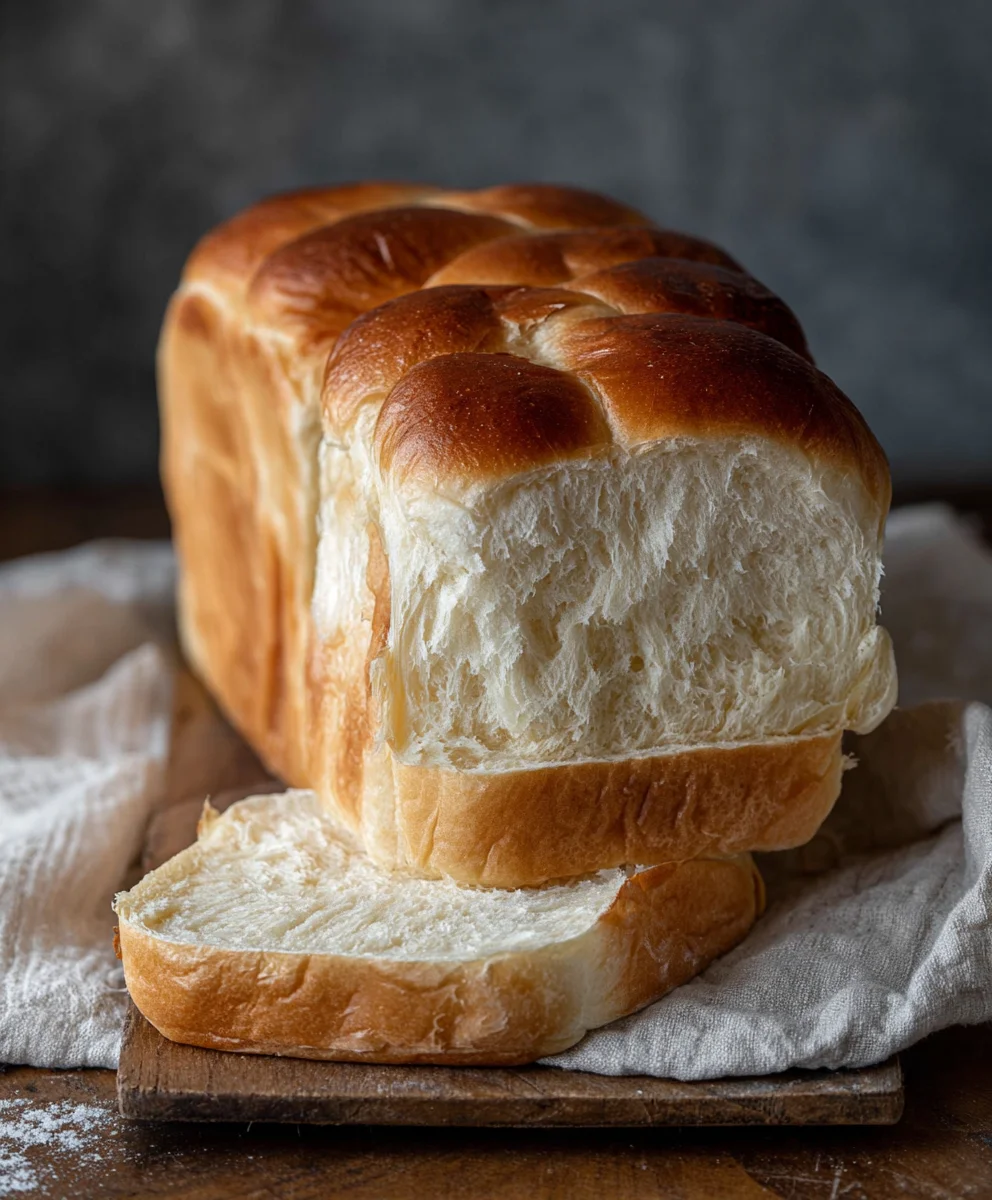
Easy Milk Bread Loaf-Fluffy & Delicious Homemade Recipe
Easy Milk Bread Loaf. Oh, the sheer joy of a perfectly baked, impossibly soft, and subtly sweet milk bread loaf. If you’ve ever experienced the cloud-like texture and comforting aroma wafting from your oven as this glorious creation bakes, you understand its irresistible charm. It’s the kind of bread that elevates a simple breakfast toast into a moment of pure bliss, makes sandwiches sing, and is utterly delightful enjoyed on its own with a smear of butter. People adore this easy milk bread loaf not just for its incredible tenderness, but also for its versatility and surprisingly approachable preparation. What truly sets this recipe apart is its ability to deliver that signature melt-in-your-mouth quality without requiring advanced baking skills. Get ready to impress yourself and everyone you share it with!
Ingredients:
- 500 g bread flour (approximately 3¾ cups)
- 40 g granulated sugar (approximately 3 tablespoons)
- 1½ teaspoons instant yeast
- 225 g cold water (a little bit less than 1 cup)
- 115 g cold milk (½ cup)
- 9 g sea salt (1½ teaspoons)
- 25 g unsalted butter, softened (1¾ tablespoons)
- Additional butter for greasing the pan and brushing the finished loaf
- Additional flour for dusting the pan
Preparing the Dough
Mixing the Dry Ingredients
In a large mixing bowl, I like to combine all the dry ingredients first. This ensures that the yeast is evenly distributed throughout the flour, which is crucial for a consistent rise. Add the 500 g of bread flour, 40 g of granulated sugar, and 1½ teaspoons of instant yeast to the bowl. Give everything a good whisk with a fork or a small whisk to thoroughly mix them. Make sure there are no clumps of yeast.
Adding the Wet Ingredients and Initial Kneading
Now, it’s time to introduce the liquids and start bringin extractg the dough together. Pour in the 225 g of cold water and the 115 g of cold milk. Using a sturdy spoon or a spatula, mix these wet ingredients into the dry ingredients until a shaggy dough forms. Don’t worry if it looks a bit rough at this stage; that’s perfectly normal. Once the dough has come together, you can turn it out onto a lightly floured surgin extracte. Begin to knead the dough. Initially, it will be sticky and a little unruly. Resist the urge to add too much extra flour, as this can make the bread dense. Instead, focus on the kneading technique: push the dough away from you with the heels of your hands, fold it back over itself, and then rotate it a quarter turn. Continue this process for about 5-7 minutes. The dough will start to become smoother and less sticky.
Incorporating the Butter and Salt
This next step is key to achieving that incredibly tender and soft crum extractb characteristic of milk bread. After the initial kneading, the dough should be somewhat manageable. Now, add the 9 g of sea salt and the 25 g of softened unsalted butter to the dough. The salt not only adds flavor but also strengthens the gluten structure, while the butter contributes to tenderness and richness. Continue kneading. At first, the butter and salt might make the dough feel a bit greasy and separated, but keep at it. Push, fold, and rotate. It will take another 8-10 minutes of kneading for the butter and salt to be fully incorporated and for the dough to become smooth, elastic, and a little bit shiny. You should be able to stretch a small piece of the dough thinly without it tearing easily – this is known as the windowpane test.
First Rise (Bulk Fermentation)
Once your dough has reached the desired smoothness and elasticity, it’s time for its first rise. Lightly grease a clean bowl with a little bit of oil or cooking spray. Place the kneaded dough into the prepared bowl, turning it once to ensure the entire surface is lightly coated. Cover the bowl tightly with plastic wrap or a damp kitchen towel. Place the bowl in a warm, draft-free spot to rise. This usually takes about 1 to 1.5 hours, or until the dough has doubled in size. The exact time will depend on the temperature of your room. A good test to see if it’s ready is to gently poke the dough with a floured finger; if the indentation remains, it’s likely proofed sufficiently.
Shaping the Loaf
After the dough has doubled in size, gently punch it down to release the trapped air. Turn the dough out onto a lightly floured surface. For a standard loaf pan, I like to flatten the dough into a rough rectangle. Then, starting from one of the shorter ends, tightly roll up the dough into a log. Pinch the seam shut to seal it, and tuck in the ends. This tight rolling helps create a beautifulrum extractven crumb structure in the final loaf. Prepare your loaf pan by generously greasing it with butter and then dusting it lightly with flour. This prevents the bread from sticking and gives it a lovely golden crust. Carefully place the shaped dough log into the prepared loaf pan, seam-side down.
Second Rise (Proofing in the Pan)
Now, it’s time for the dough to proof in its final pan. Cover the loaf pan loosely with plastic wrap or a clean, lightly oiled kitchen towel. Again, place it in a warm, draft-free place to rise. This second rise is typically shorter than the first, usually around 45-60 minutes, or until the dough has risen to about 1 inch above the rim of the pan. It should look puffy and airy. During this time, preheat your oven to 180°C (350°F).
Baking the Bread
Once the dough has finished its second rise and your oven is preheated, it’s time to bake! For an even richer flavor and a gorgeous sheen, I like to lightly brush the top of the risen loaf with a little melted butter just before it goes into the oven. Place the loaf pan on the center rack of your preheated oven. Bake for approximately 30-35 minutes. The bread should be a deep golden brown and sound hollow when tapped on the bottom. If the top starts to brown too quickly, you can loosely tent it with aluminum foil.
Cooling and Finishing Touches
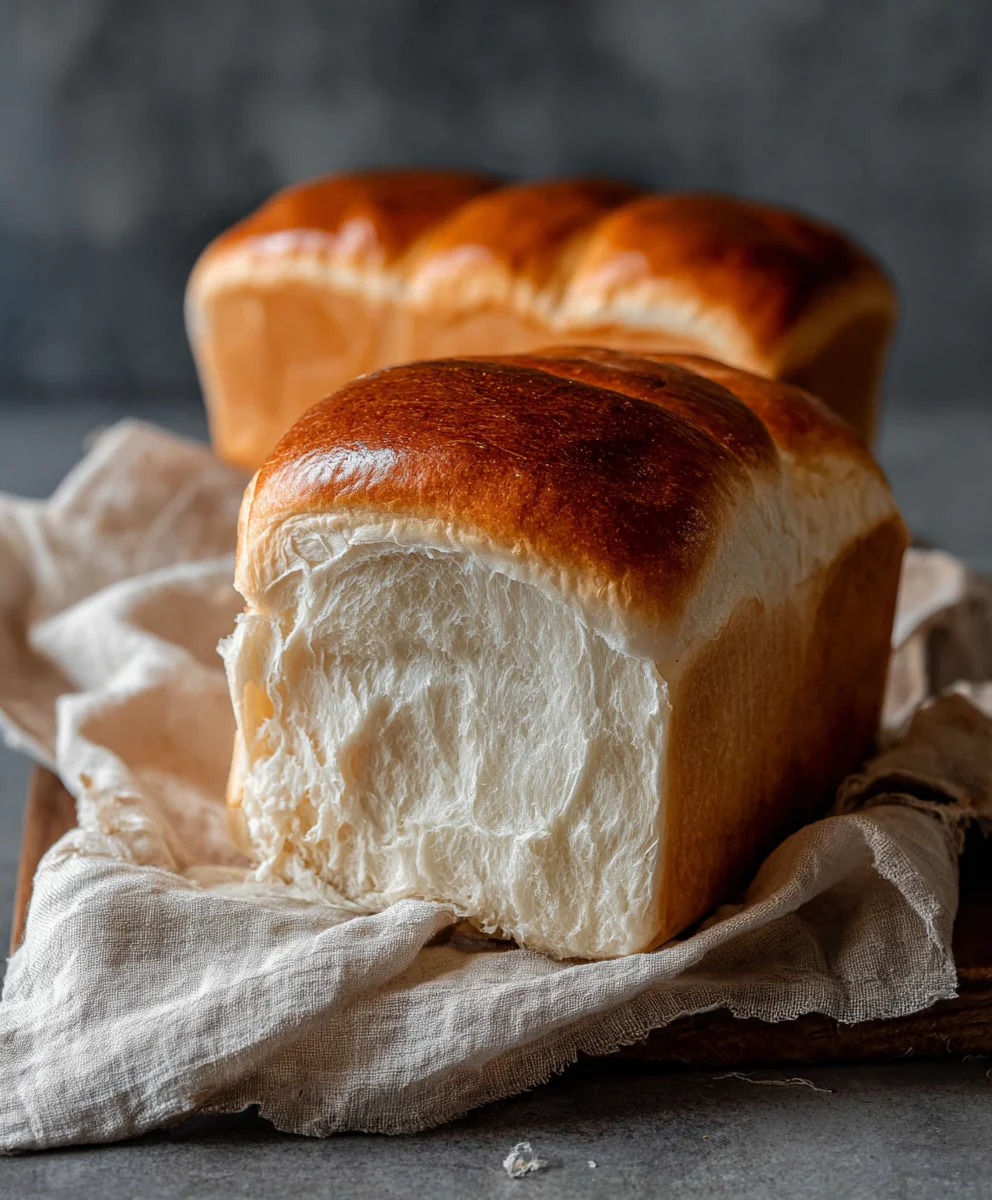
As soon as the bread is out of the oven, carefully remove it from the loaf pan and place it on a wire rack to cool completely. While the bread is still warm, I love to brush the top with another light coating of melted butter. This adds a beautiful shine and a subtle extra layer of flavor. Allow the bread to cool for at least 30 minutes before slicing. This allows the internal structure to set, preventing a gummy texture. The aroma alone is worth the wait!
Conclusion:
Congratulations on embarking on the journey to create your own delicious Easy Milk Bread Loaf! You’ve now mastered the art of achieving that incredibly soft, slightly sweet, and beautifully golden-brown crum extractb that’s perfect for so many occasions. This recipe, as you’ve seen, is wonderfully forgiving and incredibly rewarding. Whether you’re a seasoned baker or just starting out, this Easy Milk Bread Loaf is sure to become a staple in your kitchen. Don’t be afraid to experiment and make it your own – that’s half the fun of baking!
This versatile Easy Milk Bread Loaf is fantastic on its own, lightly toasted with butter, or as the foundation for delightful sandwiches. Imagin extracte the possibilities: classic beef ham and cheese, creamy avocado toast, or even decadent French toast. For a touch of sweetness, a drizzle of honey or a smear of your favorite jam is always a welcome addition. Feel free to get creative with additions to the dough itself – consider a sprinkle of sesame seeds on top for a nutty crunch, or a pinch of dried herbs for a savory twist on your next Easy Milk Bread Loaf.
Frequently Asked Questions about Easy Milk Bread Loaf:
Q1: How can I store my Easy Milk Bread Loaf to keep it fresh?
To keep your Easy Milk Bread Loaf at its best, allow it to cool completely on a wire rack. Once cooled, wrap it tightly in plastic wrap or store it in an airtight bread bag at room temperature. It should stay fresh for about 3-4 days. For longer storage, you can slice the loaf and freeze the slices in a freezer-safe bag for up to 3 months. Simply thaw at room temperature or toast directly from frozen.
Q2: My Easy Milk Bread Loaf didn’t rise as much as I expected. What could be the issue?
There are a few common reasons for this. Ensure your yeast was fresh and properly activated. If using active dry yeast, it should become foamy when mixed with warm liquid. Also, make sure your kitchen environment wasn’t too cold, as this can slow down yeast activity. Over-kneading or under-kneading the dough can also affect the rise, as can using an incorrect amount of liquid. Pay close attention to the dough consistency described in the recipe – it should be soft and slightly sticky.
Q3: Can I make this Easy Milk Bread Loaf dairy-free?
Absolutely! You can easily make a dairy-free version of this Easy Milk Bread Loaf. Simply substitute the milk with an unsweetened, plant-based milk like almond milk, soy milk, or oat milk. For the butter, use a dairy-free butter alternative or a neutral-flavored oil such as vegetable or canola oil. The texture might be slightly different, but you’ll still achieve a wonderfully soft and delicious loaf.
Easy Milk Bread Loaf-Fluffy & Delicious Homemade Recipe
A simple and delicious recipe for a fluffy, homemade milk bread loaf, perfect for sandwiches or enjoying on its own.
Ingredients
-
500 g bread flour
-
40 g granulated sugar
-
1½ teaspoons instant yeast
-
225 g cold water
-
115 g cold milk
-
9 g sea salt
-
25 g unsalted butter, softened
-
Additional butter for greasing the pan and brushing the finished loaf
-
Additional flour for dusting the pan
Instructions
-
Step 1
In a large mixing bowl, combine bread flour, granulated sugar, and instant yeast. Whisk well to ensure even distribution. -
Step 2
Add cold water and cold milk to the dry ingredients. Mix with a spoon or spatula until a shaggy dough forms. Turn out onto a lightly floured surface and knead for 5-7 minutes until smoother and less sticky. -
Step 3
Add sea salt and softened unsalted butter to the dough. Continue kneading for another 8-10 minutes until the dough is smooth, elastic, and shiny. Perform the windowpane test. -
Step 4
Place the dough in a lightly greased bowl, cover tightly, and let rise in a warm, draft-free spot for 1 to 1.5 hours, or until doubled in size. -
Step 5
Gently punch down the dough, flatten into a rectangle, and roll tightly into a log. Pinch the seam and tuck in the ends. Place in a greased and floured loaf pan, seam-side down. -
Step 6
Cover the loaf pan loosely and let the dough rise for 45-60 minutes, or until it rises about 1 inch above the rim. Preheat oven to 180°C (350°F). -
Step 7
Brush the top of the risen loaf with melted butter. Bake for 30-35 minutes, or until deep golden brown and hollow when tapped. Tent with foil if browning too quickly. -
Step 8
Remove from the pan and place on a wire rack. Brush with more melted butter while warm. Let cool for at least 30 minutes before slicing.
Important Information
Nutrition Facts (Per Serving)
It is important to consider this information as approximate and not to use it as definitive health advice.
Allergy Information
Please check ingredients for potential allergens and consult a health professional if in doubt.